Screenshots are one of those underrated tools that make your digital life infinitely easier. Whether you’re capturing an online receipt, saving a conversation, documenting an error message, or sharing your desktop layout with a colleague, knowing how to screenshot on Mac can save you time and frustration. Thankfully, macOS provides multiple built-in methods (no extra apps needed) to capture exactly what you see on your screen.
In this guide, I’ll walk you through all the easy ways to take a screenshot on your Mac, from full-screen captures to selecting custom areas and even recording your screen.
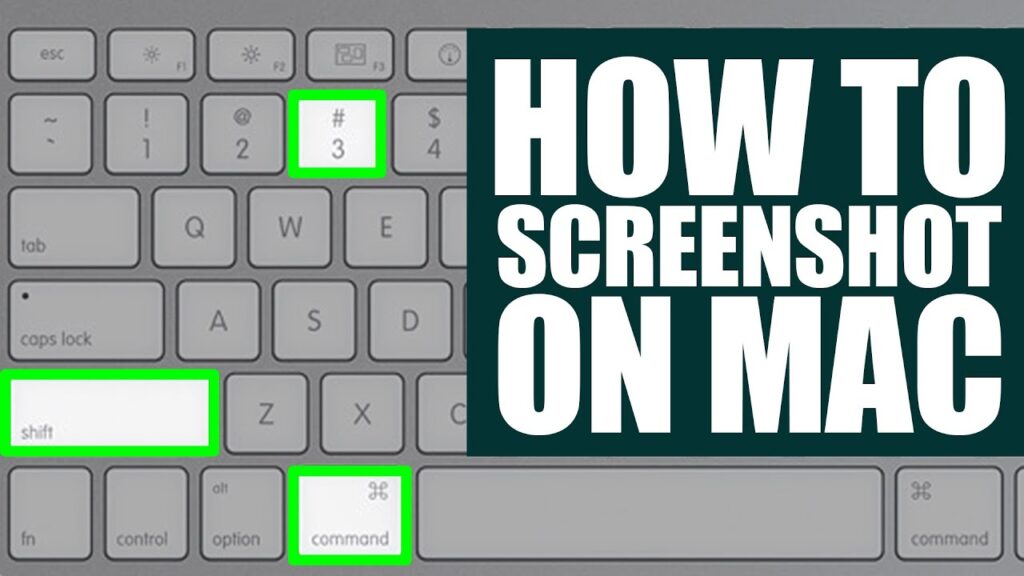
How to Take a Full-Screen Screenshot on Mac
If you want to capture everything that’s visible on your display, this is the quickest method.
Shortcut:
Command (⌘) + Shift + 3
Once you press this combination, your Mac instantly takes a snapshot of your entire screen. By default, the image is saved on your desktop as a PNG file named something like Screenshot 2025-10-25 at 15.45.30.png.
If you prefer to save screenshots in another location, you can easily change the destination. Here’s what to do:
- Press Command (⌘) + Shift + 5 to open the Screenshot Toolbar.
- Click Options → Save to → choose Desktop, Documents, or Clipboard.
This method is perfect for capturing the entire screen, such as when troubleshooting or sharing desktop visuals during online meetings.
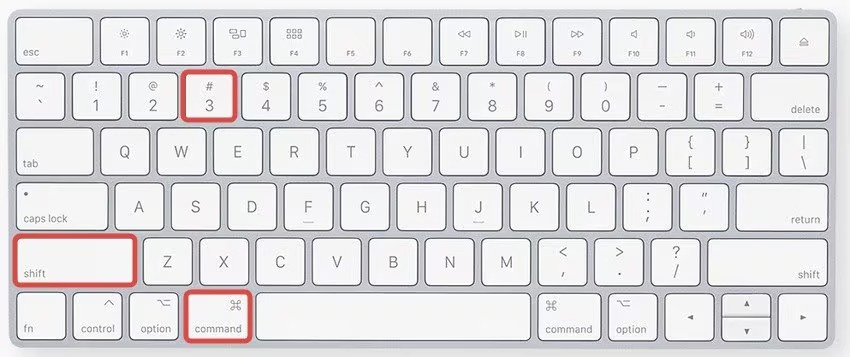
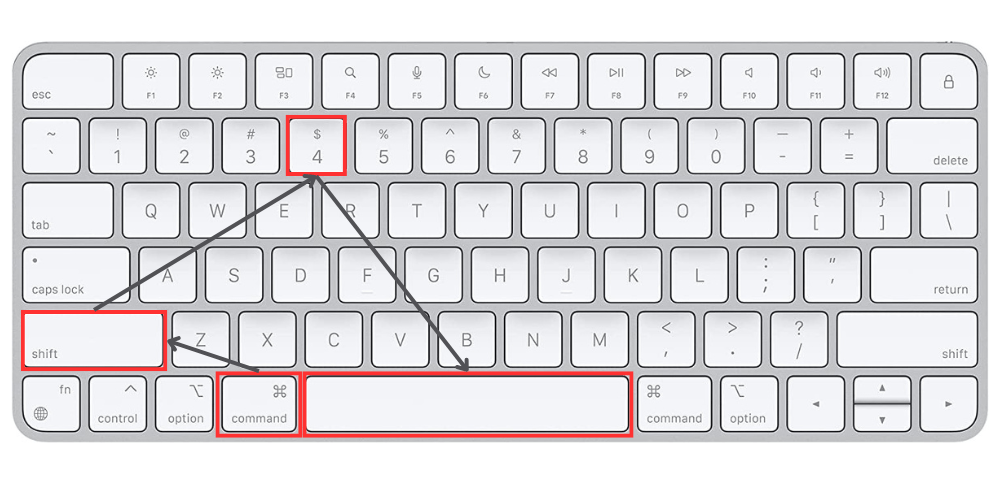
How to Screenshot a Selected Portion
Sometimes you only need a small part of your screen, such as a snippet of text, a photo, or a specific app window. macOS lets you capture just the area you want with precision.
Shortcut:
Command (⌘) + Shift + 4
After pressing this shortcut, your cursor turns into a crosshair. Click and drag to select the area you want to capture. Release your mouse to take the screenshot. If you make a mistake, simply press Escape (Esc) to cancel and start again.
This method is ideal for designers, writers, and anyone who needs clean, focused screenshots without unnecessary clutter.
How to Capture a Specific Window
Want to take a screenshot of just one app window, like Safari or Finder, without cropping later? macOS makes that easy, too.
Shortcut:
Command (⌘) + Shift + 4, then press Spacebar
Your cursor changes into a small camera icon. Hover it over any open window, and you’ll notice the window being highlighted. Click to capture it instantly.
Screenshots taken this way have a subtle drop shadow around them by default, giving them a polished, professional look. You can remove that shadow using Terminal commands if you prefer a flat image.
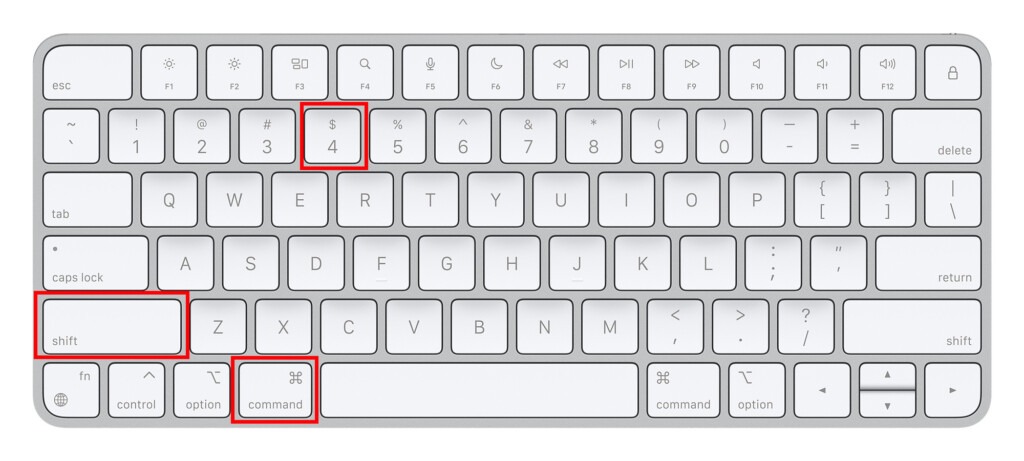
How to Use the Screenshot Toolbar
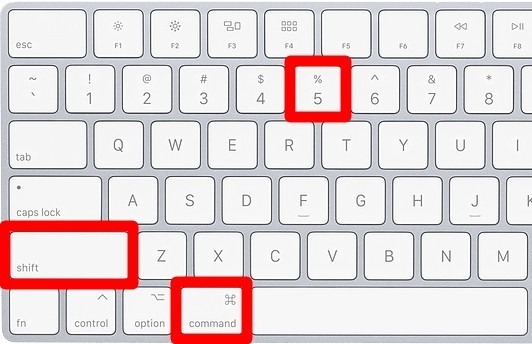
If you prefer a visual interface to memorizing shortcuts, macOS offers a built-in Screenshot Toolbar that does it all: capture, record, and customize.
Shortcut:
Command (⌘) + Shift + 5
Once activated, you’ll see options to:
- Capture the entire screen
- Capture a specific window
- Capture a selected portion
- Record the entire screen
- Record a selected portion
You can also:
- Choose where to save screenshots
- Set a timer before capturing
- Show or hide the mouse pointer in screenshots
Here’s a quick comparison of what each option in the toolbar does:
Option | Best For | Shortcut Alternative | Includes Video Capture? |
Capture Entire Screen | Full desktop or presentations | ⌘ + Shift + 3 | ❌ |
Capture Selected Window | Individual app windows | ⌘ + Shift + 4 + Spacebar | ❌ |
Capture Selected Portion | Custom screen area | ⌘ + Shift + 4 | ❌ |
Record Entire Screen | Demos, tutorials | ⌘ + Shift + 5 → Record | ✅ |
Record Selected Portion | Short clips or instructions | ⌘ + Shift + 5 → Record | ✅ |
The Screenshot Toolbar is especially useful if you create tutorials or software guides, as in our related article, “How to Fix App Crashes on iPhone,” where capturing screenshots of app errors makes troubleshooting much clearer.
How to Take Screenshots Using the Touch Bar
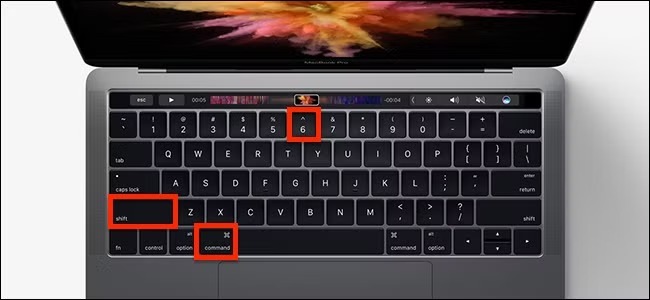
If your MacBook has a Touch Bar, you can capture it too!
Shortcut:
Command (⌘) + Shift + 6
This takes a screenshot of everything displayed on the Touch Bar, perfect for developers testing Touch Bar-enabled apps or users who want to share keyboard shortcut layouts.
You can also customize your Touch Bar to include a screenshot button. To do this:
- Go to System Settings → Keyboard → Customize Control Strip
- Drag the Screenshot icon onto your Touch Bar for one-tap captures
How to Edit and Annotate Screenshots
Once you’ve taken a screenshot, macOS instantly displays a thumbnail at the bottom-right of your screen. Click it, and you’ll open the Markup tool, allowing you to:
- Crop or resize the image
- Draw shapes and arrows
- Highlight important details
- Add text or signatures
For more detailed edits, you can use the Preview app, which supports annotations, color adjustments, and exporting to different file formats (such as JPEG or PDF).
These quick edits make it easy to enhance guides or bug reports, especially when sharing troubleshooting steps, such as those in How to Speed Up iPhone Performance.
Troubleshooting Screenshot Issues on Mac
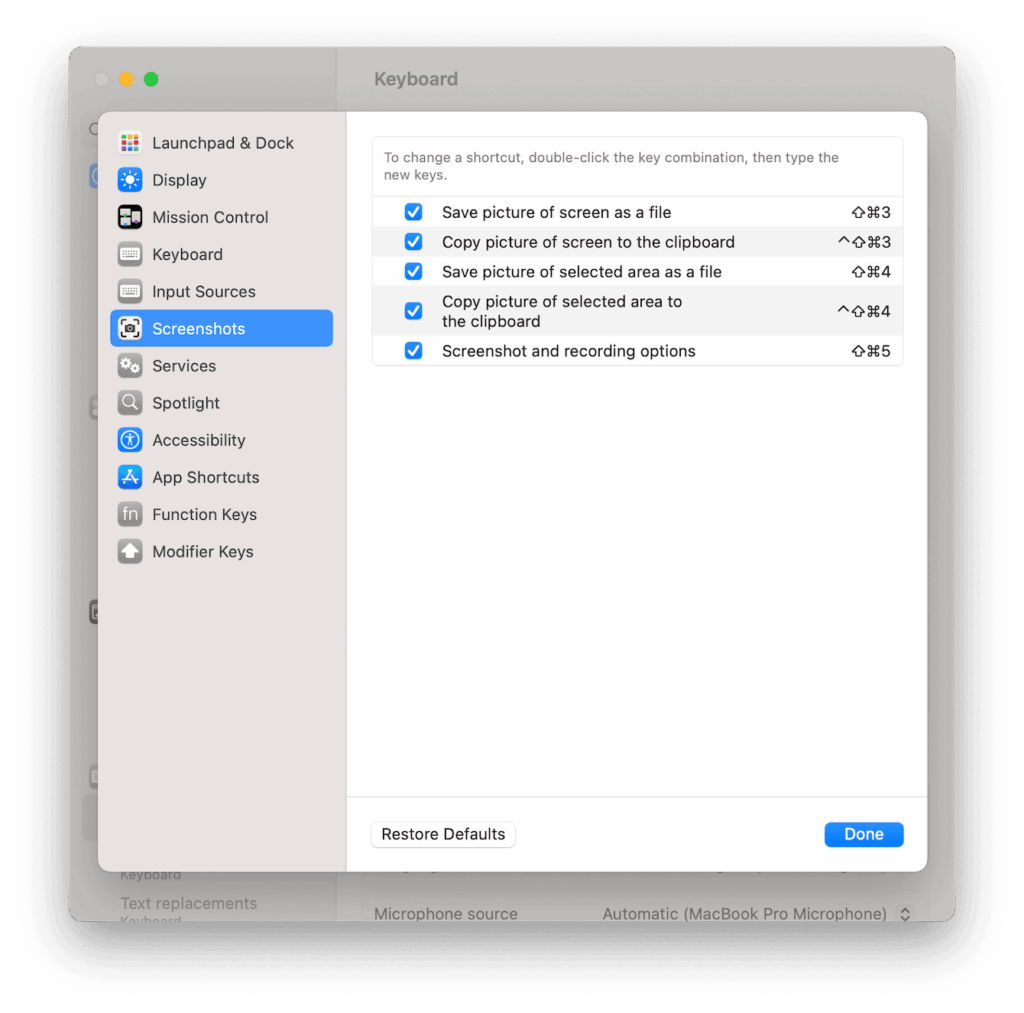
Shortcuts not Working
Go to System Settings → Keyboard → Keyboard Shortcuts → Screenshots and verify all four shortcuts are enabled and haven’t been overridden by another app. Some apps, particularly design tools and remote desktop software, capture the same key combinations for their own use, which breaks the system shortcuts.
Screenshots not Saving
Check your storage. If your Mac’s storage is nearly full, new files, including screenshots, may fail to save. Go to Apple menu → About This Mac → Storage to see available space. Clearing caches or offloading files to iCloud frees space quickly.
Permission Issues
Some macOS security configurations block screen capture for certain apps. Go to System Settings → Privacy & Security → Screen Recording and make sure the Screenshot tool and any third-party capture apps have permission.
Screenshot Saves as a Blank Image
This sometimes happens in apps that use DRM to block screen capture; streaming video apps like Netflix and Amazon Prime Video intentionally prevent screenshots within their players. This is expected behaviour, not a bug.
Mac Running Slowly Around the Time of Screenshot Issues
Broader performance problems can affect screenshot saving and thumbnail previews. Our Mac keeps crashing guide and Safari keeps crashing guide cover the most common macOS performance fixes if screenshot issues accompany other instability.
Legacy Note for Touch Bar Macs
If you’re on a 2016–2021 MacBook Pro with a Touch Bar, use ⌘ + Shift + 6 to capture the Touch Bar display as a separate image. This shortcut doesn’t exist on current Macs, which no longer include the Touch Bar.
Bonus: Third-Party Screenshot Tools for Mac
While macOS tools are powerful, third-party apps can take your screenshot game to the next level.
Tool | Best Feature | Why It Stands Out |
Advanced editing & scrolling screenshots | Ideal for professionals who need precise documentation | |
Cloud sharing & annotation tools | Sleek, integrated design that feels native to macOS | |
Fast, lightweight captures | Perfect for quick social sharing or blog posts |
CleanShot X is the most popular upgrade from native tools among Mac power users. Its standout feature is scrolling screenshots, and it captures an entire webpage or document in a single image by automatically scrolling, which macOS’s native tools can’t do. It also uploads screenshots to cloud storage and generates a shareable link in one step.
Snagit targets documentation professionals. It has the most complete annotation toolkit of the three, supports video capture with built-in editing, and integrates with tools like Google Drive, Slack, and Microsoft Teams.
Lightshot is the simplest option, a lightweight tool that adds a quick-capture overlay and lets you share images directly from the capture screen. It’s free and unobtrusive.
Conclusion
Taking a screenshot on Mac isn’t just about pressing a few keys; it’s about using the right method for the right moment. From quick shortcuts to detailed captures and screen recordings, macOS gives you complete control over how you capture and share your screen. And with built-in tools for editing and annotation, you don’t even need third-party software to make your screenshots presentation-ready.
At Your Tech Compass, we publish practical guides and honest tech reviews to help users make smarter decisions.