Resetting a MacBook Air can feel intimidating, especially if you are worried about losing files, breaking something, or getting stuck halfway through. However, when done correctly, a reset is one of the safest and most effective ways to fix persistent performance issues, prepare your device for resale, or simply start fresh with a clean system.
In this guide, I will walk you through how to reset MacBook Air safely, step by step, with clear explanations and practical tips. Along the way, I will explain why each step matters, what to expect, and how to avoid the most common mistakes. By the end, you will know exactly what to do before, during, and after the reset process.
When and Why You Might Need to Reset a MacBook Air
Before jumping into the steps, it helps to understand when a reset is the right move.
In most cases, people choose to reset their MacBook Air because it has become noticeably slower, is plagued by recurring software glitches, or is about to change ownership. For example, if apps frequently freeze, macOS updates fail, or storage-related errors keep popping up, a reset can often clear out the underlying issues.
Additionally, resetting is essential if you plan to sell or give away your MacBook Air. Without a proper reset, your personal data, Apple ID, and iCloud information may remain tied to the device, creating security and activation problems for the next owner.
That said, a reset is not always the first solution. If your MacBook Air is still relatively new, you should read performance-specific guides, such as my view on newer hardware in the MacBook Air M3 review guide or the MacBook Air M4 review guide, to determine whether software optimization alone could solve your issue. Still, when problems persist, resetting is often the cleanest fix. I have found it to be the most reliable “reset button” when everything else fails.
Important Things to Do Before Resetting Your MacBook Air
Now that you know why you might reset your device, let’s talk about preparation. This part is critical, and skipping it is where most people run into trouble.
Step 1: Back Up Your Data
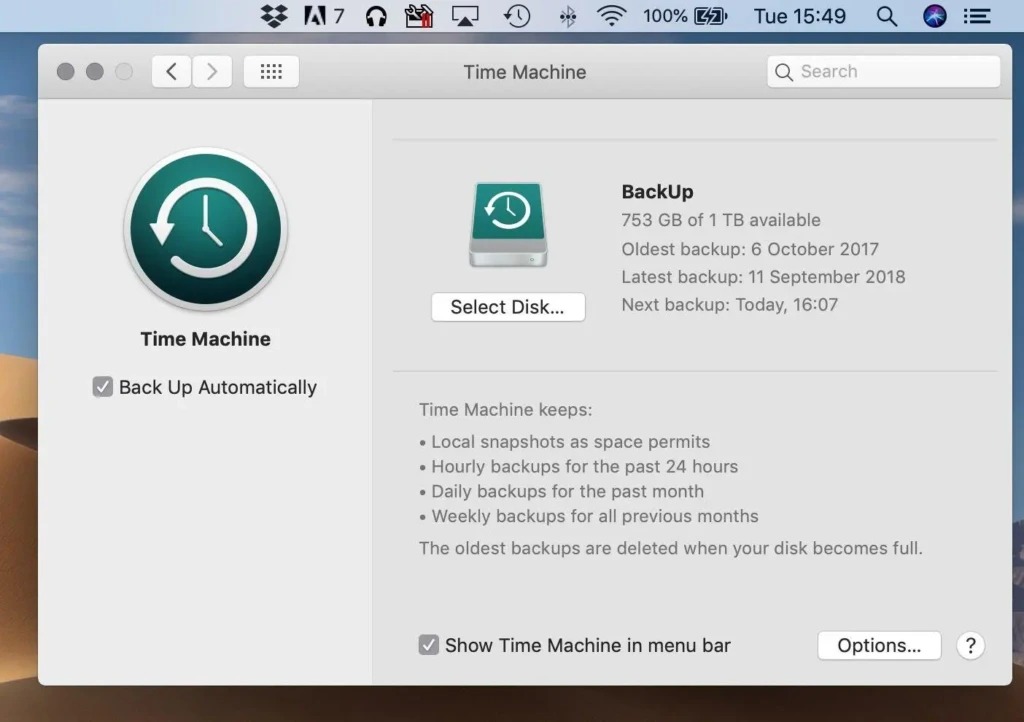
- Connect an external drive or confirm you have enough iCloud storage.
- Open System Settings.
- Select General → Time Machine.
- Turn on Time Machine and start a full backup.
- Wait for the backup to complete before continuing.
Step 2: Sign Out of Apple ID and iCloud
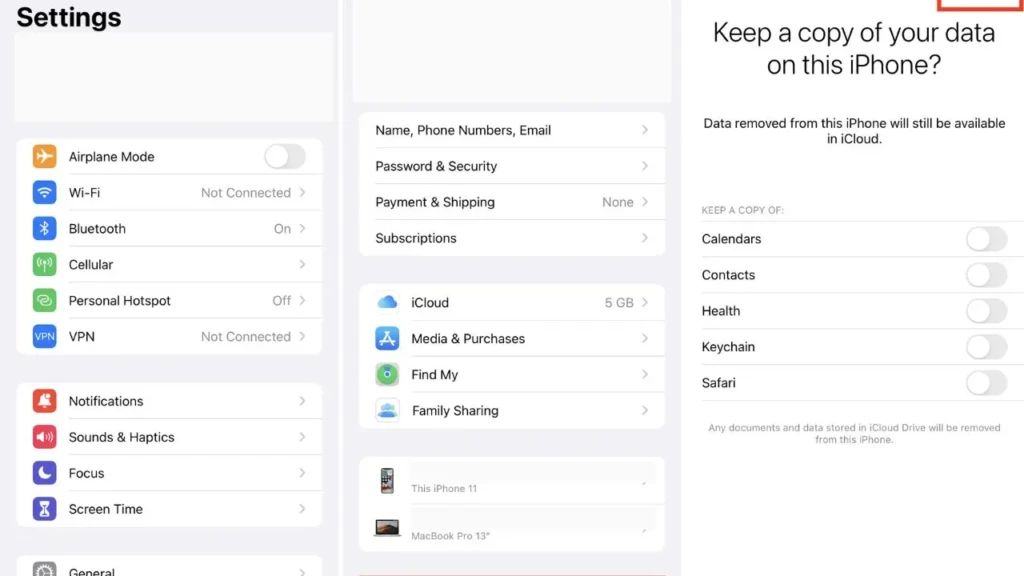
Next, sign out of your Apple ID. This step is crucial if you are selling or giving away your MacBook Air. If you do not sign out, Activation Lock may remain enabled, preventing anyone else from setting up the device.
To do this:
- Open System Settings.
- Click your Apple ID at the top.
- Scroll down and select Sign Out.
- Confirm sign-out from iCloud, Messages, and FaceTime.
Step 3: Disable Find My and Unpair Accessories
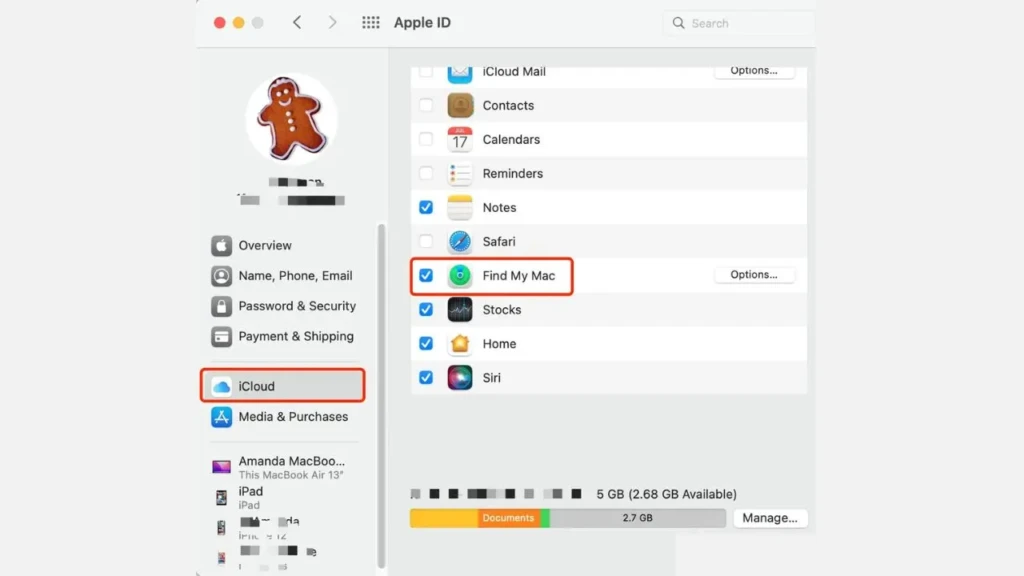
Finally, unpair Bluetooth accessories such as keyboards, mice, and AirPods. While not strictly required, this avoids confusion later if you are setting up a new Mac or passing the device to someone else.
At the same time, confirm that Find My is disabled for the MacBook Air. This ensures the reset process goes smoothly without security prompts blocking the erase step.
To disable Find My and unpair accessories:
- Go to System Settings → Apple ID → Find My.
- Turn off Find My Mac.
- Open Bluetooth settings.
- Unpair keyboards, mice, AirPods, and other accessories.
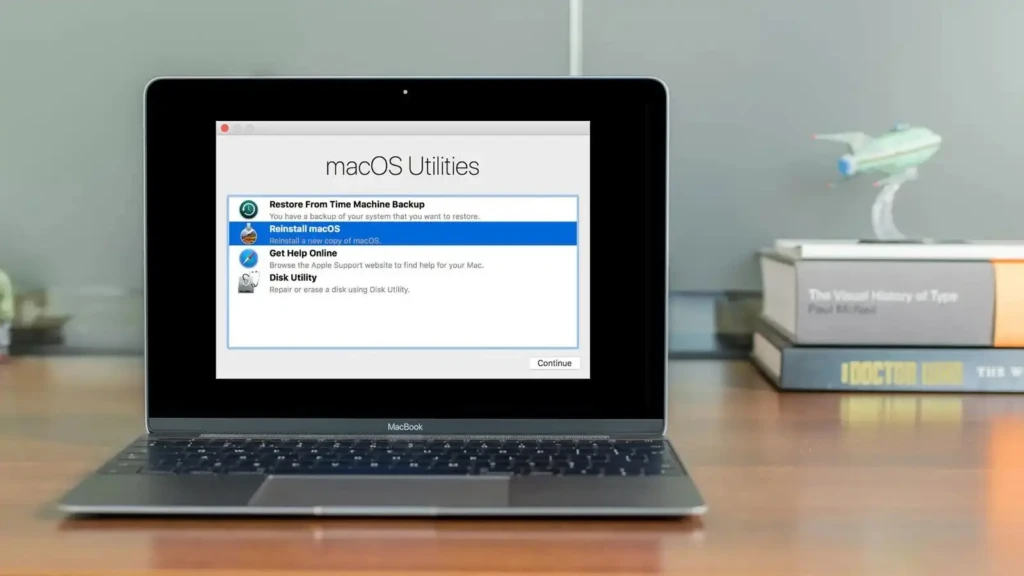
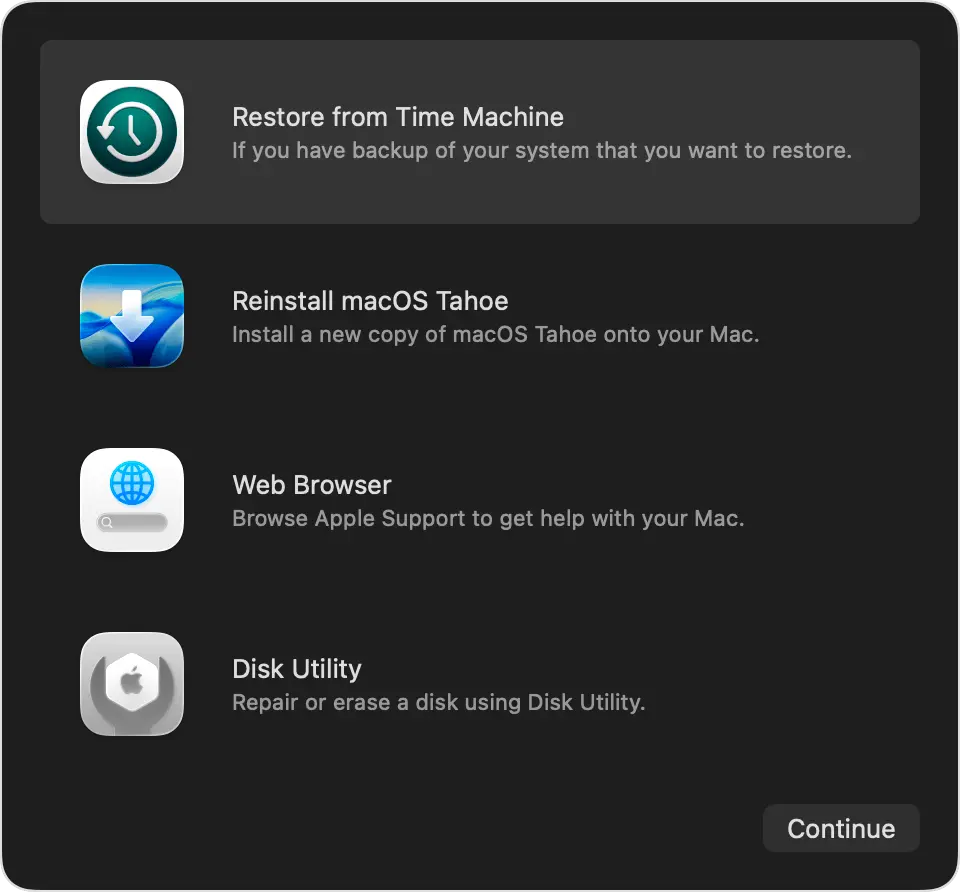
How to Reset MacBook Air Using macOS Recovery
With your data backed up and accounts signed out, you are ready to reset your MacBook Air using macOS Recovery. This is the most reliable way to reset a MacBook Air and works for both Intel and Apple silicon models.
Step 1: Enter macOS Recovery Mode
For Apple Silicon MacBook Air Models:
- Shut down the Mac completely.
- Press and hold the power button.
- Release when startup options appear.
- Select Options → Continue.
For Intel-Based MacBook Air Models:
- Shut down the Mac.
- Power it on.
- Immediately hold Command + R.
- Release when the Apple logo appears.
Step 2: Erase the Startup Disk
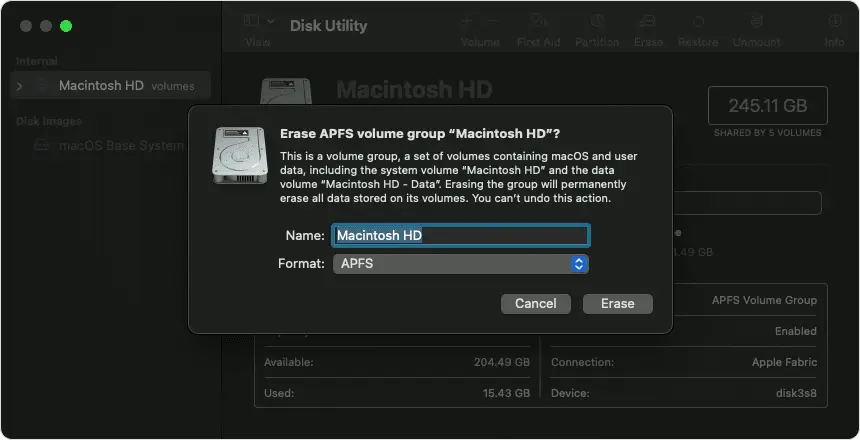
- Select Disk Utility from the Recovery menu.
- Click Continue.
- Select Macintosh HD (or your primary internal disk).
- Click Erase.
- Use the default format shown.
- Confirm the erase process.
- Close Disk Utility once complete.
Step 3: Reinstall macOS
- From the Recovery menu, select Reinstall macOS.
- Click Continue.
- Connect to Wi-Fi when prompted.
- Follow the on-screen instructions.
- Wait for the installation to complete.
- Allow the Mac to restart automatically.
How to Factory Reset MacBook Air Using System Settings
If your MacBook Air is functioning normally, you may see an erase assistant in System Settings. This option simplifies the process by automatically prompting you to back up, guiding you through sign-out steps, and erasing the disk.
Steps to Use the Built-In Reset Option
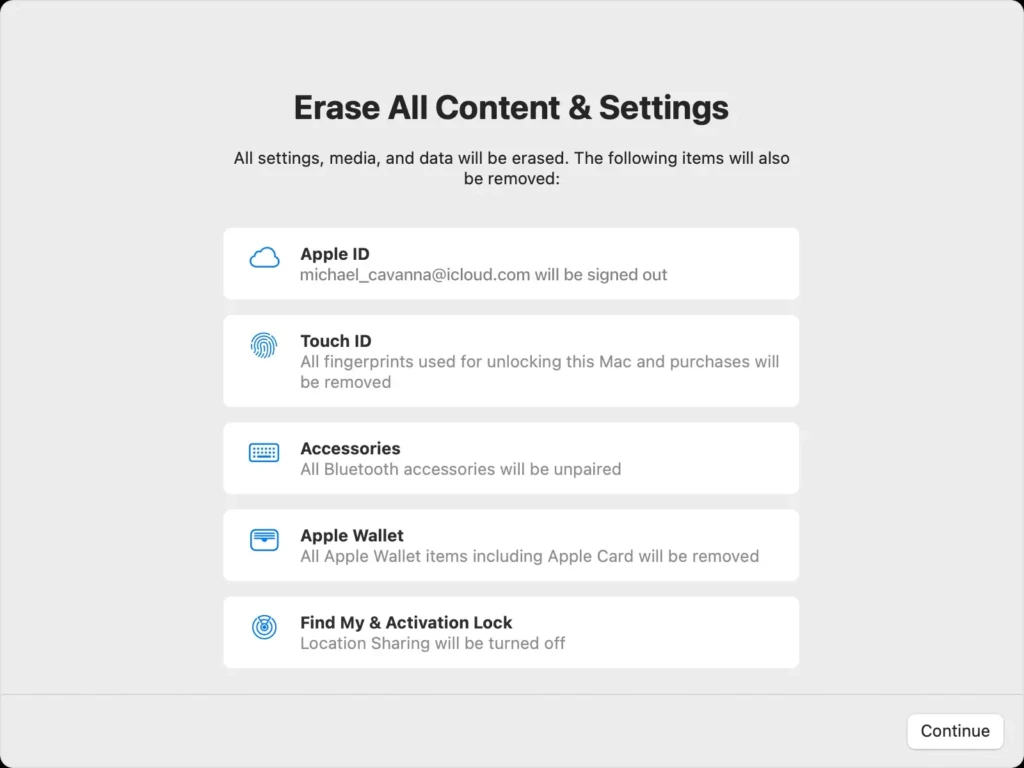
- Open System Settings.
- Select General.
- Click Transfer or Reset.
- Choose Erase All Content and Settings.
- Review the checklist shown.
- Confirm the erase process.
- Wait for the Mac to restart.
For a deeper explanation of factory reset variations, see this detailed guide on how to factory reset MacBook.
Reset Method Comparison
To help you choose the right approach, here is a quick comparison:
Reset Method | Best For | Difficulty | Reliability |
macOS Recovery | Major issues, selling Mac | Moderate | Very High |
System Settings Reset | Quick clean start | Easy | High |
Restart Only | Minor glitches | Very Easy | Low |
In most scenarios, macOS Recovery remains the safest and most thorough option.
What to Do After Resetting Your MacBook Air

Once the reset is complete, you will be greeted by the setup assistant. At this point, you can choose to restore from a backup or start fresh.
If performance was your primary concern, starting fresh often delivers the best results. You can then reinstall only essential apps and settings. This is also a good opportunity to install tools that genuinely improve workflow. For inspiration, I recommend checking out these best productivity apps for Mac, which pair exceptionally well with a clean macOS install.
After the reset is complete, follow these steps:
- Choose language and region.
- Connect to Wi-Fi.
- Decide whether to restore from a backup or start fresh.
- Sign in with your Apple ID (if keeping the Mac).
- Complete the setup assistant.
Common Problems and Fixes When Resetting a MacBook Air
Occasionally, things do not go as planned. Recovery Mode may fail to load, disks may refuse to erase, or macOS reinstallation may stall.
In most cases, restarting the Mac and re-entering Recovery Mode resolves the issue. Ensuring a stable internet connection is also critical during reinstallation. If Activation Lock appears unexpectedly, double-check that you are signed out of your Apple ID.
While these problems can be frustrating, they are usually fixable with patience and the correct steps.
If Recovery Mode Does Not Load
- Shut down the Mac.
- Try entering Recovery Mode again.
- Ensure the correct key combination is used.
- Connect the Mac to power.
If the Disk Will Not Erase
- Restart into Recovery Mode.
- Open Disk Utility.
- Select the top-level internal drive.
- Retry the erase process.
If macOS Reinstall Fails
- Confirm a stable internet connection.
- Restart the Mac.
- Re-enter Recovery Mode.
- Attempt to reinstall again.
Resetting a MacBook Air Before Selling or Giving It Away
If you are resetting your MacBook Air for resale, double-check everything. Confirm that no Apple ID remains signed in, no personal data is accessible, and the Mac boots directly to the setup screen.
Skipping these steps can lead to support requests later or, worse, expose personal information. A proper reset protects both you and the next owner.
Final Thoughts

Ultimately, resetting a MacBook Air is one of the most effective ways to regain stability, performance, and peace of mind. While it requires preparation and a bit of time, the payoff is often a system that feels refreshed and reliable again.
If you are dealing with ongoing issues or preparing your Mac for a new owner, I genuinely believe a proper reset is worth the effort. Having done it myself more than once, following these steps carefully makes the process far less stressful and far more rewarding.
FAQs
In most cases, yes, it does. A complete reset removes malicious software embedded in the system.
From my experience, it often does, especially if the system has accumulated years of clutter.
No. A reset is very different from a restart. Restarting simply reloads macOS, while resetting completely erases and reinstalls it.