Taking a screenshot on Windows can be incredibly handy, whether you’re capturing an important work presentation, saving an online receipt, or sharing a software error with tech support. Luckily, Microsoft has made this process simple and flexible with several built-in methods that cater to different needs. From quick keyboard shortcuts to advanced tools like Snipping Tool and Game Bar, there’s a perfect method for everyone.
In this guide, I’ll show you how to take screenshots on Windows using the built-in tools and a few third-party options. By the end, you’ll know exactly which shortcut or tool fits your needs best, and how to make every capture look perfect.
How to Take a Full-Screen Screenshot on Windows
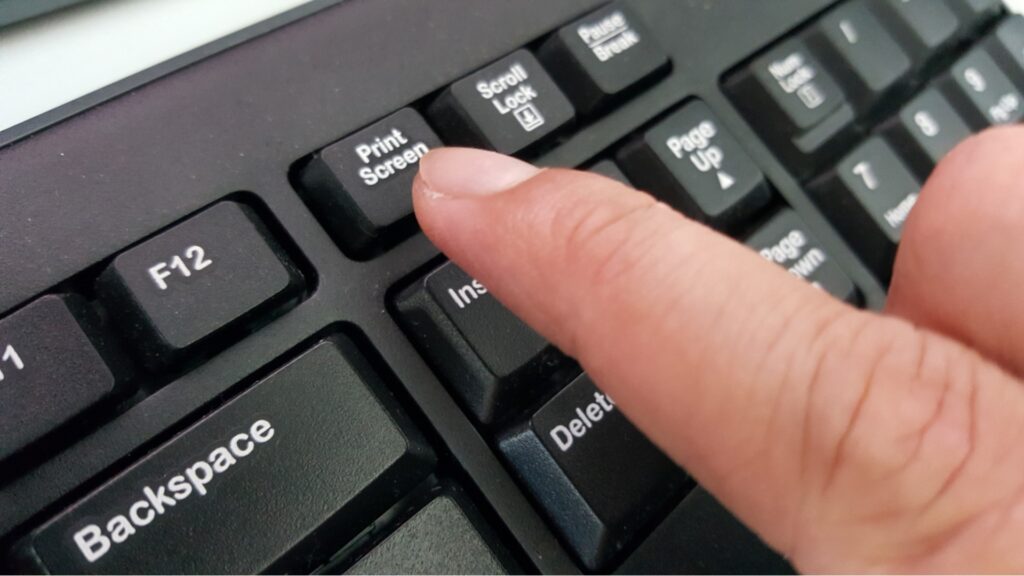
The simplest way to take a screenshot on Windows is by using the Print Screen (PrtScn) key. This captures the entire screen and copies it to your clipboard. You can then paste it into programs like Paint, Word, or even an email using Ctrl + V.
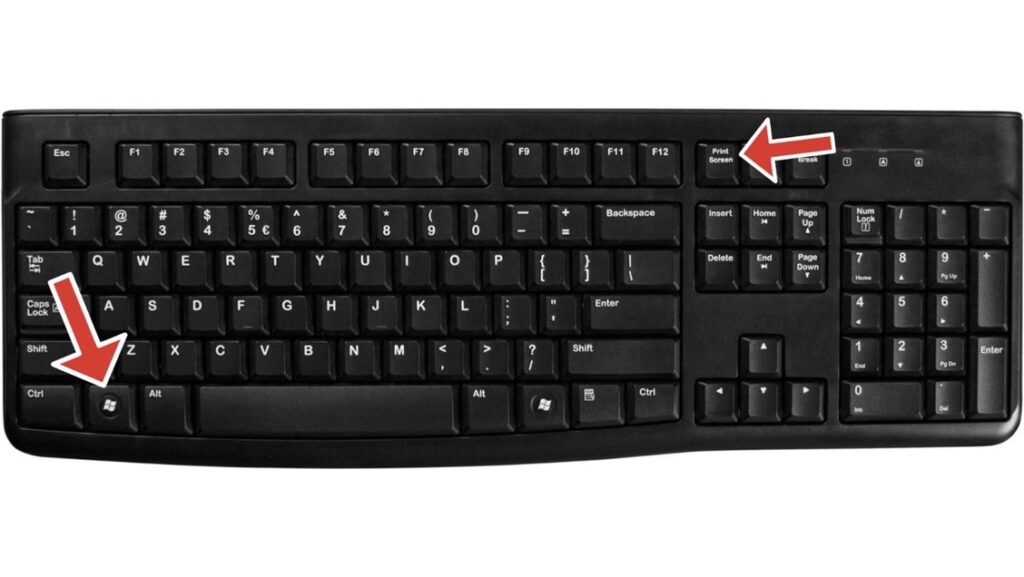
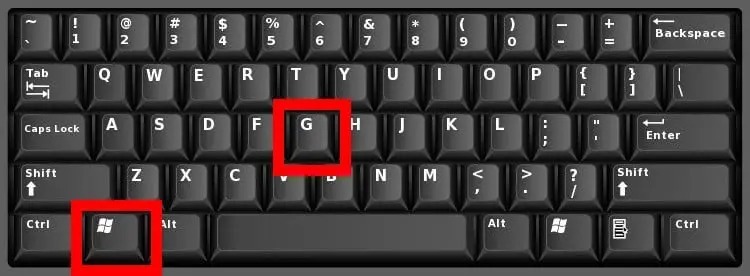
If you’d rather have your screenshots saved automatically, press Windows + PrtScn. This method captures your entire screen and automatically saves the image in the Pictures > Screenshots folder. It’s perfect for when you need to take multiple screenshots quickly without worrying about copying and pasting each one.
Pro Tip: If nothing happens, check if your keyboard requires the Fn key (common on laptops).
How to Capture an Active Window
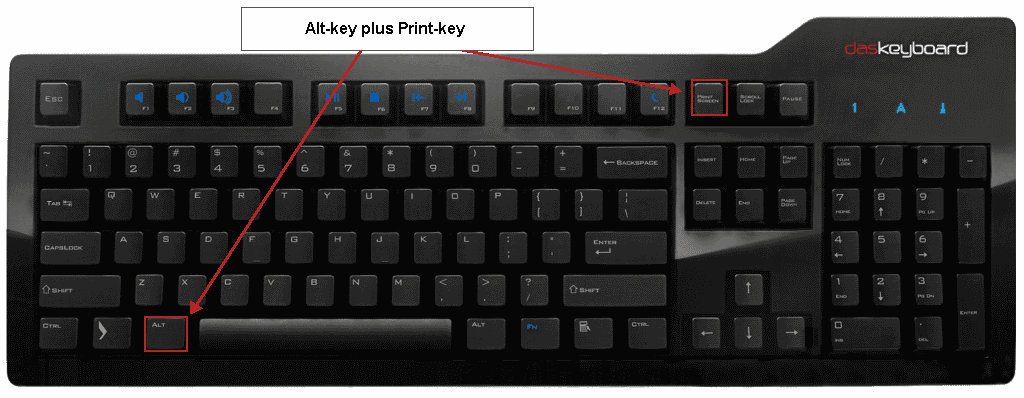
If you only want to screenshot the window you’re currently working in (like a browser or app), use Alt + PrtScn. This captures just that window and copies it to your clipboard, no extra background clutter.
Simply open Paint or Word, press Ctrl + V, and save your image. This method is excellent when you want to highlight a specific section of your screen without cropping later.
How to Use Windows + Shift + S
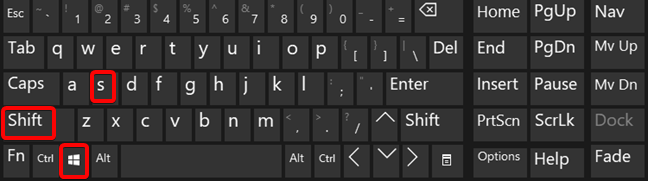
Shortcut: Win + Shift + S
This shortcut dims your screen and shows a small toolbar at the top with four capture options.
- Rectangular Snip: Drag to draw a rectangle around your selection.
- Freeform Snip: Draw any shape around the area you want to select.
- Window Snip: Click any open window to capture it.
- Full-screen Snip: Captures everything visible.
After you capture the image copies to your clipboard, a notification appears in the bottom-right corner. Click the notification to open the image in the Snipping Tool for editing and saving. If you dismiss the notification without clicking it, the screenshot stays in your clipboard; paste it before you copy anything else, or it’ll be overwritten.
Windows 10 vs Windows 11: In Windows 10, Win + Shift + S opened Snip & Sketch as a separate app. In Windows 11, Microsoft merged Snip & Sketch into the Snipping Tool. The shortcut works identically in both versions, but in Windows 11, it opens the updated Snipping Tool. The practical experience is the same for most users.
How to Use the Snipping Tool: Full Built-In App
Open the Snipping Tool directly by searching for it in the Start menu, or press Win + Shift + S in Windows 11. The full app gives you more control than the shortcut alone.
- Delay Timer: Set a 1–10 second delay before the capture fires. This solves the classic problem of capturing dropdown menus, right-click context menus, and hover states that disappear the moment you try to screenshot them. Set your delay, open the menu, and wait; the Snipping Tool captures it mid-display.
- Annotation Before Saving: Draw arrows, add text, highlight areas, and crop; all before you save or share. Nothing commits until you save.
- Multiple Modes in One Place: Rectangular, freeform, window, and full-screen modes are all accessible from the app toolbar without switching methods or shortcuts.
- Screen Recording: The Snipping Tool in Windows 11 includes a basic screen recording function. Press the video camera icon, draw your recording area, and hit Start. Recordings save as MP4 files.
The Snipping Tool is the right tool when you need precise control, such as selecting a specific area, adding annotations before sharing, or setting a timed delay.
If you’re on macOS, the equivalent tool is the Screenshot Toolbar, which offers similar versatility. You can learn more in How to Screenshot on Mac, which covers everything from shortcuts to editing options.
How to Screenshot Using the Game Bar
Gamers and streamers will love the Game Bar, a built-in overlay that captures screenshots and records gameplay. To access it, press Windows + G, then click the camera icon or press Windows + Alt + PrtScn to instantly take a screenshot.
Your captures will be saved in Videos > Captures by default. It’s a seamless way to take high-quality screenshots during gameplay without disrupting your experience.
How to Edit and Annotate Screenshots
Once you’ve taken your screenshot, you can easily edit it using Snip & Sketch, Paint, or the Photos app. These built-in tools allow you to crop, draw, add text, and highlight key areas.
For more advanced options, you can use third-party tools such as Lightshot, ShareX, or Greenshot. These offer faster uploads, cloud storage, and automation, making them perfect for professionals who handle visuals daily.
Troubleshooting Screenshot Problems
- PrtScn Does Nothing: On laptops, PrtScn often requires the Fn key to be pressed. Try Fn + PrtScn or Fn + Win + PrtScn. If it still fails, go to Settings → Accessibility → Keyboard and confirm Print Screen is enabled. Some machines map PrtScn to open the Snipping Tool directly; if yours does this, PrtScn opens the app rather than copying to the clipboard.
- Win + PrtScn Doesn’t Save: Navigate to Pictures > Screenshots in File Explorer and confirm the folder exists. If it’s missing, create a new folder there with that exact name. Also, check that your drive has available storage; a full drive prevents new files from being saved.
- Screenshots Save Blank or Black: Apps using hardware acceleration or DRM, such as Netflix, Amazon Prime Video, and some video players, intentionally block screen capture. This is expected behaviour, not a Windows bug. Capture outside those apps, and the blank result disappears.
- Win + Shift + S Shortcut Doesn’t Respond: Go to Settings → System → Clipboard and confirm clipboard history is enabled. Also, check that no other app has claimed Win + Shift + S; video conferencing software and screen recorders sometimes override it.
- Game Bar Won’t Open: Go to Settings → Gaming → Xbox Game Bar and toggle it on. On some versions, Game Bar requires a Microsoft account. If Win + G does nothing in a specific app, that app may have intentionally blocked the overlay.
- Screenshots Look Blurry After Pasting: This happens when pasting into apps that auto-compress images; messaging apps and email clients often reduce image quality. Save the screenshot as a PNG file first, then attach it as a file rather than pasting directly.
If you’re dealing with broader app instability alongside screenshot issues, our Fix Apps Crashing on Android guide covers overlapping software troubleshooting principles that apply across platforms.
Bonus: Third-Party Screenshot Tools
If you take many screenshots for tutorials or work, you may want more advanced functionality. Tools like Snagit, Lightshot, and ShareX allow for features such as scrolling capture, automatic saving, direct sharing, and video recording.
While Windows’ native tools are excellent for most users, these third-party apps offer professional-level editing and convenient sharing.
Conclusion
Taking a screenshot on Windows is fast, flexible, and incredibly easy once you know the right shortcuts. Whether you’re capturing your entire display, a single app, or a specific area, Windows provides multiple tools to match your workflow.
From PrtScn for quick snapshots to Snipping Tool for precision edits, every method has its place. You can even integrate advanced tools if you want more control or features. With all these options at your fingertips, capturing your Windows screen has never been simpler.