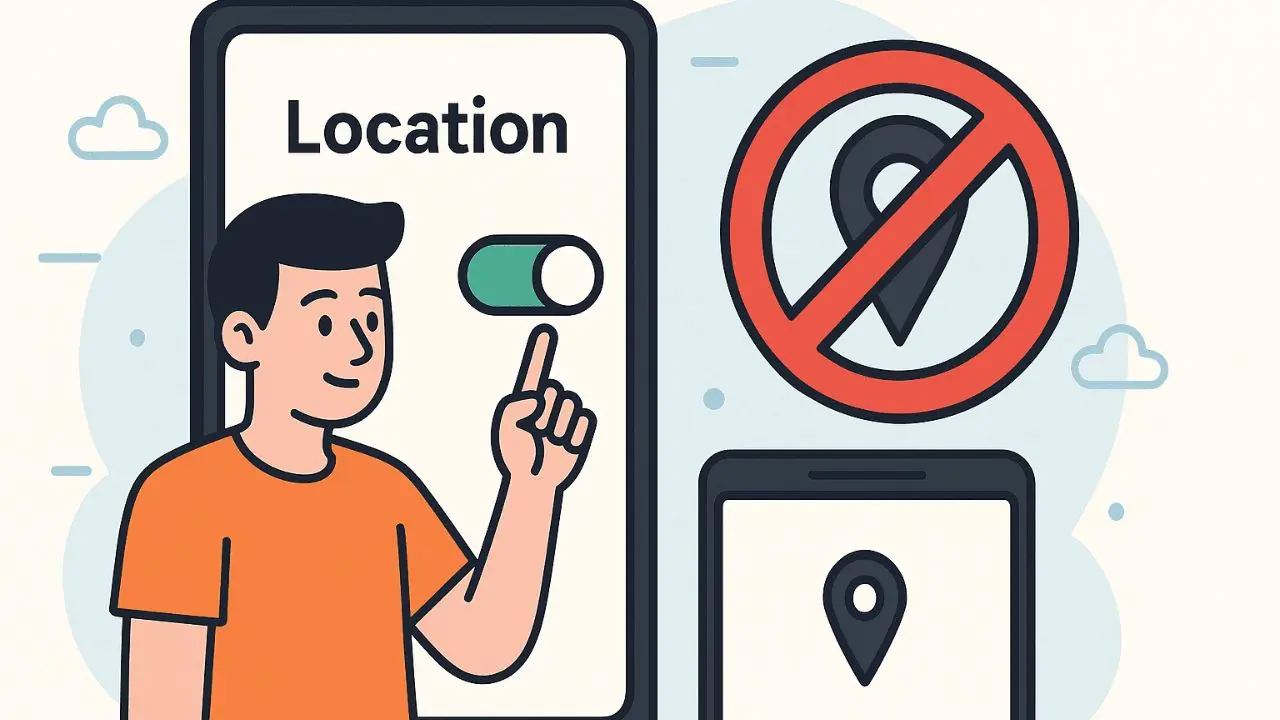
Let’s be honest about why you’re actually here. It’s probably not just to save battery. It’s because you’ve started paying attention to how much your Android phone knows about where you are, and how many apps, services, and companies have access to that information without you actively choosing to share it. News reports have shown that social platforms like Facebook have profited by collecting and selling users’ location data. You noticed that you searched for a restaurant in a new city and suddenly saw local ads on Instagram. You picked up your phone and thought, “Enough.” That instinct is correct, and this guide will help you act on it properly.
Here’s what most location guides won’t tell you upfront: turning off location on Android is not a single action. It’s a layered system, a master toggle, per-app permissions, Wi-Fi and Bluetooth scanning settings, Google account-level logging, and system-level services that each operate somewhat independently. Tap the quick toggle to stop most tracking, but not all of it. This guide covers every layer, in plain language, with step-by-step instructions for each method. You’ll walk away knowing exactly which settings actually matter for your privacy, and which ones most people miss entirely.
How Android Location Services Actually Work
Before you start turning things off, you need to understand what you’re actually disabling. Android doesn’t use a single location signal; it combines three different data sources, and understanding each one changes how you approach your privacy settings.
- GPS: The Global Positioning System (GPS) is the most accurate signal. It works by communicating with satellites orbiting the Earth and can pinpoint your position within a few meters. The trade-off is that it requires a clear view of the sky, works poorly indoors, and drains your battery faster than the other methods. Furthermore, GPS requires your device to actively request location, which is why disabling the master location toggle stops GPS immediately.
- Wi-Fi Positioning: This works differently, and this is where things get interesting. Your phone scans for nearby Wi-Fi network identifiers and cross-references them against a global database of known network locations. Critically, this works even when you’re not connected to Wi-Fi and even when Wi-Fi itself appears to be off, because Android keeps a separate Wi-Fi scanning process running specifically for location purposes. Consequently, this is the signal that most people don’t realize continues operating after they tap the main location toggle.
- Cell Tower Triangulation: It uses the signal strength from multiple nearby mobile towers to estimate your position. It’s the least accurate method, often placing you within a few hundred meters rather than a few meters, but it works anywhere you have a mobile signal. Your carrier always has access to this data, regardless of your device settings, because your phone must communicate with towers to make calls and use data.
Android’s Location Manager API combines all three signals simultaneously, weighting each based on accuracy, availability, and battery conditions. Additionally, Google maintains its own separate location history system at the account level, meaning even if you turn off every device-level setting, Google may still be logging your location through your Google account activity. That distinction between device location and Google account location is the most important concept in this entire guide.
How to Turn Off Location on Android

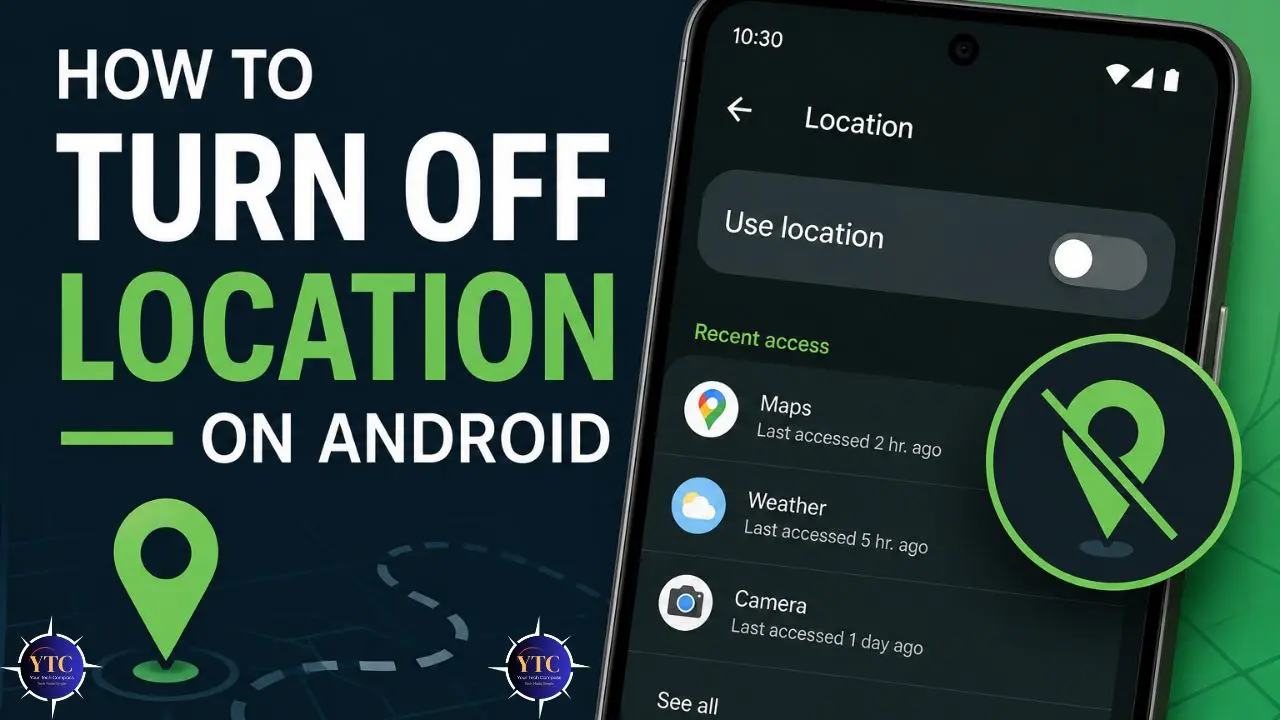
Method 1: The Master Location Toggle (Quickest Option)
This is the method most people already know, but there are details about what it actually does and doesn’t do that matter for your privacy.
Via Quick Settings (Fastest)
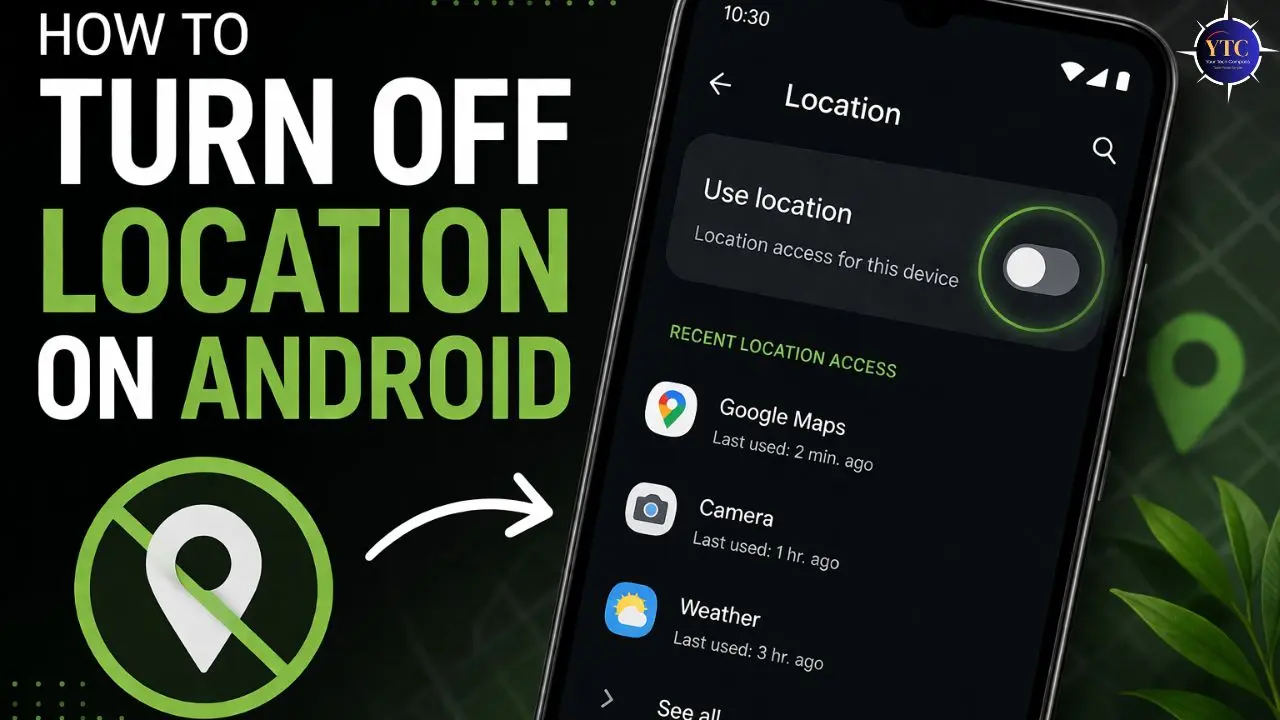
Swipe down from the top of your screen to open the notification shade. On most Android phones, you’ll need to swipe down a second time or swipe with two fingers to expand the full Quick Settings panel. Look for the Location tile, which typically shows a pin or crosshair icon. Tap it once to toggle location off. The icon will grey out to confirm it’s disabled.
If you don’t see the Location tile in your Quick Settings panel, tap the pencil or three-dot edit icon to customize your tiles. Find Location in the available tiles list, press and hold it, then drag it into your active panel. Tap Done, and the toggle will appear going forward.
Via Settings (Full Path)
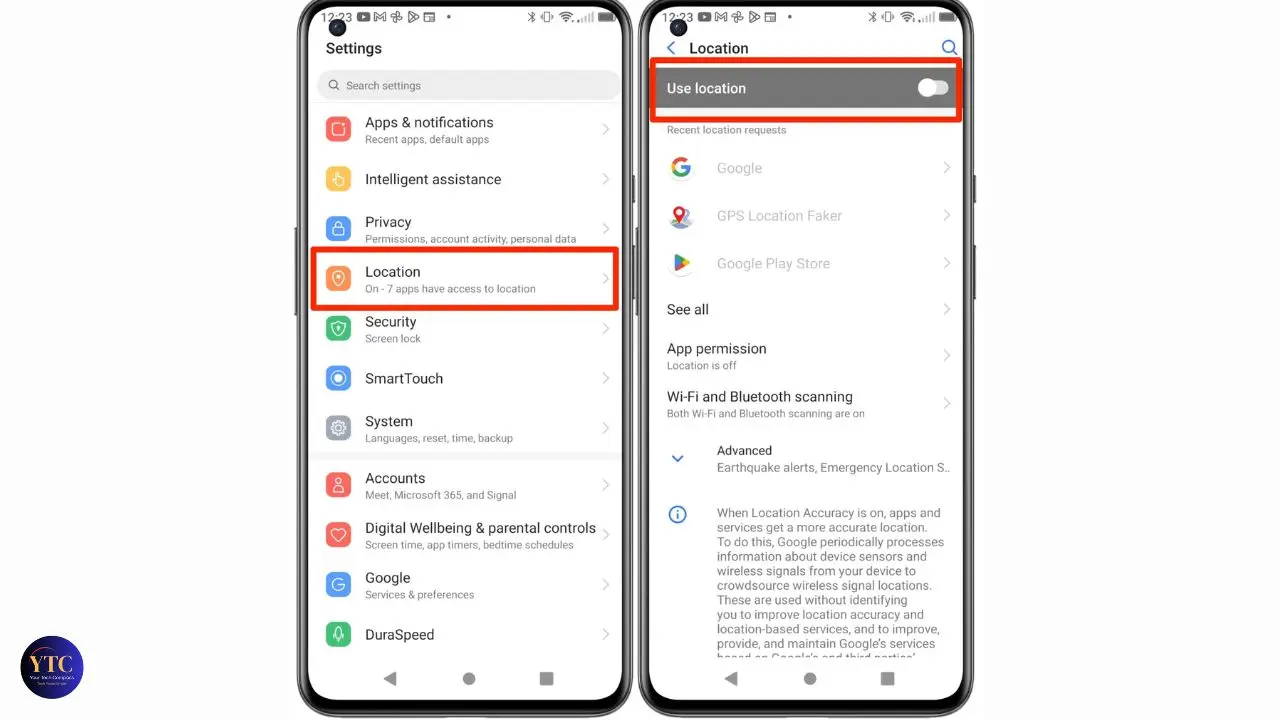
Open your Settings app → tap Location → toggle Use Location to off. On Samsung devices running One UI, the path is Settings → Location → toggle at the top. And, on Xiaomi/MIUI devices, look under Settings → Privacy → Location. On OnePlus with OxygenOS, the path follows standard Android: Settings → Location.
What the Master Toggle Actually Does and Doesn’t Do
Turning off the master location toggle disables GPS and stops apps from submitting location requests through Android’s official Location Manager API. That covers most app-based location tracking. However, this toggle does not stop Wi-Fi scanning and Bluetooth scanning, which continue running independently.
Additionally, it does not stop Google from logging location data at the account level through your Google account activity. Furthermore, apps that have already collected your location data retain that historical data even after you disable the toggle. The toggle is forward-looking, not retroactive.
When To Use This Method: Quick privacy when entering a sensitive area, lending your phone to someone, or when you simply don’t need location for an extended period. Think of it as a first line of defense, necessary but not sufficient on its own.
Method 2: Per-App Location Permissions
This is the method that delivers the highest real-world privacy impact, and the one most people spend the least time on. Reviewing and tightening per-app location permissions is the most effective single action in this guide.
How to Access Per-App Location Settings
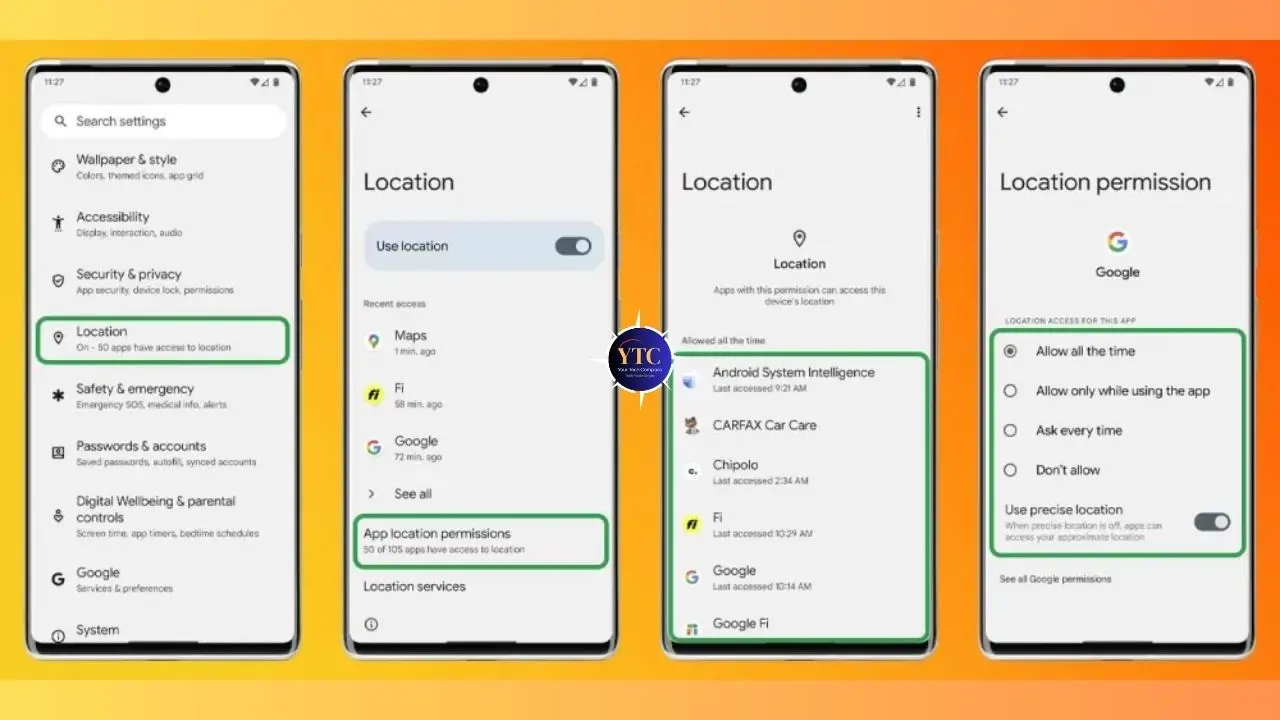
Path 1: Settings → Privacy → Permission Manager → Location Path 2: Settings → Location → App Permissions Path 3: Settings → Apps → [select an app] → Permissions → Location
Any of these three paths gets you to the same place. You’ll see a list of every app that has requested location access, organized by permission level.
The Four Permission Levels: What Each One Means for You
- Allow All the Time
This is the most invasive setting. It means the app can access your location continuously, even when it’s completely closed and running in the background. This is the setting you should audit most aggressively. Very few apps genuinely need this level of access. Moreover, background location access is how apps build detailed movement profiles over time, logging where you go, how long you stay, and when you leave, entirely without your active involvement.
- Allow Only While Using the App
This means the app can access your location only when it’s open on your screen or actively in the foreground. This is the recommended setting for most legitimate location-based apps. It gives the app the access it needs to function while eliminating background surveillance.
- Ask Every Time
This means the app must request your permission at the start of each session. It’s the most privacy-conscious option for apps you use infrequently. Consequently, there’s slightly more friction, but it gives you explicit awareness of every location request.
- Don’t Allow
It means the app has no access to location whatsoever. This is the correct setting for any app that has no legitimate reason to know your location.
Recommended Settings by App Category
App Type | Recommended Setting | Honest Reason |
Maps / Navigation | Allow only while using | Needs real-time location to function |
Ride-Hailing (Uber, Bolt) | Allow only while using | Needs your location during active trips |
Weather Apps | Ask every time | Only needs location when you open it |
Food Delivery | Allow only while using | Needs location during active order |
Social Media (Instagram, TikTok, X) | Don’t allow | No legitimate need for your location |
Games | Don’t allow | Virtually no games require location |
Shopping Apps | Don’t allow | Location is for ad targeting, not function |
Banking / Finance | Don’t allow (or Ask every time) | Fraud detection at most, not continuous |
Camera Apps | Ask every time | Only needed for geotagging photos |
Browsers | Ask every time | Only needed for location-specific searches |
The Honest Framing: Most apps requesting “Allow all the time” don’t need it. Social media platforms, shopping apps, and games have no functional requirement for your location; they request it for advertising and behavioral profiling. Switching these to “Don’t allow” is the single highest-impact privacy action you can take on your Android device.
Method 3: Turn Off Wi-Fi and Bluetooth Scanning
This is the setting most privacy guides skip entirely, and it’s more important than most people realize.
What Scanning Actually Is
Android maintains a separate process that continuously scans for nearby Wi-Fi networks and Bluetooth devices, even when both Wi-Fi and Bluetooth appear to be switched off on your phone. This process exists specifically to improve location accuracy: by identifying nearby networks and devices and cross-referencing them against location databases, Android can estimate your position indoors and in low-GPS environments. Furthermore, apps with the right permissions can use these scanning signals to infer your location even after the master location toggle is disabled.
How to Turn Off Wi-Fi Scanning
Go to Settings → Location → Location Services → Wi-Fi Scanning → toggle off.
On Samsung Devices: Settings → Location → Improve Accuracy → Wi-Fi Scanning → off. On stock Android / Pixel: Settings → Location → Location Services → Wi-Fi Scanning → off.
How to Turn Off Bluetooth Scanning
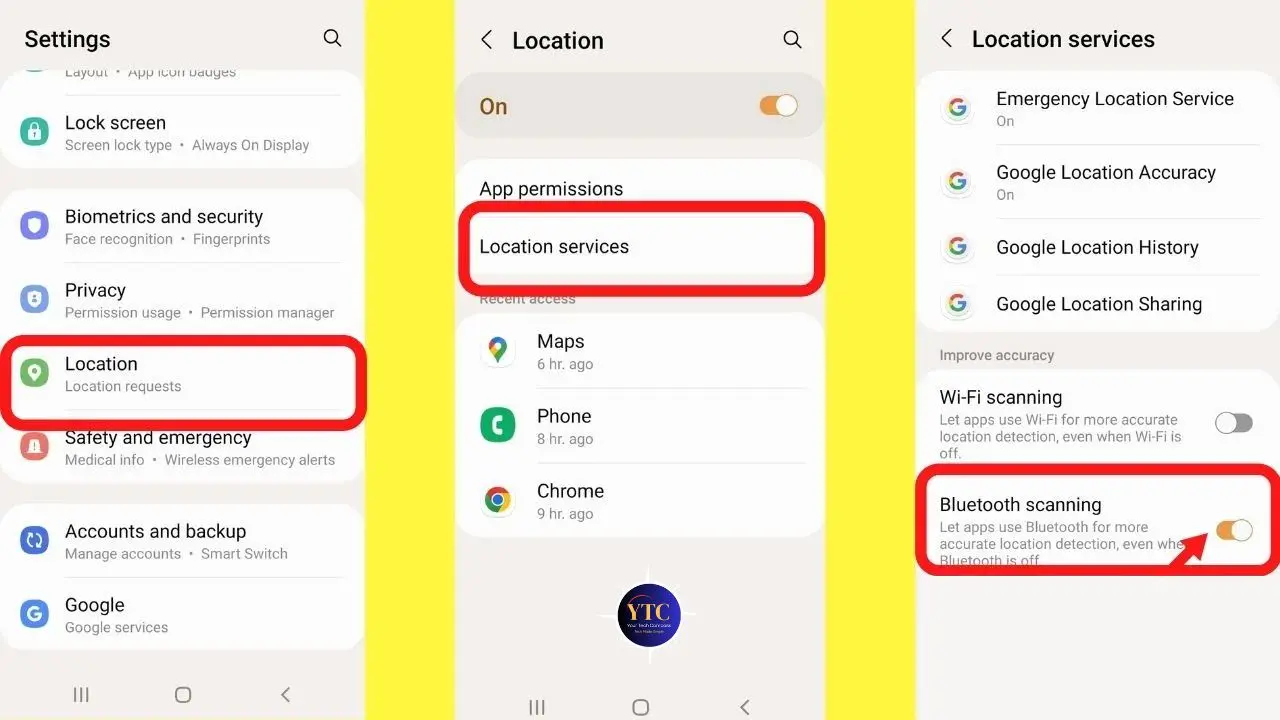
Go to Settings → Location → Location Services → Bluetooth Scanning → toggle off.
On Samsung Devices: Settings → Location → Improve Accuracy → Bluetooth Scanning → off.
The Honest Trade-Off
Disabling Wi-Fi scanning may reduce location accuracy when you choose to use it, particularly for indoor positioning where GPS is unavailable. Therefore, if you regularly use navigation or location-based apps in enclosed spaces, you may notice slightly slower or less precise location acquisition.
However, for most users, the privacy gain from disabling these scanning processes significantly outweighs the minor loss in accuracy. Additionally, disabling background scanning has a measurable positive impact on battery life, as the scanning process runs continuously and consumes power even when the device is on standby.
Method 4: Disable Google Location History (The Most Overlooked Step)
Here’s the most important distinction in this entire guide, and the one that most “how to turn off location on Android” articles completely miss. Your device location settings and your Google account location settings are separate systems. Turning off every device-level setting described above does nothing to stop Google from logging your location at the account level.
What Google Logs Independently
Even with your device location disabled, Google can log and store your location through Google Maps usage and search history, Google Search queries with location context, Google Photos geotagging from camera data, and Google Assistant interactions. Furthermore, this data is tied to your Google account, meaning it follows you across devices, browsers, and platforms.
How to Turn Off Google Location History (Timeline)
Via Google Account:
- Go to myaccount.google.com in your browser
- Select Data & Privacy
- Scroll to Location History
- Select Turn off
- Choose whether to delete the existing history or keep it
Via Google Maps app:
- Open Google Maps
- Tap your profile picture in the top right
- Select Your Timeline
- Tap the three-dot menu (top right)
- Select Timeline settings
- Tap Turn off under Location History
How to Delete Your Existing Location History
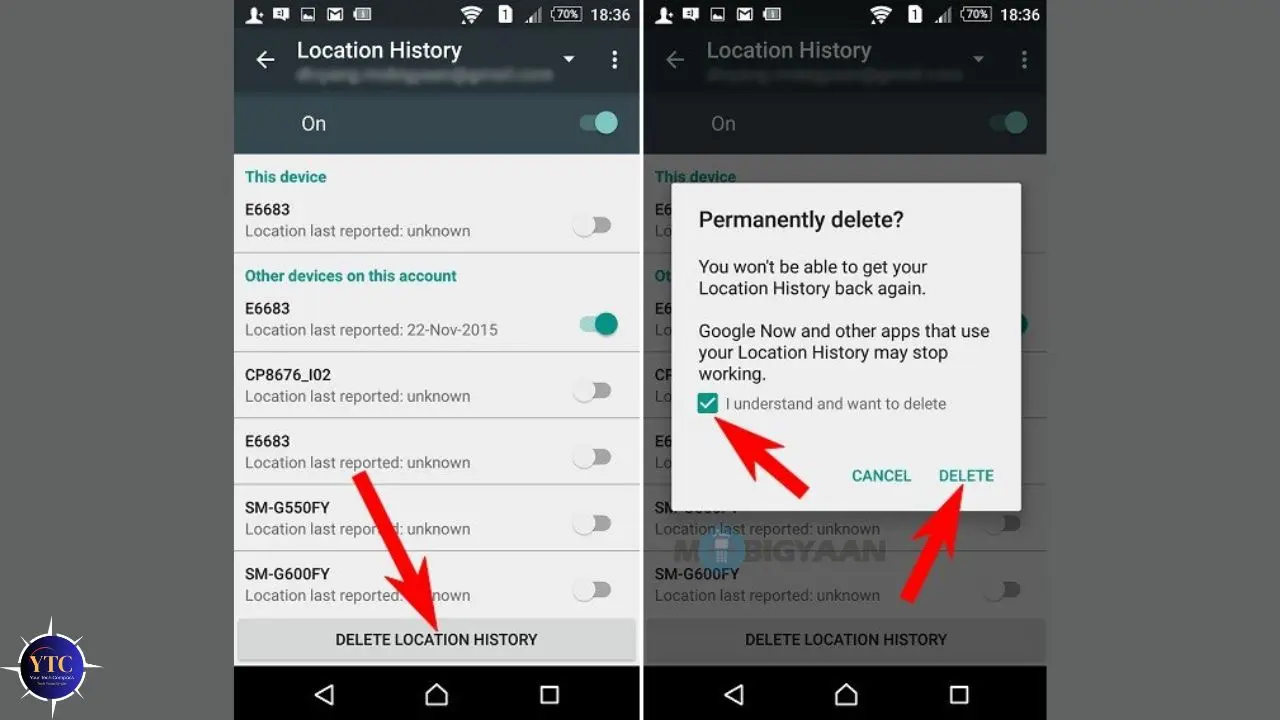
Go to myaccount.google.com → Data & Privacy → scroll to Location History → select Delete Location History. You can delete all history or set auto-delete to trigger after 3 months or 18 months. Consequently, setting auto-delete to 3 months means even if location logging resumes, the historical data doesn’t accumulate indefinitely.
Web & App Activity: The Connected Setting You Also Need to Disable
Web & App Activity is a separate Google setting that logs your searches, apps you open, and location-tagged activity across Google services. Even with Location History off, this setting can continue capturing location context from your searches and interactions.
To disable it: myaccount.google.com → Data & Privacy → Web & App Activity → Turn off.
This is the step that makes the biggest difference for users whose primary concern is Google specifically, and it’s the step most Android location guides skip.
Method 5: Emergency Location Service and Other System Settings
These are the remaining system-level location settings that complete a privacy configuration.
Emergency Location Service (ELS)
ELS automatically shares your precise location with emergency services when you make an emergency call, even if location is disabled on your device. To find it: Settings → Location → Emergency Location Service.
Our Recommendation: Leave this on. ELS exists to help emergency responders find you when you most need them to. Disabling it for privacy reasons is an extreme trade-off that most users should not make. The data is shared only during genuine emergency calls and goes only to emergency services.
Google Location Accuracy
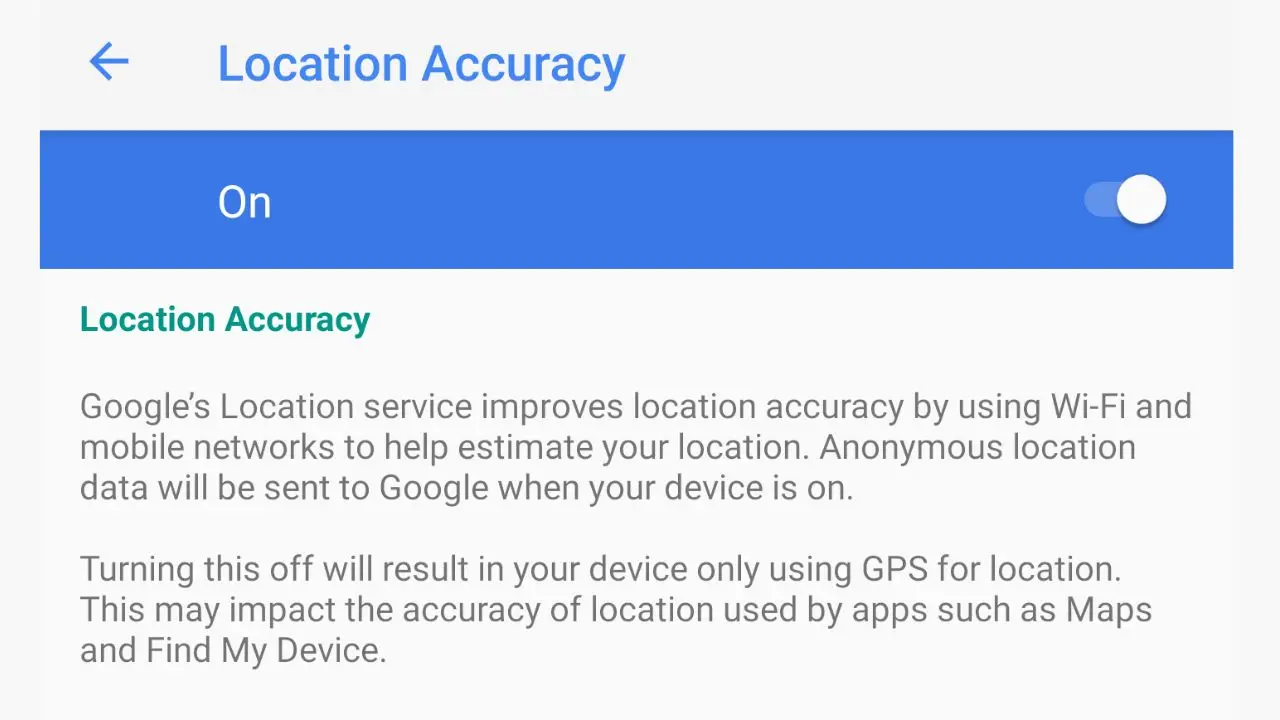
Google Location Accuracy (formerly called High Accuracy mode) controls whether Google uses Wi-Fi, Bluetooth, and mobile network data to supplement GPS for improved positioning.
To disable it: Settings → Location → Google Location Accuracy → toggle off.
Turning this off means your Android device relies only on GPS when location is active, reducing the multi-signal triangulation that improves indoor accuracy, but also reducing Google’s ability to use non-GPS signals for location inference. For a privacy-focused configuration, this setting should be off.
Location Sharing
Google Maps allows you to share your real-time location with specific contacts. If you’ve ever enabled this feature, it may still be running. To review and stop location sharing: open Google Maps → tap your profile picture → tap Location Sharing → review active shares → tap the X next to any contact to stop sharing.
Manufacturer-Specific Settings

Different Android skins add their own location layers. On Samsung One UI, check Settings → Privacy → Permission Manager → Location for Samsung-specific app permissions. And, on Xiaomi MIUI, Settings → Privacy → Location controls an additional permission layer. On OPPO/OnePlus, look under Settings → Privacy → Privacy Permissions → Location. These manufacturer layers run alongside Android’s standard settings, so reviewing both is important for a complete configuration.
Method 6: VPN and Mock Location (Advanced Users)
This section is for users who want to go beyond permission management into more advanced privacy tools. Most readers don’t need this, but it’s worth understanding what these tools do and don’t.
What a VPN Does and Doesn’t Do for Location Privacy
A VPN (Virtual Private Network) hides your IP address, which means apps and websites that guess your location from your IP address will see a different location. However, a VPN does absolutely nothing to disable GPS, Wi-Fi scanning, Bluetooth scanning, or any of the device-level location signals described above.
Consequently, if an app has location permission and your device location is on, a VPN will not prevent that app from seeing your real location. Think of a VPN as protecting your network-level identity, not your GPS coordinates.
Mock Location via Developer Options
For advanced users, Android’s Developer Options include a mock location feature that lets you feed a fake GPS signal to your device, overriding your real location.
To enable Developer Options: Settings → About Phone → tap Build Number seven times until you see “You are now a developer.”
Then: Settings → Developer Options → Select mock location app → install and configure a mock location app.
This is most useful for developers testing location-based applications, or for users who want to appear to be in a specific location for privacy reasons. Additionally, be aware that many financial, security, and high-stakes apps actively detect mock location signals and may refuse to function or flag your account if a fake GPS signal is detected. Consequently, this approach is not suitable for everyday use on devices that run banking or payment applications.
Quick Reference: Android Location Privacy Settings Checklist
Here’s your complete action checklist, organized by time investment and privacy impact. Save this section or take a screenshot for easy reference.
Basic Privacy: 5 Minutes
- ☐ Turn off the master location toggle when not actively using location services.
- ☐ Open Settings → Location → App Permissions and switch all social media apps to “Don’t allow.”
- ☐ Identify any apps set to “Allow all the time” and revoke where the permission isn’t genuinely necessary.
- ☐ Switch weather and shopping apps to “Ask every time.”
Stronger Privacy: 15 Minutes
- ☐ Settings → Location → Location Services → Wi-Fi Scanning → Off
- ☐ Settings → Location → Location Services → Bluetooth Scanning → Off
- ☐ Settings → Location → Google Location Accuracy → Off
- ☐ myaccount.google.com → Data & Privacy → Location History → Turn off
- ☐ Set Google Location History auto-delete to 3 months
Maximum Privacy: 30 Minutes
- ☐ All steps above completed
- ☐ myaccount.google.com → Data & Privacy → Web & App Activity → Turn off
- ☐ Review and delete existing Google Location History
- ☐ Google Maps → Profile → Location Sharing → confirm no active shares
- ☐ Settings → Privacy → Ads → Reset Advertising ID (or Delete, on Android 12+)
- ☐ Check manufacturer-specific location settings (Samsung Privacy, MIUI Privacy, etc.)
Does Turning Off Location Really Stop Tracking?
This is the question you deserve a direct, honest answer to, without exaggeration in either direction.
For app-level tracking and Google account logging, the methods in this guide are highly effective. Disabling per-app permissions, turning off Wi-Fi and Bluetooth scanning, disabling Google Location History, and turning off Web & App Activity removes the vast majority of location data collection that affects everyday privacy. Furthermore, if you’re primarily concerned about social media apps, shopping platforms, and advertising networks knowing your movements, completing the steps above addresses that concern comprehensively.
That said, some location data persists regardless of these settings. Your mobile carrier always knows your approximate location through cell tower connections, because your phone must communicate with towers to function on a mobile network.
This carrier-level data is outside your control through device settings. Additionally, your Android device’s advertising ID (Google Advertising ID or GAID) enables behavioral profiling even without precise location data. To address this: Settings → Privacy → Ads → Reset Advertising ID, or on Android 12 and above, you can delete the advertising ID entirely.
The Realistic Takeaway
For everyday privacy from app tracking, advertising networks, and Google account logging, the methods in this guide are comprehensive and effective. However, for complete anonymity from carrier-level data and state-level surveillance, a different class of tool, including dedicated privacy-first operating systems, is required. Most readers need the former, not the latter.
FAQs
Does turning off location on Android save battery? Yes, meaningfully. GPS is one of the most power-intensive components on your Android device. Apps that actively access location in the background, particularly those set to “Allow all the time,” can significantly drain battery life. Additionally, disabling Wi-Fi and Bluetooth scanning removes continuous background processes that consume power even when the devices are on standby. Users who disable location and background scanning typically see a noticeable improvement in battery life, particularly on older devices or those with heavily installed apps. If you’re also dealing with apps running unnecessarily in the background, our guide on stopping apps from running in the background on Android covers that problem in detail.
Can apps still track my location if I turn it off? If the master location toggle is off and you’ve reviewed per-app permissions, most apps cannot access your real-time GPS location. However, apps can still infer your general location from your IP address (unless you use a VPN), nearby Wi-Fi networks they detect (if you haven’t disabled Wi-Fi scanning), and previously collected location data stored on their servers. Consequently, turning off location prevents new collection; it doesn’t erase what’s already been gathered.
What’s the difference between turning off location and turning off GPS? Turning off location via the master toggle disables all three location signals: GPS, Wi-Fi positioning, and cell tower triangulation, for apps using Android’s Location Manager API. “Turning off GPS” specifically would disable only the satellite-based signal. Android doesn’t offer a standalone GPS-only toggle in standard settings; the master location toggle is the closest equivalent. Additionally, even with location off, Wi-Fi and Bluetooth scanning continue unless explicitly disabled in Location Services settings.
How do I stop Google from tracking my location on Android? Four steps cover this comprehensively. First, turn off Google Location History at myaccount.google.com → Data & Privacy → Location History. Second, turn off Web & App Activity in the same menu. Third, review and delete your existing stored location history. Fourth, open Google Maps and confirm no active location sharing is enabled under your profile. These four steps address Google’s account-level location logging, which operates independently from device-level settings.
Will turning off location affect emergency calls on Android? Standard location-off settings do not affect your ability to make emergency calls. Emergency calls work regardless of your location settings. Furthermore, the Emergency Location Service (ELS) is designed to override location settings specifically during emergency calls, sharing your location with emergency responders even if the master toggle is off. This is intentional and beneficial behavior; you should generally leave it enabled. Only manually disabling ELS in Settings → Location → Emergency Location Service would affect this.
How do I know which apps are using my location? Android provides real-time visibility into location access. Go to Settings → Privacy → Privacy Dashboard (available on Android 12 and above) to see a timeline of which apps accessed your location in the past 24 hours. Additionally, you can go to Settings → Location → App Permissions to see the full list of apps organized by their current permission level. A small location indicator icon also appears in your status bar whenever an app is actively accessing your location. Look for a small pin icon in the top right corner of your screen.
Final Thoughts
Android’s location system is more layered than most people realize, and that’s by design. The master toggle handles the obvious layer, per-app permissions handle the granular layer, and Google’s account-level settings handle the layer that most guides never mention. Completing all three levels of the checklist in this guide gives you genuine, comprehensive control over your location data, not just the appearance of privacy that comes from tapping one toggle and moving on. Moreover, reviewing your per-app permissions alone, particularly revoking “Allow all the time” from social media and shopping apps, is one of the highest-impact privacy actions you can take on any Android device in under ten minutes.
The broader lesson is that Android privacy requires active management. The default settings are configured for functionality, not privacy, so the burden of adjusting them falls to you. That’s not ideal, but it’s the reality of how these systems are designed. The good news is that once you’ve done this work, maintaining it is straightforward: check your app permissions when you install something new, review your Google account settings periodically, and keep Wi-Fi and Bluetooth scanning disabled as your default configuration. For more Android guides that help you get more control over your device, our Tech Guides section covers everything from performance tweaks to cross-platform tips like how to schedule a text on iPhone and how to pair AirPods to Android.
Your phone should work for you, not the other way around. Head to YourTechCompass.com for more practical guides that help you take back control of your devices, your data, and your digital life.