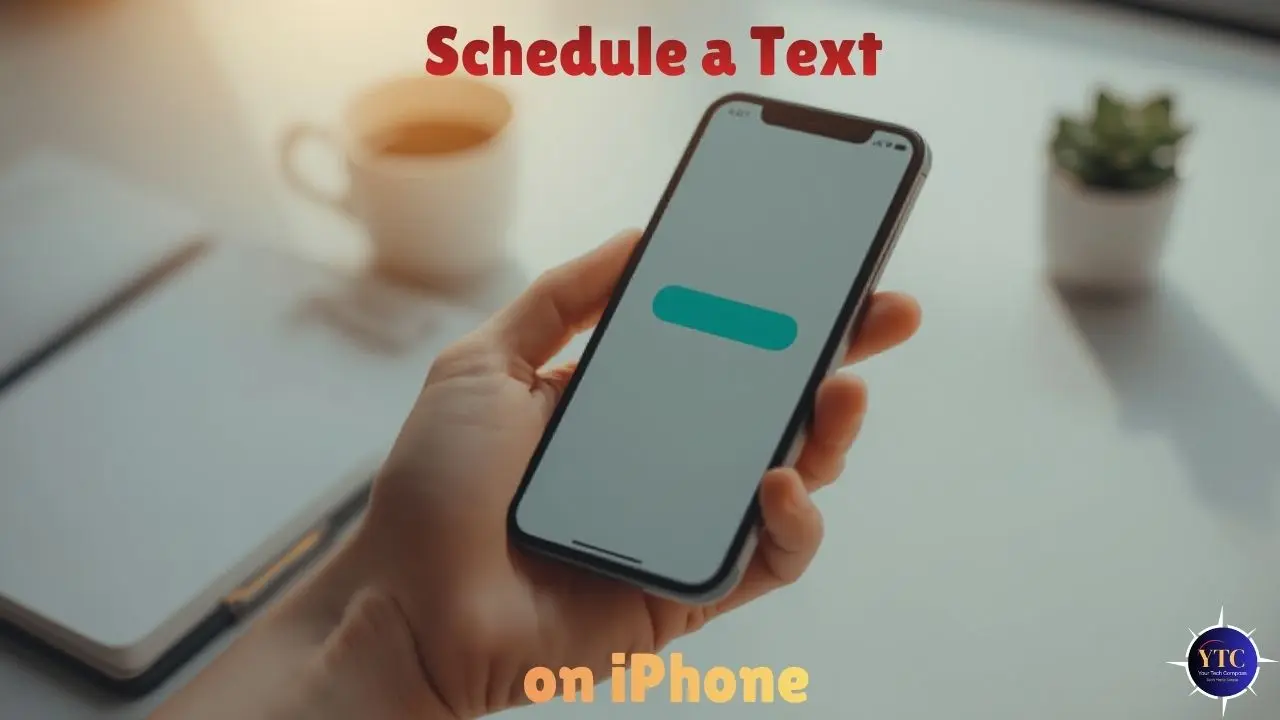
Scheduling a text on an iPhone used to require a third-party app, a workaround, or a Shortcuts automation that half the time demanded your attention anyway. That changed with iOS 18, which introduced a native Send Later feature built directly into the Messages app; no extra downloads, no complicated setup, and no notifications asking you to confirm the send. For the first time, you can compose a message now and have your iPhone deliver it automatically at exactly the time you choose.
That said, the native feature has real limitations worth knowing before you rely on it. It works only with iMessage, meaning the recipient needs a blue bubble, not a green one. It also maxes out at 14 days in advance. For SMS contacts, Android users, and recurring scheduled messages, you need a different approach entirely. This guide covers every method clearly, so regardless of your iOS version or who you’re texting, you leave with a solution that works.
Can You Schedule a Text on iPhone?
Yes, but the right method depends on two things: your iOS version and whether you’re texting an iMessage or SMS contact. On iOS 18 and later, the Messages app includes a built-in Send Later feature that automatically schedules iMessages. On iOS 17 and earlier, or for SMS and green bubble contacts, you’ll need the Shortcuts app or a third-party scheduling app instead.
The table below shows which method works for each scenario at a glance.
Method | iMessage | SMS (Green Bubble) | Free | Auto-Sends | iOS Needed |
iOS 18 Send Later | ✅ Yes | ❌ No | ✅ Yes | ✅ Yes | iOS 18+ |
Shortcuts Automation | ✅ Yes | ⚠️ Limited | ✅ Yes | ⚠️ Sometimes | iOS 13+ |
Scheduled App | ✅ Yes | ✅ Yes | ⚠️ Limited free | ⚠️ Semi-auto | Any iOS |
Siri Reminder | ⚠️ Partial | ⚠️ Partial | ✅ Yes | ❌ No | Any iOS |
Start with Method 1 if you’re on iOS 18 and texting an iMessage contact. Jump to Method 2 if you need SMS scheduling or are on an older iOS version.
How to Schedule a Text on iPhone
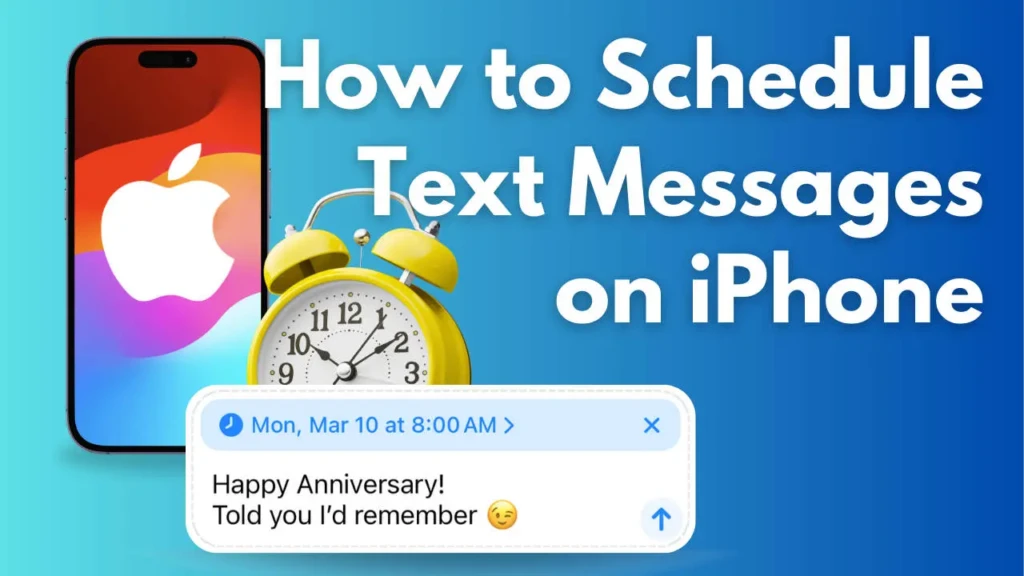
Method 1: Schedule a Text Using iOS 18 Send Later (Native; iMessage Only)
This is the simplest, most reliable method available, and it works completely automatically once set up. Your iPhone stores the message securely and sends it at the scheduled time, even if your phone is locked. Notably, the recipient sees a regular blue iMessage bubble and has no indication that it was scheduled in advance.
Requirements before you start:
- Your iPhone must run iOS 18 or later. Check via Settings → General → About.
- The conversation must be via iMessage (blue bubbles); the option does not appear for SMS (green bubble) contacts.
- An active internet connection at the time of sending. This is because iMessage requires data or Wi-Fi to deliver.
Step-by-step:
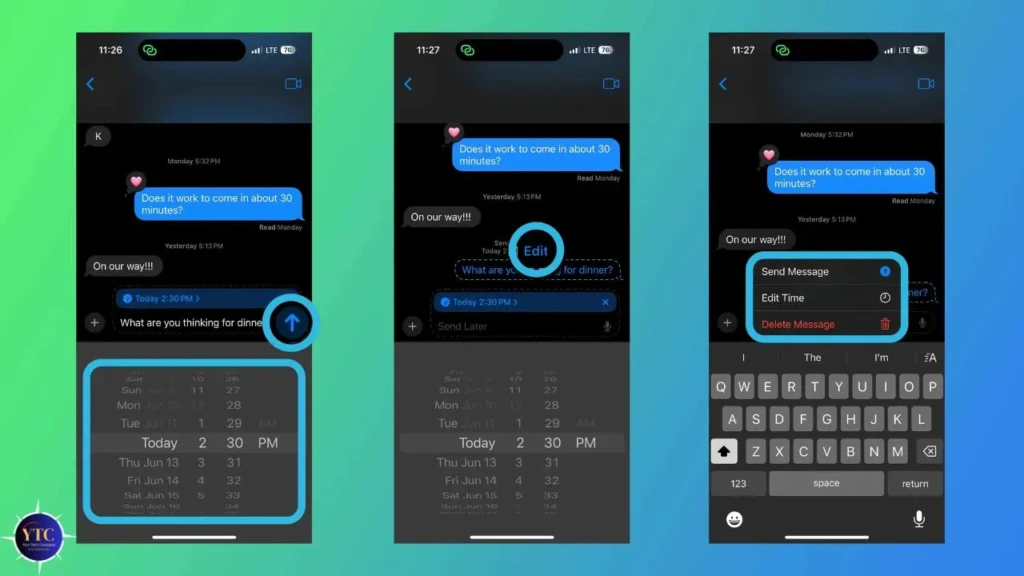
- Open the Messages app
- Open an existing iMessage conversation or start a new one with an iMessage contact
- Type your message; you can include text, emoji, photos, links, or videos
- Long-press the blue Send button (the upward arrow) for 1 to 2 seconds
- Tap Send Later from the menu that appears
- Use the date and time picker to select when you want the message to be sent. You can choose up to 14 days in advance
- Tap Send to confirm the schedule.
After confirming, the message appears in the conversation as a dashed bubble with a hollow outline, visually separating it from your sent messages. Additionally, a small timestamp sits above the bubble showing exactly when it goes out. That visual indicator makes it easy to spot and manage your scheduled messages at any time before they are delivered.
Two important things to know:
- If your iPhone is completely powered off at the scheduled send time, the message sends automatically when you turn it back on; it will not be lost.
- The 14-day limit is a hard cap; you cannot schedule more than two weeks in advance using this method.
Method 2: Schedule a Text Using the Shortcuts App (iOS 13+)
The Shortcuts app is the best option if you’re on iOS 17 or earlier or want to set up a recurring scheduled message, such as a weekly check-in or a monthly reminder. It works on any iPhone running iOS 13 and above and requires no subscription. Additionally, unlike the iOS 18 native method, Shortcuts supports recurring sends on daily, weekly, or monthly schedules.
Step-by-step:
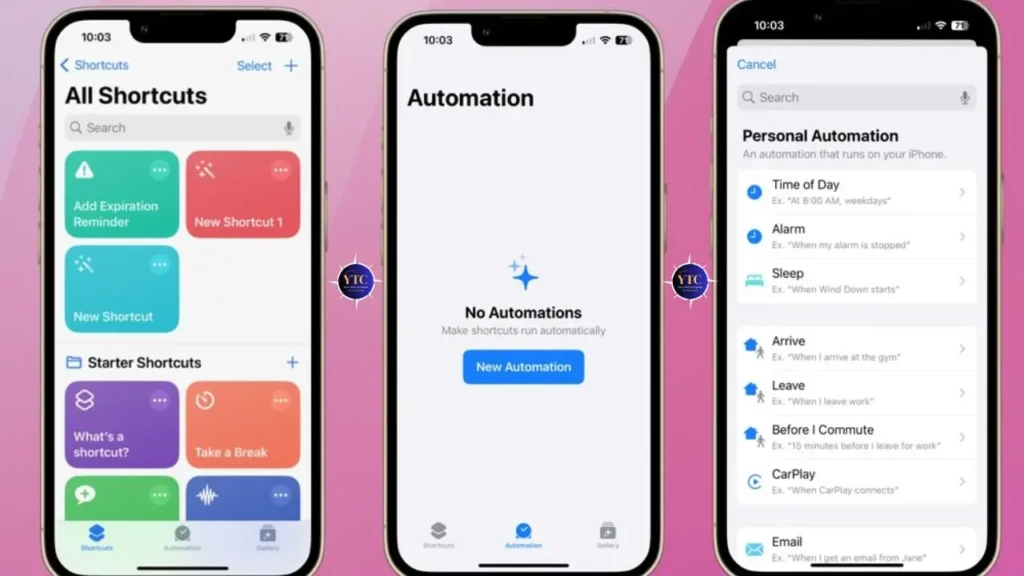
- Open the Shortcuts app. It comes pre-installed on iOS 13 and later; download it free from the App Store if it’s missing
- Tap the Automation tab at the bottom of the screen
- Tap the + icon in the top-right corner
- Tap New Automation
- Select Time of Day as your trigger
- Set the specific time and date; choose Run Once for a single send or select a repeat schedule for recurring messages
- Tap Next
- Tap Add Action
- Search for Send Message and select it
- Enter the recipient’s name or number and type the message content
- Tap Next
- Toggle off Ask Before Running if you want the message to fire automatically without any confirmation prompt
- Tap Done
One caveat worth knowing clearly: with Ask Before Running turned off, iOS may still display a banner notification requiring a tap to confirm, depending on your iOS version and permissions. Additionally, Shortcuts-based scheduling requires your iPhone to be powered on at the scheduled time, unlike iOS 18’s Send Later.
Shortcuts does not store messages on Apple’s servers. Therefore, if your phone is off or in Airplane Mode when the automation triggers, the message will not send.
Method 3: Use Siri as a Reminder (Not True Scheduling)
Siri offers a partial workaround that works on any iOS version, but it’s important to understand what it actually does before you rely on it. You say, “Hey Siri, remind me to text [Name] at [time],” and Siri sets a Reminders notification, not a scheduled message. When the reminder fires, you tap it to open a compose window with the contact pre-filled, then you tap Send manually.
This method suits casual situations where you just need a nudge, such as “remind me to text Mum at 8 pm.” It doesn’t suit situations where the timing is critical, you’re unavailable at send time, or you need the send to happen automatically without your involvement. For true automated scheduling, Methods 1, 2, or 3 are the correct approaches.
How to Edit or Cancel a Scheduled Message
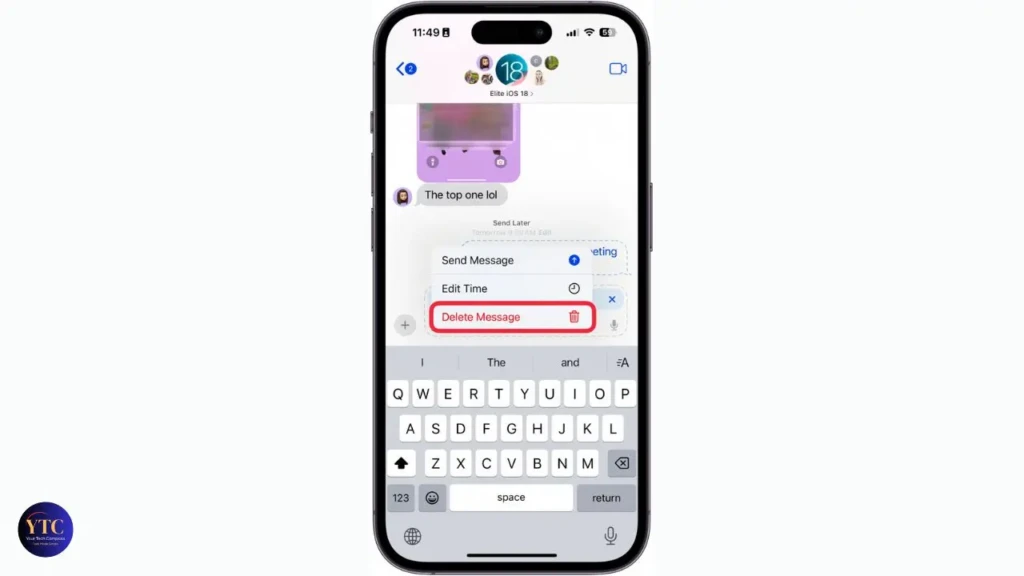
Managing scheduled messages in iOS 18 is straightforward once you know where to look. Open the Messages app and go to the conversation containing the scheduled message. Next, find the dashed bubble; it typically appears at the bottom of the thread, and tap it to reveal your options.
To change the send time, tap Edit next to the timestamp, then tap Edit Time. Select the new date and time using the picker, then tap outside the picker to save.
To send it immediately, tap Send Message instead; the message delivers right away. In addition, to cancel it entirely, tap and hold the dashed bubble, select Delete, and confirm; the message will disappear from the conversation without being sent.
Common Problems and How to Fix Them
Send Later Option Not Appearing
The two most common causes are running iOS 17 or earlier, or texting an SMS contact (green bubble). Confirm your iOS version in Settings → General → About, and confirm the conversation shows blue bubbles.
If you need to update your iPhone, the How to Restart iPhone guide covers a force restart; sometimes required before a software update installs correctly.
The Scheduled Message Didn’t Send
For iOS 18 Send Later, check that your iPhone has internet access at the scheduled time. If your phone was in Airplane Mode, the message queues and sends as soon as connectivity returns.
For Shortcuts-based scheduling, confirm your iPhone is powered on. This is because Shortcuts do not use server-side delivery and require the device to be active.
Shortcuts Automation Fired, But Asked for Confirmation
You left Ask Before Running enabled. Return to Shortcuts → Automation tab, tap the automation, and toggle Ask Before Running off. Additionally, make sure the Shortcuts app has permission to send messages in Settings → Privacy → Shortcuts.
Third-Party App Notification Appeared, But The Message Didn’t Send
Your phone was locked, or the app was force-closed when the notification fired. Keep your screen accessible at the scheduled send time and ensure the Scheduled app has notification permissions enabled in Settings → Notifications → Scheduled.
iOS 18 Send Later Missing from A Blue Bubble Conversation
Confirm iMessage is enabled by going to Settings → Messages and checking that iMessage is toggled on. Beyond that, confirm your Apple ID is signed in under Settings → Messages → Send & Receive. iMessage requires a valid Apple ID to function.
Tips for Scheduling Texts Effectively
- Account for Time Zones When Scheduling: iOS 18 Send Later uses your iPhone’s current time zone to set the delivery time. If you’re traveling or scheduling a message for someone in a different region, adjust accordingly. A 9 am birthday message in London schedules from your local time, not theirs.
- Use Shortcuts for Recurring Messages: iOS 18’s Send Later has no recurring option; each scheduled message is a one-time send. Consequently, for weekly reminders, monthly check-ins, or annual birthday automations, Shortcuts is the better tool. Set the automation to repeat, and it fires every year without any maintenance.
- Verify iMessage Status Before Relying on Send Later: If the recipient switches to a new Android phone between now and your scheduled send time, the blue bubble may convert to green, and the message may fail to deliver as scheduled. For time-critical messages to contacts who occasionally switch devices, the Scheduled app’s SMS support delivers more reliably.
For related iPhone communication features worth mastering alongside text scheduling, the how to record a phone call on iPhone guide and how to share location on iPhone guide cover two of the most commonly searched messaging and communication how-tos. For step-by-step iPhone guides across every feature, our tech guides section covers the full range. And if you regularly create iPhone walkthroughs or demo scheduled features, the how-to screen-record-on-iPhone guide shows you exactly how to capture and share those steps.
FAQs
Yes. On iOS 18 and later, the native Send Later feature in the Messages app lets you schedule iMessages without any third-party download. For SMS contacts or older iOS versions, the Shortcuts app (free, pre-installed on iOS 13+) provides automation-based scheduling without a paid app.
Yes. iOS 18 introduced the Send Later feature in Messages. Long-press the blue send button after typing your message, tap Send Later, choose your date and time, and tap Send to confirm. The message delivers automatically at the scheduled time, even if your phone is locked.
Not natively. iOS 18’s Send Later feature works with iMessage only (blue bubbles). For green-bubble SMS contacts, use the Scheduled app, which supports both iMessage and SMS scheduling with a semi-automated send process.
For iOS 18 Send Later, Apple stores the message on its servers and sends it automatically when your iPhone reconnects to the internet, even after being powered off. For Shortcuts-based scheduling, the automation requires your device to be powered on at the trigger time, so messages will not be sent if the phone is off.
No. iOS 18 Send Later works only with iMessage and requires both the sender and recipient to be on Apple devices. Android contacts receive SMS (green bubbles), and the Send Later option does not appear for those conversations. Use the Scheduled app for Android contacts.
The Scheduled app has a free tier with a limited number of scheduled messages per month, sufficient for occasional use. A premium subscription unlocks unlimited scheduling, additional platform support, and priority delivery notifications.
Conclusion
For most iPhone users on iOS 18, scheduling a text takes under 30 seconds: type your message, long-press the send button, tap Send Later, pick your time, and you’re done. The message is delivered automatically, even if your phone is locked or off, and the recipient sees nothing unusual. That simplicity makes it the best starting point for anyone who needs to send birthday messages, time zone-aware work texts, or reminders without being at their phone at the right moment.
For SMS contacts, Android recipients, recurring messages, or iPhones running iOS 17 and earlier, the Shortcuts app and the Scheduled app each fill the gap left by the native feature. Use iOS 18 Send Later for iMessage contacts, the Scheduled app for SMS and cross-platform needs, and Shortcuts for recurring automations that need to fire weekly or monthly without resetting. Between those three methods, every scheduling scenario has a clean, workable solution.
Found this helpful? Browse more in-depth tech guides, honest reviews, and step-by-step tutorials at YourTechCompass; your go-to resource for making smarter tech decisions.