Your iPhone has a built-in screen recorder that most users never touch, and once you know how to use it, you’ll wonder how you managed without it. Screen recording captures everything happening on your display as a video file: app demos, gameplay, step-by-step tutorials, bug reports, and content you want to save for later. Best of all, the feature is completely free, built directly into iOS, and available on every iPhone running iOS 11 or later, no third-party app required.
What surprises most people is how capable the built-in recorder actually is. You can record with or without your microphone, capture system audio from any app, overlay your camera feed in a picture-in-picture window, and record in HDR on iOS 18.3 and later. This guide walks you through every method, every model-specific difference, every common problem, and every practical tip, so you get a clean, usable recording on your first try.
What Is iPhone Screen Recording?
iPhone screen recording is Apple’s built-in video capture feature; it records everything visible on your display and saves it directly to the Photos app as an MP4 video file. Apple introduced it in iOS 11, and it has been available on every iPhone model and iOS version since. Consequently, whether you’re on an older iPhone SE or the latest iPhone 16 Pro, the feature works the same way.
The key difference between a screenshot and a screen recording is exactly what you’d expect. A screenshot captures a single static image of your screen in that moment. A screen recording captures continuous video (everything that moves, changes, or plays) for as long as you keep it running.
One important limitation to know before you start: DRM-protected content from apps like Netflix, Disney+, and Apple TV+ will appear as a black screen because those platforms block capture at the system level. Additionally, some banking and financial apps restrict recording as a security measure. For everything else, including apps, games, web browsers, FaceTime calls, and your home screen, the built-in recorder captures it all.
How to Add Screen Recording to Your Control Center
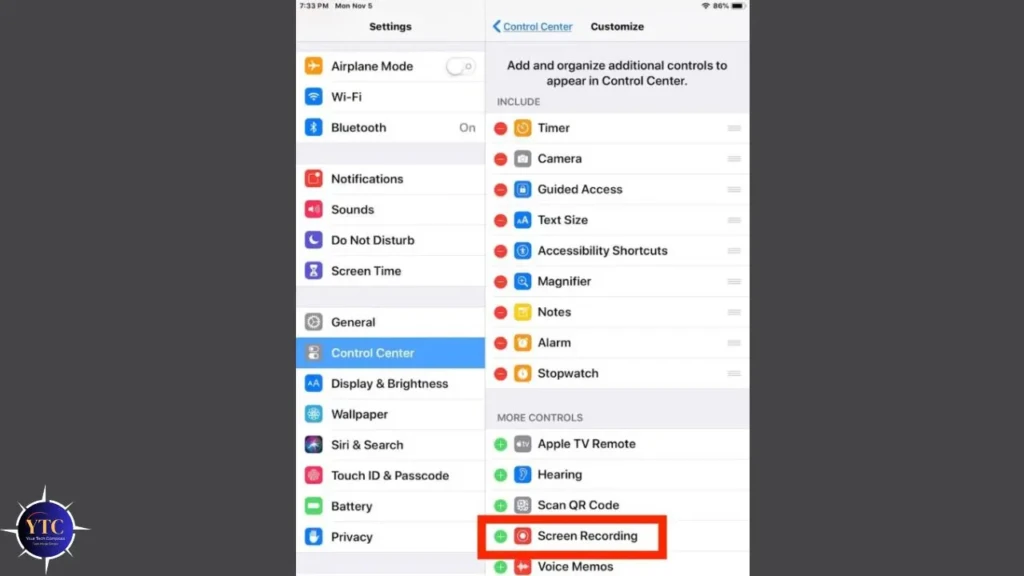
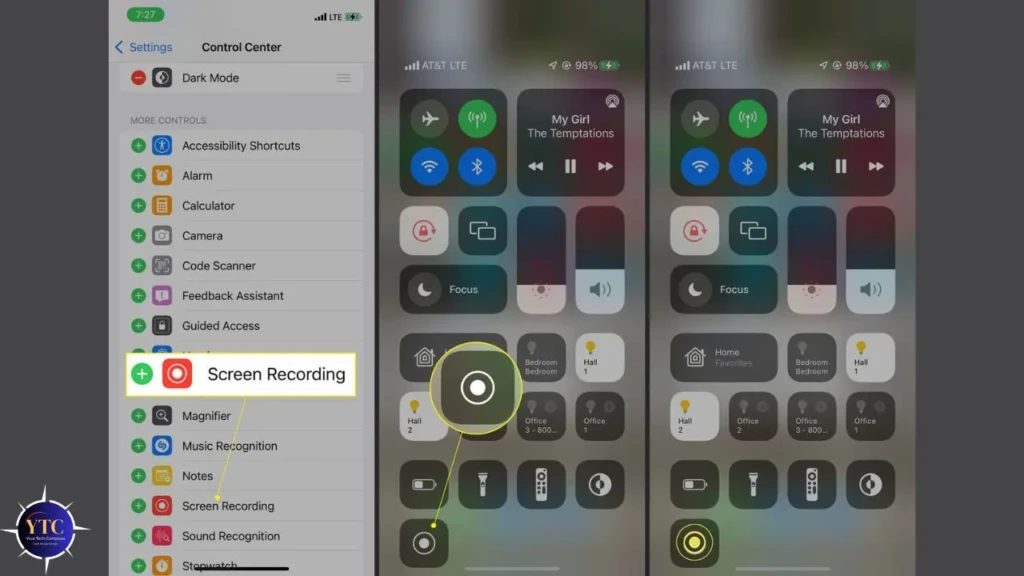
Screen recording does not appear in your Control Center by default, so the first thing you need to do is add it. The process differs slightly depending on whether you’re running iOS 18 or later versus an earlier iOS version, so check your iOS version in Settings → General → About before following the steps below.
On iOS 18 and iOS 26:
- Swipe down from the top-right corner of your screen to open Control Center
- Tap the + icon in the top-left corner of Control Center
- Tap Add a Control at the bottom of the screen
- Scroll through the list and tap Screen Recording
- Tap anywhere outside the panel to exit editing mode
On iOS 17 and earlier:
- Open the Settings app
- Tap Control Center
- Scroll down to “More Controls” and find Screen Recording
- Tap the green + button next to it
- Confirm it now appears in the “Included Controls” list above
After adding the button, you’re ready to record. Additionally, you can press and hold the Screen Recording icon and drag it to reposition it anywhere in your Control Center layout.
How to Screen Record on iPhone: Step-by-Step
Method 1: Standard Screen Recording (No Microphone)
This is the quickest method for capturing your screen with system audio, including app sounds, music, and in-app effects, but without your voice. Follow these steps:
- Open Control Center: Swipe down from the top-right corner on Face ID iPhones (iPhone X and later), or swipe up from the bottom on Home button iPhones (iPhone 8 and earlier, iPhone SE)
- Tap the Screen Record Button: It looks like a solid circle inside a larger circle
- Wait for the 3-second Countdown: A countdown appears on the button before recording begins
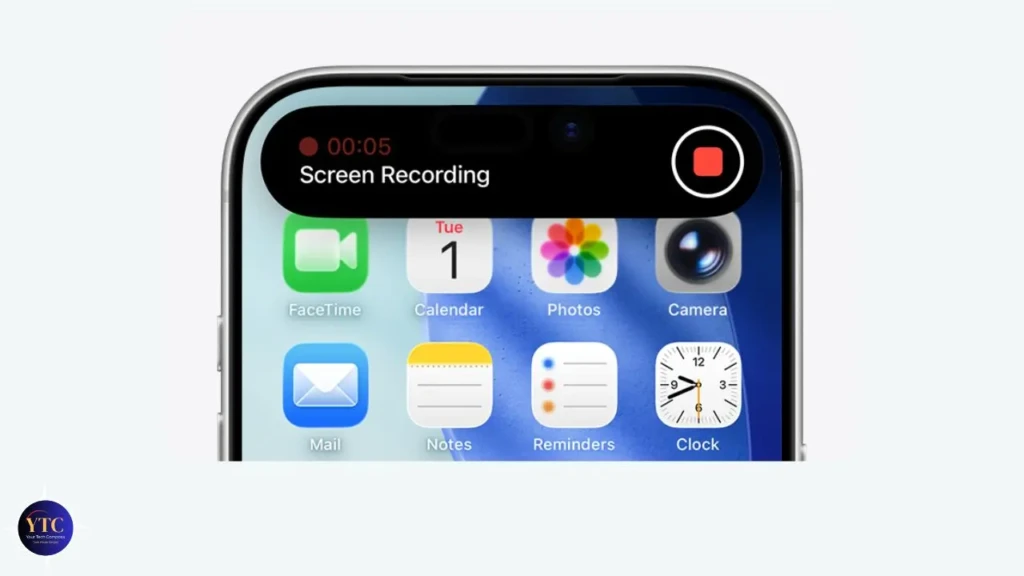
- Record Your Screen: A red status bar or red pill appears at the top of your screen while recording is active; on iPhones with Dynamic Island, the indicator appears there instead
- Stop the Recording: Tap the red bar or the Dynamic Island indicator at the top, then select Stop, or return to Control Center and tap the Screen Record button again
- Find Your Recording: It saves automatically to the Photos app.
That’s the complete process. In total, it takes under 30 seconds from start to finish.
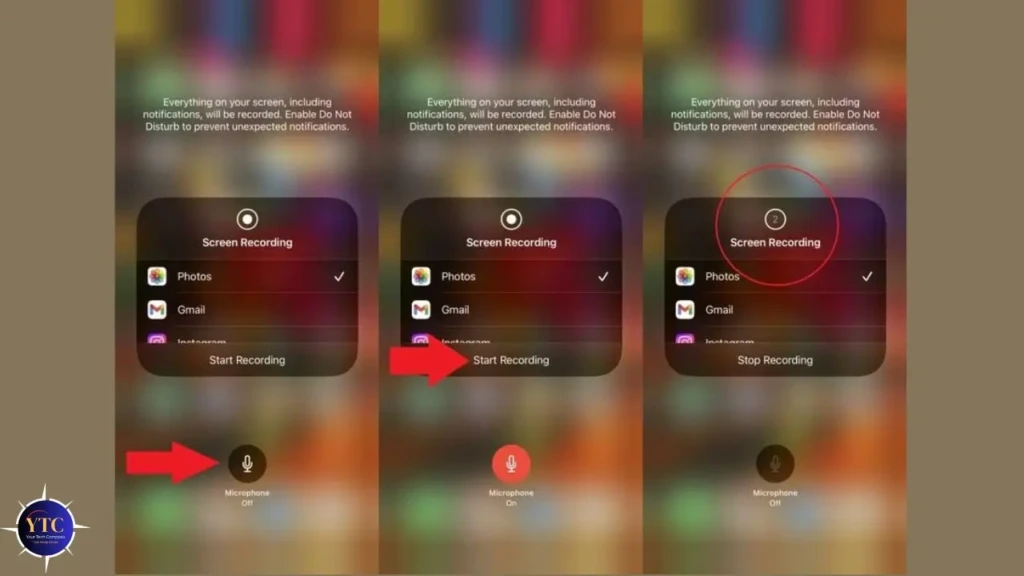
Method 2: Screen Recording With Microphone Audio
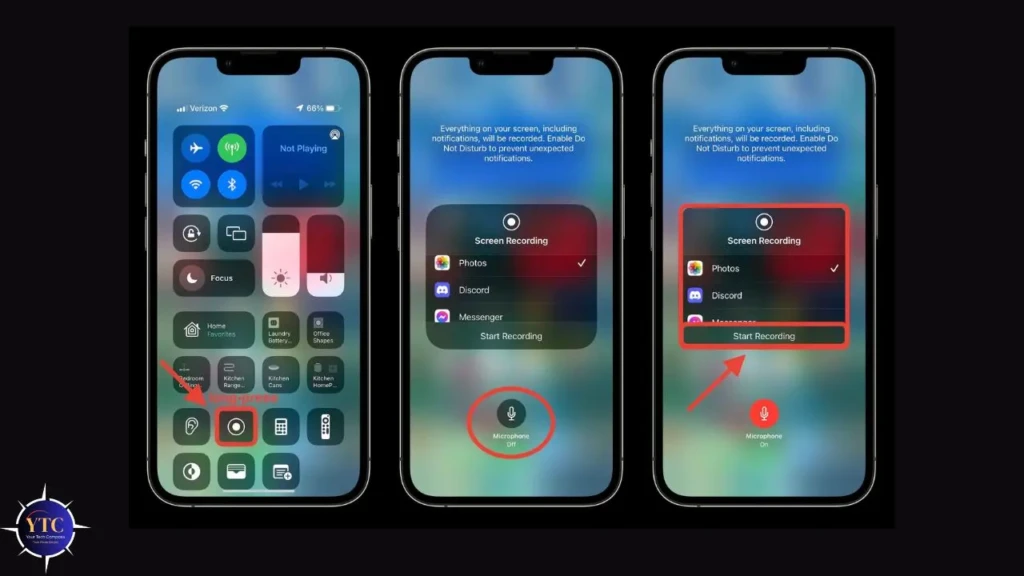
Use this method when you want to narrate a tutorial, add commentary to a demo, or capture your voice alongside the screen content. Here’s how to enable it:
- Open Control Center
- Long-press the Screen Record Button: Hold your finger on it for a second until a menu appears
- Tap the Microphone Icon: It turns red when active, indicating your microphone is now on
- Tap Start Recording
- Wait for the 3-second countdown and begin.
Please NOTE: The microphone setting resets every time you stop recording. Therefore, you must re-enable it manually at the start of each new recording session; it does not stay on between recordings. Beyond that, recording in a quiet environment yields significantly cleaner audio, since the microphone picks up ambient sounds, including fans, traffic, and background noise.
Method 3: Camera Overlay (iOS 18.3 and Later)
Apple introduced a picture-in-picture camera overlay in iOS 18.3. You can now show your face in a small circular window over your screen recording.
Long-press the Screen Record button, enable the camera toggle next to the microphone, and your front-facing camera feed will appear as an overlay during the recording. This feature is particularly useful for app tutorials and content creation, where viewers benefit from seeing your reactions alongside the screen.
iOS 18 and iOS 26 Improvements Worth Knowing

iOS 18.3 brought three significant upgrades to screen recording that make the feature noticeably more capable. The upgrades include:
- Stereo Audio Recording: Your iPhone now uses multiple built-in microphones to automatically capture stereo sound. No settings change is needed; if you’re on iOS 18.3 or later, stereo microphone recording is active by default. This makes a real difference for recording music apps, games, or any content where audio quality matters.
- HDR Recording: Previously, your iPhone recorded HDR content in standard dynamic range, washing out colors. As of iOS 18.3, HDR video and photos are recorded in full HDR quality, preserving the complete color range.
- Camera Overlay: Your front camera now appears as a picture-in-picture window during recordings. Together, these three updates make the built-in recorder a genuinely capable tool for content creators.
If your iPhone is running an older version, our iOS 26 guide covers all the latest updates and what’s changed in Apple’s current release. Additionally, for details on the latest beta features, our iOS 26.3 beta breakdown is worth a read.
Where to Find Your Screen Recordings
Every screen recording saves automatically to the Photos app; you don’t need to do anything to save it manually. To find it, open Photos and tap Albums → Recents. Your most recent recording appears at the top. Alternatively, tap the Search tab in Photos, then type “Screen Recording” to filter for your recordings.
Screen recordings save as MP4 files (H.264 encoding). There is no built-in time limit on how long you can record; the only constraint is your available storage. Consequently, before starting a long recording session, go to Settings → General → iPhone Storage to confirm you have enough free space. A 5-minute screen recording typically uses 100 to 200MB, depending on screen activity and resolution.
To share a recording, open it in Photos and tap the Share icon. From there, you can AirDrop it to another Apple device, send it via Messages or Mail, save it to Files, or upload it directly to any cloud service. For large files, AirDrop is the fastest method, as it transfers at full quality without compression.
How to Screen Record With Audio: The Full Picture
Understanding the two distinct audio sources in iPhone screen recordings helps you get exactly the result you want every time.
- System Audio: These are sounds generated by apps, games, music players, and videos and are recorded automatically in every screen recording without any extra steps.
- Microphone Audio: This is your voice and ambient environmental sound, and it is recorded only when you specifically enable it through the long-press menu before each recording session.
For recording phone or video calls alongside your screen, consent requirements apply. In addition, recording a phone call without the other person’s knowledge is illegal in many regions and carries serious legal consequences.
Our “How to record a phone call on iPhone” guide covers the legal landscape and the correct technical method in detail. For FaceTime specifically, Apple does not block screen recording of FaceTime calls, but the other person receives a notification that you’ve taken a screenshot or recording. You should, therefore, factor that into your decision before you start.
Screen Recording on Different iPhone Models
iPhone Model | Control Center Access | Screen Recording Indicator | Notes |
iPhone 16 / 15 / 14 / 13 | Swipe down from the top-right | The Dynamic Island pill turns red | Camera overlay available (iOS 18.3+) |
iPhone 12 / 11 / X / XS / XR | Swipe down from the top-right | Red status bar at top | Standard screen recording |
iPhone SE (all generations) | Swipe up from the bottom | Red status bar at top | Home button model |
iPhone 8 and Earlier | Swipe up from the bottom | Red status bar at top | Must update to iOS 11 minimum |
The most common point of confusion is the Control Center gesture.
- Face ID iPhones: Everything from the iPhone X onward uses a swipe down from the top-right corner.
- Home Button iPhones: iPhone 8, iPhone SE, and earlier models use a swipe up from the bottom edge.
If you’re unsure which model you have, go to Settings → General → About to see your exact model name.
Screen Recording With QuickTime on Mac
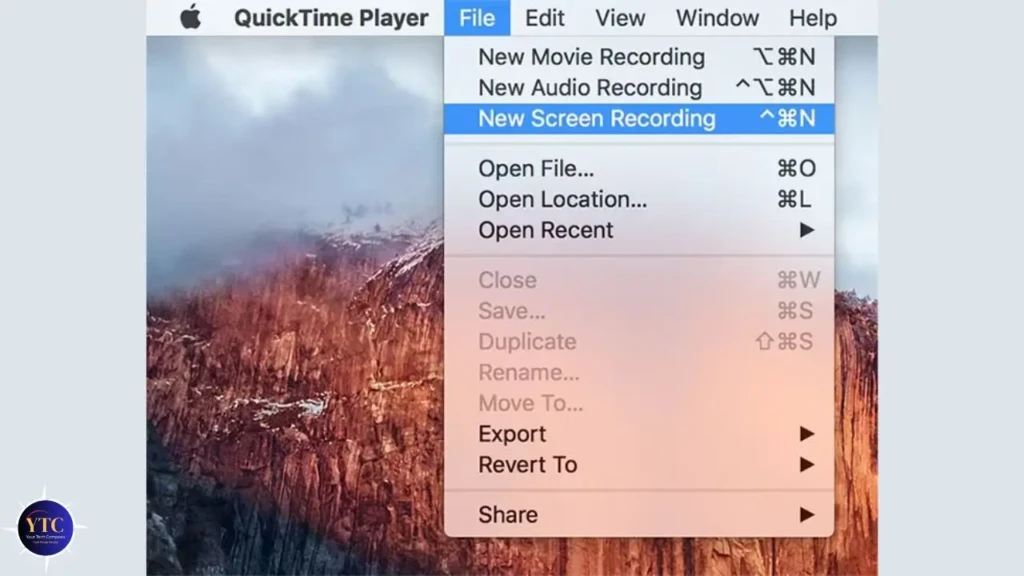
QuickTime Player on your Mac offers a high-quality alternative for capturing your iPhone screen. It’s particularly useful for professional demos, app previews, and recordings where you want more control over editing afterward.
Connect your iPhone to your Mac via USB cable, then trust the computer when prompted on your iPhone. Next, open QuickTime Player, go to File → New Screen Recording, click the dropdown arrow next to the record button, and select your iPhone from the list. Your iPhone screen appears in QuickTime at full resolution, and you can record it without any time or storage limitations on the iPhone itself.
This method produces the highest-quality output of any screen recording approach, captured directly at native resolution without compression. Moreover, QuickTime saves the recording to your Mac rather than your iPhone, which is particularly practical for long recordings that would otherwise fill your phone’s storage.
For Mac users who want to extend this workflow further, the Windows for Mac guide covers related device management tools worth knowing about.
Common Problems and How to Fix Them
Screen Record Button Missing from Control Center
You haven’t added it yet. On iOS 18 and later, open Control Center, tap the + icon, and add Screen Recording. On iOS 17 and earlier, go to Settings → Control Center and add it from the More Controls list.
No Sound in the Recording
Check two things.
First, confirm whether you need microphone audio or system audio. System audio is recorded automatically, but microphone audio requires manual activation via a long-press before each session. Second, some apps (Spotify, Apple Music, and certain streaming services) block audio capture due to DRM, which cannot be overridden.
Recording Shows a Black Screen
The app you’re trying to record has DRM protection. Netflix, Disney+, Apple TV+, and most banking apps block screen capture at the system level. No workaround exists for DRM-protected content; this is by design and applies to every iPhone and iOS version.
Recording Stops Automatically
Your storage is likely full. Go to Settings → General → iPhone Storage and free up space by deleting unused apps, old photos, or large video files. Additionally, Low Power Mode throttles background processes and can interrupt recordings; disable it before long recording sessions.
Screen Time is Blocking the Feature
If Screen Recording doesn’t appear as an option even after adding it, Screen Time restrictions may be blocking it. Go to Settings → Screen Time → Content & Privacy Restrictions → Content Restrictions, scroll to Game Center, tap Screen Recording, and set it to Allow.
Recording Quality Looks Poor After Sharing
The recording itself is full quality; the issue is compression during sharing. iMessage compresses video automatically. Therefore, to share without loss of quality, use AirDrop, save to Files, and share via a cloud link, or use the Files app to transfer the original MP4 directly.
Tips for Better Screen Recordings
A few practical habits consistently produce cleaner, more professional recordings without any extra tools.
- Enable Do Not Disturb Before You Start: Incoming calls, messages, and notifications appear on screen during a recording, interrupting your audio. Swipe up to open Control Center, then tap Focus or Do Not Disturb to block them before tapping record.
- Check Your Storage First: Running out of storage mid-recording can stop the capture without warning and potentially corrupt the file. Beyond that, if your iPhone has been running hot before a recording session, give it a few minutes to cool down. In addition, thermal throttling on an overheating device degrades recording quality and can cause the recording to stop unexpectedly. The iPhone overheating guide covers exactly what causes this and how to address it before it affects your recordings.
- Edit Directly in Photos: You don’t need a third-party app to trim the start and end of your recording. Open the video in Photos, tap Edit, and drag the yellow handles on the timeline to trim. Additionally, tap Adjust to correct brightness and contrast, or apply filters if you’re creating tutorial content with a specific visual style.
For more iPhone how-to guides covering features most users overlook, our tech guides section covers the full range of topics.
FAQs
Not by default. System audio (sounds from apps and media) records automatically. To capture your voice, long-press the Screen Record button in Control Center, enable the Microphone, and then start recording. The microphone setting must be re-enabled before each new recording session.
The app you’re recording has DRM protection. Netflix, Disney+, Apple TV+, and most banking apps block screen capture at the system level. No workaround exists; this is intentional and applies to all iPhone models and iOS versions.
Long-press the Screen Record button in Control Center before starting. Tap the Microphone icon until it turns red, then tap Start Recording. System audio is recorded automatically without any extra steps; only the microphone audio requires manual activation.
All recordings save automatically to the Photos app. Find them in Albums → Recents, or search “Screen Recording” in the Photos search tab. They save as MP4 files and remain in Photos until you delete them manually.
Yes, Apple does not block FaceTime screen recording. However, the other person receives a notification that you’ve recorded. Always inform the other person before recording any video call, and check the legal requirements for call recording in your region.
No built-in time limit exists. You can record for as long as your storage allows. A 5-minute recording uses approximately 100 to 200MB, so check your available storage before long sessions in Settings → General → iPhone Storage.
Conclusion
Screen recording on iPhone is one of the most useful features built into iOS, and now you know exactly how to use every aspect of it. For most everyday use cases, the two-step workflow covers everything: add the button to Control Center, long-press to enable the microphone if you need it, tap record, and stop when you’re done. The recording saves to Photos automatically, ready to be trimmed, shared, or used however you need.
The only limitations worth remembering are the ones you can’t work around: DRM-protected content will always record as a black screen, and storage runs out without warning if you don’t check it beforehand. Beyond those two things, the built-in recorder handles every other use case cleanly. Enable Do Not Disturb before you start, and test a short clip first to confirm your audio settings are correct; you’ll have a clean, usable recording every time.
For more tech guides and honest reviews, visit YourTechCompass.