I want to start with a confession: I almost wrote this guide using the same steps I’d used for years: tap a contact’s name in Messages, hit “Share My Location,” done. Then I tried it on a freshly updated iPhone and discovered the option simply wasn’t there the way I remembered it. iOS 26 quietly restructured how location sharing works, and if you’ve been following an older guide, including, frankly, the version that used to sit on this page, you’ve likely run into the same confusion. The good news is that once you understand the new path, sharing your location is still genuinely simple. It just requires one extra step that didn’t exist before.
This guide covers every reliable way to share your location on a current iPhone: Find My for ongoing live tracking, Messages for quick one-off sharing, Apple Maps for sharing your ETA while driving, and Check In, Apple’s dedicated safety feature that most people have never properly set up, despite it being exactly the tool built for “let me know you got home safe.” I’ll walk you through the current step-by-step process for each method, how to stop sharing when you’re done, and what to do when something isn’t working as expected.
What You Need Before Sharing Location on iPhone
Before any of the methods below will work, four things need to be in place. Skipping this checklist is the source of most “location sharing isn’t working” problems people run into.
Turn On Location Services
Go to Settings → Privacy & Security → Location Services and confirm the toggle at the top is switched on. Without this, none of the sharing methods below will work, regardless of which app you’re using.
Confirm Find My Is Enabled and Share My Location Is On
Go to Settings → [your name] → Find My, and make sure Share My Location is toggled on. This single setting is the foundation that Find My, Messages, and Maps location sharing all build on; if it’s off, sharing attempts will fail silently or prompt you to turn it on mid-process.
Sign In to Your Apple ID and Have iCloud Active
Location sharing is fundamentally an iCloud-powered feature. If you’re not signed in or iCloud is experiencing a sync issue, sharing won’t propagate to the other person’s device, even if everything else appears to be configured correctly on your end.
Have a Stable Internet Connection
Wi-Fi or cellular data is required for live location updates to actually transmit. A one-time location pin can sometimes send over a weak signal, but ongoing Live Location sharing needs a consistent connection to keep updating.
Once all four are confirmed, you’re ready to use any of the methods below.
How to Share Location on iPhone Using Find My (Best for Ongoing Sharing)
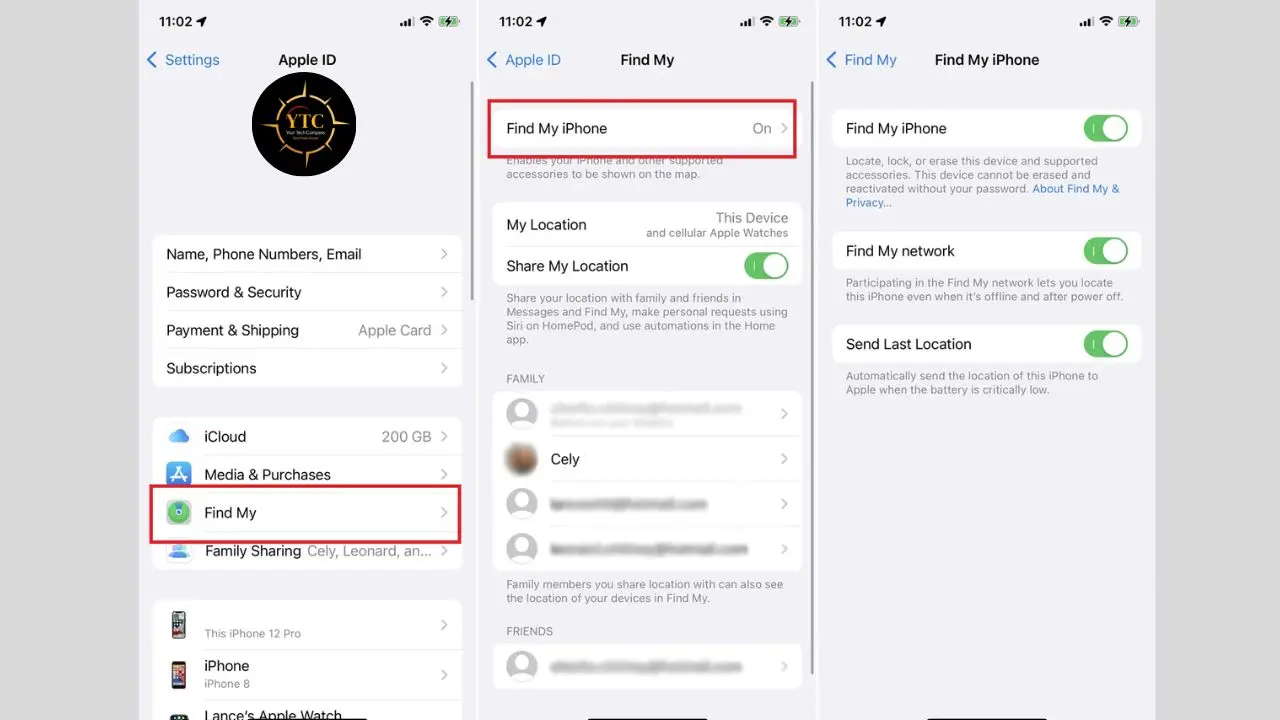
Find My is the most direct and reliable way to share your live location with someone for an extended period: a family member, a partner, or a close friend you want to stay visible to over time.
Step 1: Open the Find My app.
Step 2: Tap Me at the bottom of the Screen.
Step 3: Turn on Share My Location if it’s not already enabled.
Step 4: Tap People.
Step 5: Tap the add button, then choose Share My Location.
Step 6: Select the contact you want to share with. If this is your first time sharing with them, you may be prompted to send them a Find My invitation first; they’ll need to accept it before your location appears on their end.
Step 7: Choose a duration:
- Share for One Hour
- Share Until End of Day
- Share Indefinitely
Step 8: Tap Send.
The recipient receives a notification and can see your live location update in real time in their Find My app. This is the method to use when you want someone to be able to check in on your location whenever they want, rather than receiving a single update.
How to Share Location on iPhone Using Messages: The Updated iOS 26 Process
This is the section where the workflow genuinely changed, and it’s worth understanding exactly what’s different.
The Old Method (No Longer Works This Way)
Previously, you could open a conversation, tap the contact’s name at the top, and a Share My Location option would appear directly. As of iOS 26, that direct path has been restructured around Find My’s friend-based system, meaning Messages location sharing now routes through the same “add as a Find My friend” relationship that the Find My app itself uses.
The Current Method for Live Location Sharing
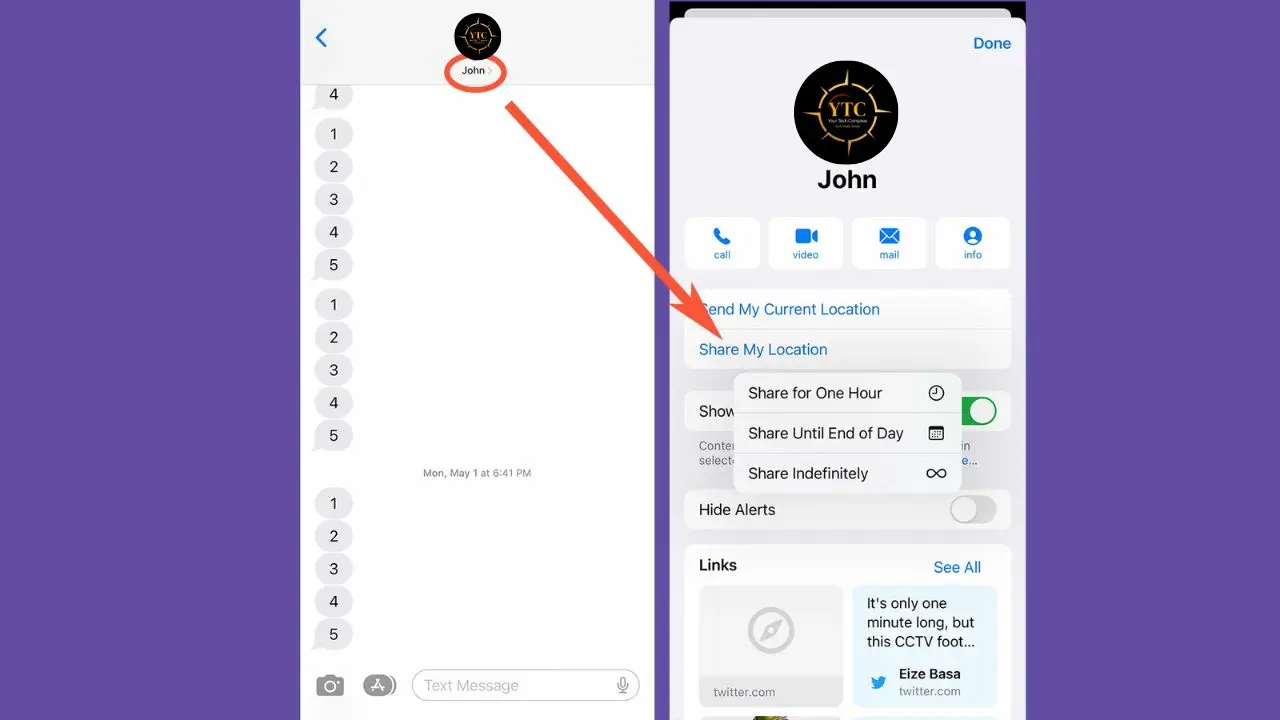
Step 1: Open the Messages app and open your conversation with the person.
Step 2: Tap the contact’s name or profile photo at the top of the conversation.
Step 3: Tap Share My Location. If you haven’t previously connected with this person through Find My, you’ll be prompted to send a Find My sharing request first. This is the new required step that wasn’t part of the process before iOS 26.
Step 4: Once the connection is established, choose your sharing duration: One Hour, Until End of Day, or Indefinitely.
If you’re sharing with someone you message regularly and already have an established Find My connection, this process feels almost identical to what you did before. The friction only shows up the first time you share with a new contact.
The Current Method for a One-Time Location Pin
If you just want to send your current location once (no ongoing tracking, just a snapshot), the process is genuinely simpler and hasn’t changed as dramatically:
Step 1: Open your conversation in Messages.
Step 2: Tap the Plus button next to the text field.
Step 3: Tap Location.
Step 4: Tap the Map Pin button, then tap Send Pin.
Step 5: Send your message.
This drops a single map pin showing exactly where you are right now, with no ongoing location updates. The recipient can tap on it for more details and even get directions to that spot, but they won’t see you move after that. It’s a snapshot, not a live feed.
How to Share Location on iPhone Using Apple Maps (Best While Driving or Navigating)
Apple Maps location sharing works best when you’re already navigating somewhere and want someone to track your progress and ETA in real time.
Step 1: Open Apple Maps and enter your destination.
Step 2: Tap Go to begin navigation.
Step 3: Tap the route bar at the bottom of the screen.
Step 4: Select Share ETA.
Step 5: Choose the contact you want to share your estimated arrival time with.
The recipient sees your real-time progress along the route and your estimated arrival time, which updates automatically if traffic or your route changes. This is the right method specifically for “I’m on my way” situations: picking someone up, heading to a meeting, or letting a family member track a road trip, rather than general ongoing location visibility.
Check In: The Safety Feature Most People Never Set Up
This is the method most directly built for the exact scenario this guide opened with: letting someone know you arrived safely. Check In was introduced in iOS 17 and has been refined in subsequent updates, but it remains genuinely underused relative to its usefulness.
Unlike standard location sharing, Check In is designed specifically around a single trip with a clear endpoint: walking home at night, a solo road trip, a first date, or any situation where you want a safety net without leaving live tracking running indefinitely.
How It Works
When you start a Check In with a chosen contact, your iPhone automatically monitors your trip. If you arrive at your expected destination on time, Check In ends automatically, and your contact is notified that you made it, without you needing to send a single message. In addition, if you don’t arrive as expected, or if your phone loses battery or signal, your iPhone automatically shares your last known location, battery level, and cell service status with your chosen contact, so they have real information to act on rather than just silence.
To Start a Check In:
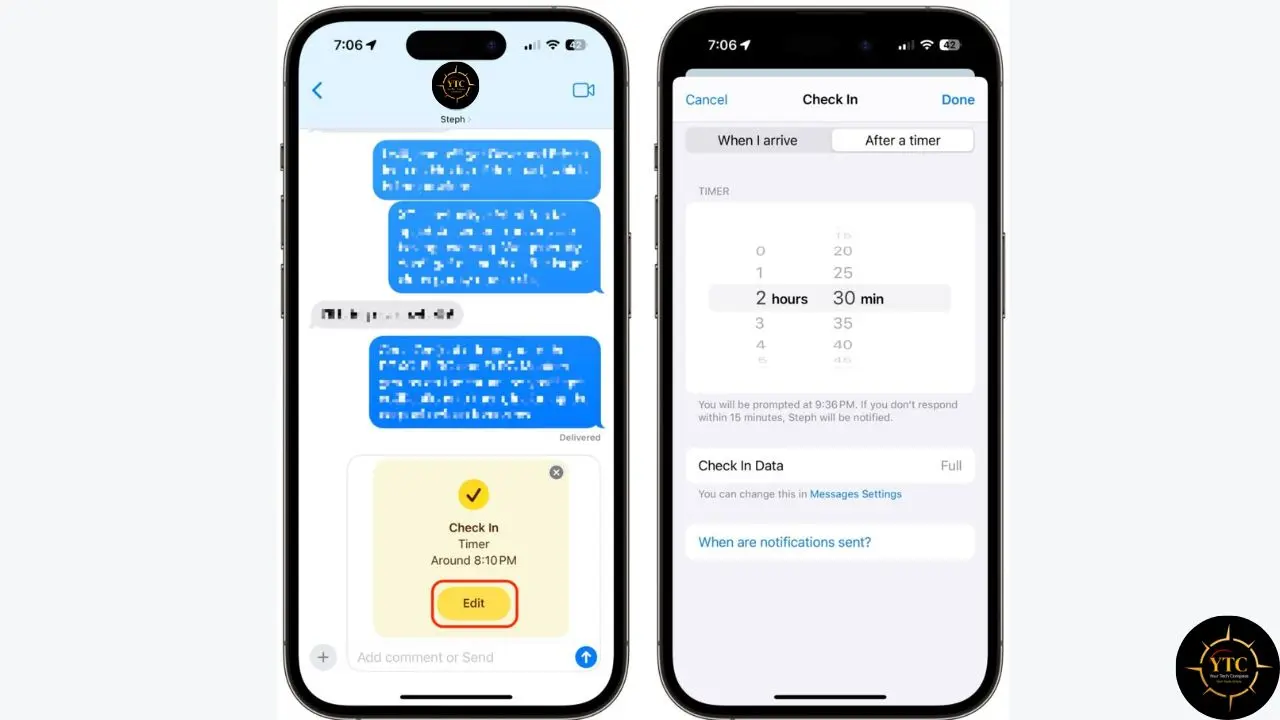
Step 1: Open Messages and select the conversation with the person you want to notify.
Step 2: Tap the Plus button next to the text field.
Step 3: Tap Check In.
Step 4: Confirm your destination and expected arrival details, then send.
Check In is the feature I’d actively recommend over standard indefinite location sharing for most “let someone know I’m safe” scenarios because it’s purpose-built for exactly that. It ends automatically, shares more useful safety information if something goes wrong, and doesn’t require you to remember to stop sharing afterward.
How to Stop Sharing Location on iPhone
Whichever method you used to start sharing, stopping it is straightforward, though the path depends on where you initiated it.
Stop Sharing via Find My
Step 1: Open Find My and tap People. Step 2: Select the contact. Step 3: Tap Stop Sharing My Location.
Stop Sharing via Messages
Step 1: Open the conversation. Step 2: Tap the contact’s name. Step 3: Tap Stop Sharing My Location.
Stop Sharing With Everyone at Once
If you want to disable location sharing entirely rather than ending it with one specific person:
Step 1: Go to Settings → [your name] → Find My. Step 2: Turn off Share My Location.
This immediately stops your location from being visible to anyone you’d previously shared it with, across both Find My and Messages.
Temporary vs Indefinite Sharing: Which to Choose
Sharing Option | Best Use Case | Privacy Level |
One Hour | Quick meetups, short errands | High (auto-expires fast) |
Until End of Day | Travel days, events, festivals | Moderate |
Check In | Solo trips, walking home, safety-critical single journeys | High (self-terminating, purpose-built) |
Indefinitely | Immediate family, long-term partners, trusted close contacts | Lower (requires manual review) |
Temporary sharing options give you meaningfully more privacy by design, since they expire without you needing to remember to turn them off. Indefinite sharing is appropriate for the small circle of people you’d genuinely want to be able to see your location at any moment, but it’s also the option most worth periodically auditing, since it’s easy to set up once and forget it’s still running months later.
Privacy and Safety Considerations

A few habits keep location sharing working for you rather than becoming a quiet privacy liability.
- Review Who You’re Sharing with Regularly: Open the People tab in Find My every so often and check the full list of people who currently have indefinite access to your location. It’s common to discover you’re still sharing with someone (an old roommate, a past situation) long after the original reason for sharing has ended.
- Default to Temporary Sharing Unless You Have A Specific Reason Not to: Indefinite sharing should be the exception, reserved for genuinely close, ongoing relationships, not the default setting you reach for out of convenience.
- Know That Hardware Issues Can Disrupt Location Accuracy Too: If your shared location starts behaving oddly (jumping around, freezing, or simply not updating), it isn’t always a software problem. Conditions like iPhone overheating can genuinely disrupt GPS and background location services, since the chip throttles certain background processes to manage heat. Similarly, if you’re somewhere with limited cellular coverage, understanding what SOS means on your iPhone is worth knowing, since a phone showing SOS has lost its normal carrier connection, which directly affects how reliably live location updates can be transmitted.
- Use Safety Check If You Need To Cut Off All Sharing Immediately: Apple’s Safety Check feature, found in Settings under Privacy & Security, lets you instantly stop all location sharing and reset access permissions across your device in one action, designed specifically for situations where you need to quickly and completely reclaim your privacy, such as leaving an unsafe relationship.
Troubleshooting Location Sharing Issues
If sharing isn’t working as expected, work through these steps in order.
- Confirm Location Services are genuinely on. Do this by going to Settings → Privacy & Security → Location Services. This is the single most common cause of sharing failures and the easiest to overlook because it’s easy to assume it’s already enabled.
- Check that Find My → Share My Location is enabled. This is the master toggle that both Find My and Messages location sharing depend on.
- Verify that you’re signed in to iCloud correctly. A signed-out or improperly synced iCloud account will cause sharing to fail silently without a clear error message.
- Confirm you selected the right contact and that they’ve accepted any pending Find My request. Since iOS 26 introduced the friend-request-based sharing flow for Messages, a pending, unaccepted request is a common reason sharing may not appear to work. Your contact needs to actively accept before your location becomes visible to them.
- Restart your iPhone if location updates appear to be lagging. A simple restart resolves a surprising number of stuck or delayed location-sharing sessions by clearing whatever background process is causing the issue.
- If Messages shows a different location than Find My, trust Find My. Find My pulls more consistently from your device’s live location services and updates more reliably than the cached location sometimes shown inside a Messages conversation thread.
FAQs
This guide covers the iOS 26 workflow change. Apple restructured Messages location sharing to route it through Find My’s friend-connection system rather than offering a standalone option directly in a conversation. You’ll still find Share My Location by tapping the contact’s name at the top of the conversation, but if you haven’t previously connected with them through Find My, you’ll be prompted to send a connection request before sharing can begin.
Share My Location creates ongoing, live tracking that updates continuously for whatever duration you choose: one hour, until the end of the day, or indefinitely. Send My Current Location (or dropping a pin) sends a single snapshot of your current location, with no further updates; the recipient sees exactly one location and nothing more.
Check In is Apple’s dedicated safety feature for single trips with a clear endpoint. Unlike standard location sharing, it ends automatically once you arrive safely, and if you don’t arrive as expected, it automatically shares your last known location, battery level, and cell signal status with your chosen contact, giving them more actionable safety information than standard sharing would. It’s purpose-built for situations like walking home alone or a solo road trip.
Generally yes. When you tap Stop Sharing My Location, the recipient’s Find My app will simply no longer show your live location, and most users will notice the entry disappear or stop updating. Apple doesn’t send an explicit “this person stopped sharing with you” notification, but the absence of updates is typically noticeable fairly quickly.
Yes, modestly. Ongoing Live Location sharing requires your iPhone to periodically check and transmit GPS data, which does use some additional battery compared to having location sharing off entirely. The effect is generally small for short-duration sharing (one hour, or even a full day), but indefinite sharing with multiple contacts simultaneously is the configuration most likely to have a noticeable cumulative impact on battery life over time.
Find My pulls directly and consistently from your device’s live location services, while the location displayed inside a Messages conversation can sometimes reflect a cached snapshot from when sharing was first established, particularly if there’s been a connectivity gap. If the two ever disagree, Find My is the more reliable and current source.
Conclusion
Once you understand the current iOS 26 workflow, particularly the new requirement to establish a Find My connection before Messages location sharing works as it used to, sharing your location on iPhone is still genuinely simple. Find My remains the right tool for maintaining long-term visibility with people you trust. Messages handle the quick, casual moment of “here’s exactly where I am right now.” Apple Maps is built for the specific “I’m on my way” scenario where someone needs to track your progress, not just your final destination. And Check In deserves far more attention than it typically gets, because it’s the one feature in this entire guide actually engineered around the exact use case most people reach for location sharing in the first place: making sure someone knows you got home safe, without you having to remember to send that text yourself.
If there’s one habit worth taking from this guide beyond the step-by-step instructions, it’s the periodic audit: open Find My every so often and actually check who has indefinite access to your location. Most people set sharing up once for a specific reason and then forget it’s still running. A few minutes of review every few months keep your location sharing working as a genuine convenience rather than a quiet, forgotten privacy gap.
There’s always more to learn about getting the most out of your iPhone safely and efficiently. Visit YourTechCompass.com for more practical, up-to-date guides on the tech you use every day.