

You press the power button, lean back in your chair, and wait. And wait. The Windows logo appears, the spinning dots circle endlessly, and by the time your desktop finally loads, apps are already fighting each other for resources before you’ve had a chance to open a single window. A Windows 11 PC that takes two minutes to reach a usable state isn’t just annoying; it’s a fixable problem that most people never fully address because they try one or two things, don’t see dramatic results, and give up. The truth is that a slow Windows 11 startup is almost never caused by a single issue. It’s the result of several small problems compounding each other: too many startup apps, outdated drivers, a fragmented or nearly full drive, and system settings that were never configured for performance.
I’ve organized every proven fix into a logical order, from the fastest, lowest-effort changes to the more involved solutions you try when the basics aren’t enough. A healthy Windows 11 PC on an SSD should reach a usable desktop in 15–30 seconds. On a traditional hard drive, 45–90 seconds is the realistic target. If you’re sitting significantly above those numbers, at least one of the fixes in this guide will measurably reduce your boot time. Work through them in order, restart after each one, and stop when your startup feels right again.
Understanding Why Windows 11 Boots Slowly
Before jumping into fixes, it helps to understand what Windows 11 is actually doing during startup, because that understanding will tell you which fix is most likely to help in your specific situation.
When you press the power button, your PC’s firmware (BIOS or UEFI) runs a Power-On Self-Test, checks for bootable storage, and hands control over to Windows. Windows then loads the kernel, initializes hardware drivers, starts system services, and finally loads your user profile and any programs set to run at startup. All of this happens in sequence and in parallel, so any bottleneck in the chain delays everything that follows.
The most common causes of slow Windows 11 startup, ranked by how frequently they’re responsible:
- Too many startup apps running automatically are the most common cause by far.
- Slow or nearly full storage, especially traditional HDDs, where boot times are structurally slow.
- Outdated or incompatible drivers, particularly display, storage controller, and chipset drivers.
- Corrupted system files can cause Windows to retry failed operations repeatedly during boot.
- Malware or unwanted background services consuming CPU and disk before you reach the desktop.
- Wrong power plan or BIOS settings. Easy to fix and frequently overlooked.
- Fast Startup conflicts. Counterintuitively, this feature sometimes causes boot problems rather than solving them.
The diagnostic approach is to identify which of these applies to you before committing to the most time-consuming fixes. That’s exactly what the next section helps you do.
How to Fix Slow Startup on Windows 11
Measure Your Current Boot Time (Do This First)
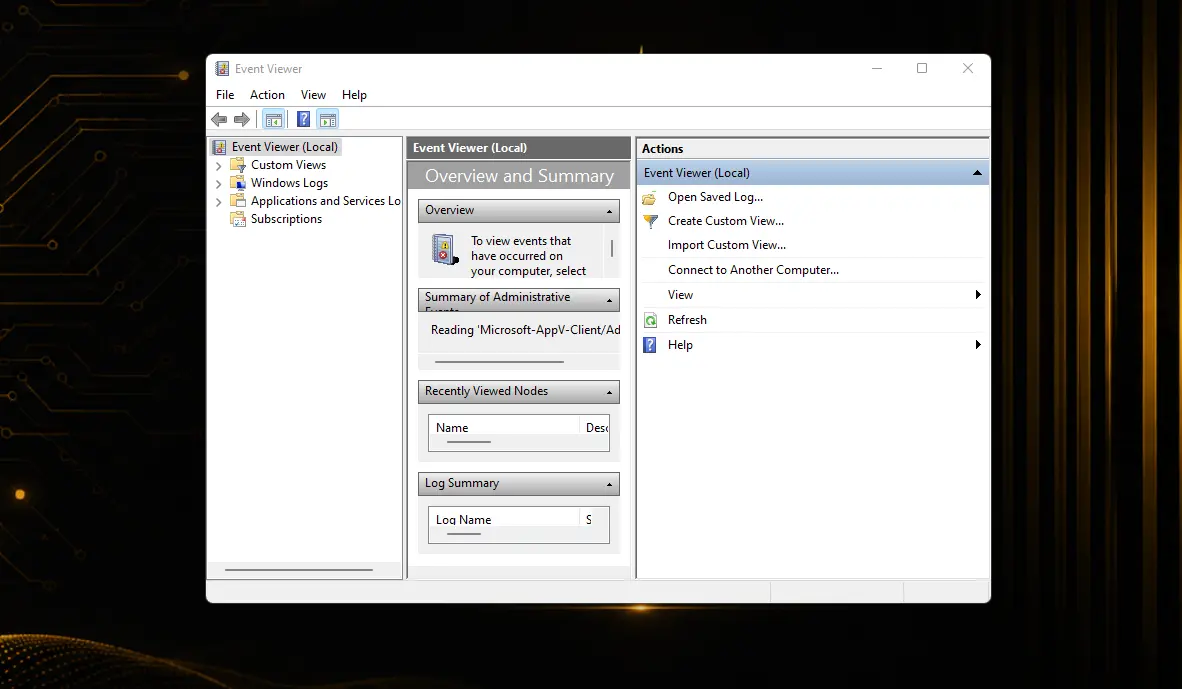
Before changing anything, establish a baseline so you know whether your fixes are actually working. Windows 11 records detailed boot time data in Event Viewer. Here’s how to check it.
Step 1: Press Windows + R, type eventvwr.msc, and press Enter. Event Viewer opens.
Step 2: In the left panel, navigate to Applications and Services Logs → Microsoft → Windows → Diagnostics-Performance → Operational.
Step 3: Look for Event ID 100 entries. These events record the total boot duration in milliseconds. Divide by 1,000 to get seconds. A reading above 30,000ms (30 seconds) on an SSD system indicates a performance problem worth fixing.
This takes three minutes to check and gives you a concrete number to compare against after applying fixes.
Identify What’s Slowing Boot: Task Manager Diagnosis
Task Manager is your first diagnostic tool before you start changing settings. It shows which startup apps have the highest impact on boot time, so you can prioritize what to fix.
Step 1: Press Ctrl + Shift + Esc to open Task Manager.
Step 2: Click Startup apps in the left sidebar (Windows 11) or the Startup tab (older builds).
Step 3: Click the Startup impact column header to sort by impact. All apps marked High consume significant boot time.
This list tells you exactly where to look first. Before you change anything, scan the High Impact list and note which apps you actually need at boot versus which ones are just launching out of habit.
Fix 1: Disable Unnecessary Startup Apps
This is the fastest fix and the one that delivers the biggest improvement for the most people. Most PCs have 10–20 programs launching at boot, even though only 3–4 are actually needed, and most users see a 20–40% improvement just by disabling 5–8 startup apps.
From Task Manager:
Step 1: With Task Manager open on the Startup apps tab, right-click any High Impact app you don’t need at boot and select Disable. Disabling doesn’t uninstall the app; it simply stops it from launching automatically. You can still open it manually whenever you want.
Safe to disable: Spotify, Discord, Steam, Teams, Skype, OneDrive, Adobe apps, iTunes, Zoom. Do NOT disable: antivirus software, audio drivers (Realtek), and GPU control panels.
From Windows Settings (Catches Apps Task Manager Misses):
Step 1: Press Windows + I to open Settings.
Step 2: Go to Apps → Startup.
Step 3: Toggle off any app you don’t need at boot.
Use both methods; some apps appear in one list and not the other. After disabling everything non-essential in both places, restart your PC and check Task Manager again. Your startup impact list should be significantly shorter.
Fix 2: Enable (or Reconsider) Fast Startup
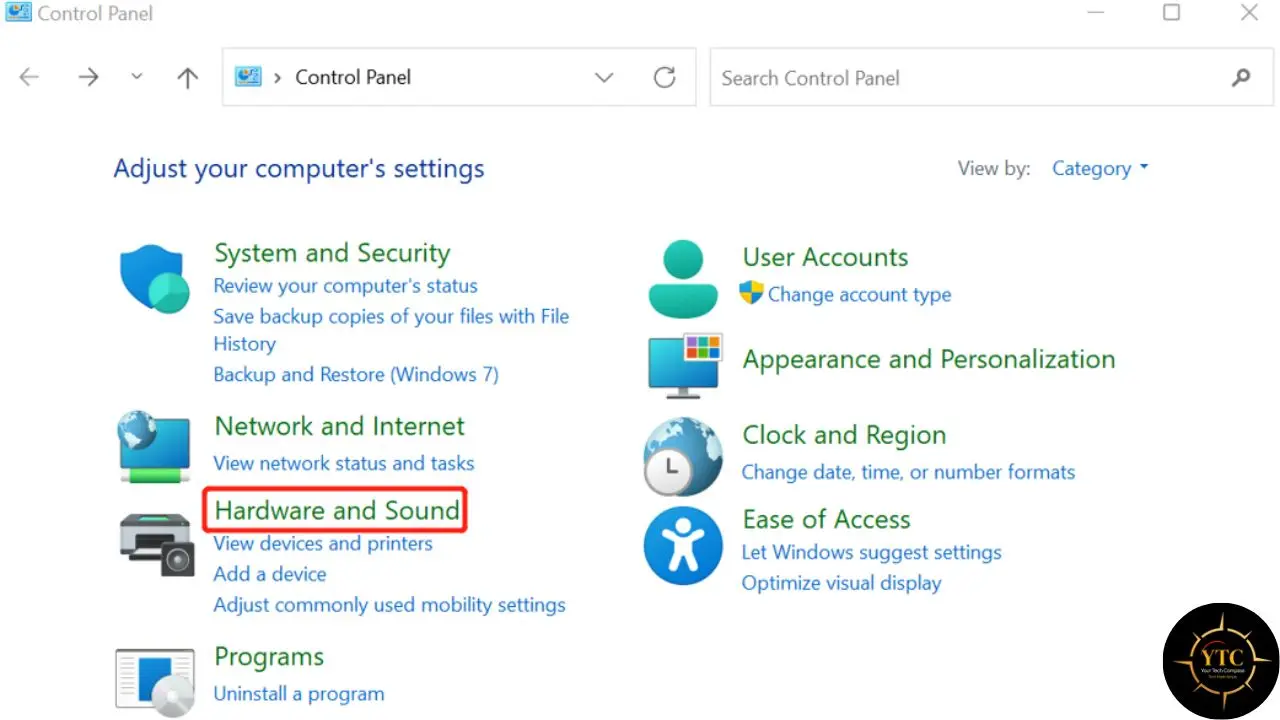
Windows Fast Startup is a hybrid sleep/shutdown mode that saves part of your system state when you shut down, allowing Windows to reload from that saved state on the next boot rather than starting completely from scratch. For most users, it reduces boot time. However, it’s not always the right choice.
How to Enable Fast Startup
Step 1: Open Control Panel (search for it in the Start menu).
Step 2: Click Hardware and Sound → Power Options.
Step 3: Click Choose what the power buttons do in the left sidebar.
Step 4: Click Change settings that are currently unavailable.
Step 5: Check the box next to Turn on fast startup (recommended) and click Save changes.
The Honest 2026 Caveat
In 2026, almost every PC is running a solid-state drive. With an SSD, cold boot times are already extremely short, and the amount of time you actually save by using Fast Startup on modern hardware is barely noticeable. The real issue is that Fast Startup isn’t a true shutdown; when you click Shut Down with Fast Startup enabled, the Windows kernel stays partially loaded, and drivers are kept in their current state. That sometimes introduces problems.
If your startup is slow and Fast Startup is enabled, try temporarily disabling it. Some users find that their boot time actually improves after turning it off, particularly on systems where drivers don’t initialize cleanly from a partially saved state. If it makes no difference or worsens performance, re-enable it.
Fast Startup and Dual-Boot
If you run both Windows and Linux on the same machine, disable Fast Startup. The partially hibernated Windows state can prevent Linux from cleanly mounting the Windows partition, leading to file system errors.
Fix 3: Update Windows and All Device Drivers
Outdated drivers are a hidden and frequently underestimated contributor to slow Windows 11 startup. Display and chipset drivers load early in the boot sequence, so an outdated or buggy version can stall startup before you reach the desktop. Updating them often improves both boot time and overall responsiveness.
How to Update Windows
Step 1: Press Windows + I to open Settings.
Step 2: Go to Windows Update and click Check for updates.
Step 3: Install everything available, including optional updates. Restart afterward.
How to Update Device Drivers
Step 1: Right-click the Start button and select Device Manager.
Step 2: Expand the following categories and update each:
- Display adapters (your graphics card)
- Network adapters
- Storage controllers (your SSD or HDD controller)
- System devices (chipset)
Step 3: Right-click each device → Update driver → Search automatically for drivers.
Manufacturer-specific drivers are often better than what Windows finds automatically. For graphics cards, install the latest drivers directly from NVIDIA, AMD, or Intel’s website rather than relying on Windows Update. For chipset and storage controller drivers on laptops, your manufacturer’s support page (HP Support Assistant, Lenovo Vantage, Dell Update) typically provides more optimized versions.
Fix 4: Adjust Your Power Plan
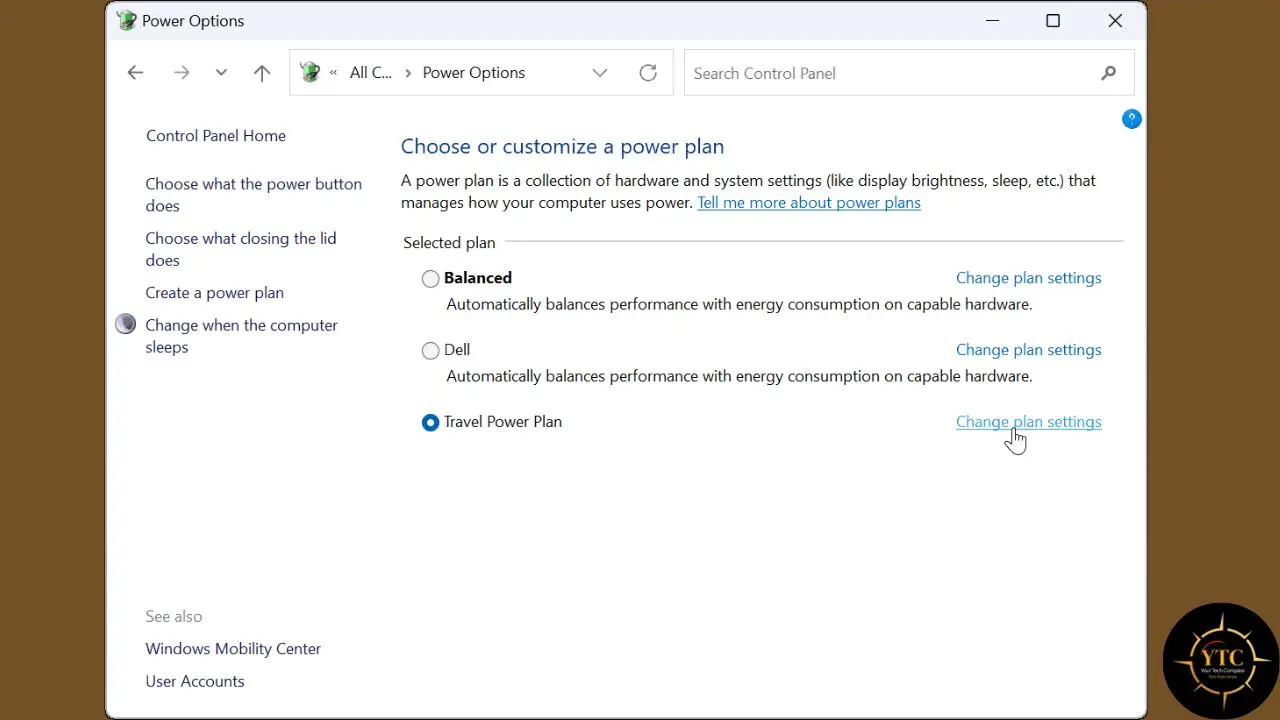
This fix surprises many people because it feels unrelated to startup speed. But your Windows power plan affects how aggressively the CPU ramps up during boot, and a system set to Power Saver mode limits processor performance to conserve energy, including during startup.
Step 1: Open Control Panel → Hardware and Sound → Power Options.
Step 2: Select Balanced if you’re on a laptop and want a good balance between energy and performance.
Step 3: On a desktop or plugged-in laptop where battery life isn’t a concern, select High Performance for the fastest possible processor ramp-up during boot.
You won’t see a dramatic improvement on modern hardware with this change alone, but combined with the other fixes in this guide, eliminating the Power Saver bottleneck during startup contributes to a faster overall boot sequence. If you don’t see these options, some manufacturers hide power plans. You can restore them by opening Command Prompt as Administrator and running:
powercfg -duplicatescheme 8c5e7fda-e8bf-4a96-9a85-a6e23a8c635c
This restores the High Performance plan if it’s been hidden.
Fix 5: Scan for Malware
Malware frequently sets itself to launch at startup and runs hidden background processes, both of which slow down boot and degrade overall speed. A full scan rules this out before you move on to harder fixes.
Here’s how to do it:
Step 1: Press Windows + S and search for Windows Security. Open it.
Step 2: Click Virus & threat protection.
Step 3: Under Current threats, click Scan options.
Step 4: Select Full scan and click Scan now.
A full scan is more thorough than the default Quick Scan. It takes longer (sometimes 30–60 minutes on a large drive), so run it when you don’t need the PC for an hour.
If Windows Security finds and removes anything, restart immediately and test your boot time. Malware removal alone can restore normal startup behavior on affected systems.
Fix 6: Free Up Disk Space and Run Storage Optimization
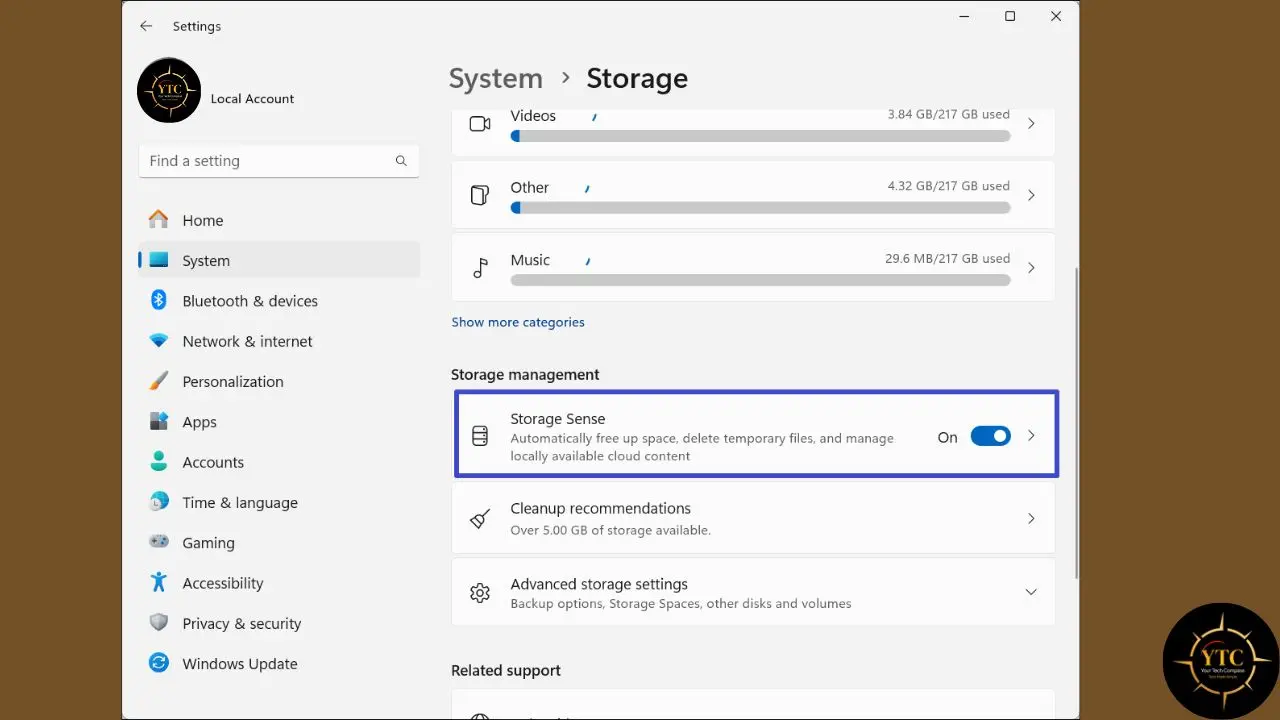
Low disk space creates a cascading performance problem. Windows needs free space for temporary files, the page file, system caching, and background operations. When available space drops below 10–15% of your total drive capacity, startup becomes noticeably slower.
How to Free Up Space with Storage Sense
Step 1: Open Settings → System → Storage.
Step 2: Click Storage Sense and toggle it on.
Step 3: Configure it to run automatically and delete temporary files regularly.
Step 4: Click Run Storage Sense now for an immediate cleanup.
How to Remove Additional Junk with Disk Cleanup
Step 1: Search for Disk Cleanup in the Start menu and open it.
Step 2: Select your C: drive.
Step 3: Click Clean up system files for a more thorough scan, including Windows Update leftovers.
Step 4: Check everything you want to delete and click OK.
How to Optimize Your Drive
Step 1: Search for Defragment and Optimize Drives in the Start menu.
Step 2: Select your drive and click Optimize.
For SSDs, this runs TRIM (not defragmentation), a process that prepares freed storage blocks for faster future writes. It’s safe to run monthly. For HDDs, this performs actual defragmentation, which reorganizes fragmented files to improve sequential access during boot. Run it whenever your fragmentation percentage is above 5–10%.
Fix 7: Check Your BIOS/UEFI Settings
This is the fix most general guides skip, and it’s one of the most impactful for persistent slow startup, especially on systems that were set up several years ago or upgraded from Windows 10.
How to Access BIOS/UEFI
Restart your PC and immediately press the key shown on the manufacturer’s logo screen. The key to enter this screen is usually Delete, F2, or F10, depending on your manufacturer. It will typically flash on the screen for a brief moment during the first second after power-on.
What to Check and Change
- Boot Order: Make sure your SSD or primary Windows drive is listed first in the boot sequence. If the firmware is scanning USB drives, optical drives, or network boot options before your main drive, it adds seconds to every startup.
- Fast Boot (BIOS setting): This is separate from Windows Fast Startup. Most modern motherboards and laptops have a Fast Boot option built into the firmware. Enable it if it’s available.
- UEFI vs Legacy/CSM Mode: Windows 11 is designed for UEFI with Secure Boot enabled. If your system is running in Legacy or CSM mode, switching to UEFI can improve both boot speed and security. Note that changing this setting requires care; if you’re not familiar with the process, research your specific motherboard or laptop model before making this change, and ensure Windows is installed in UEFI mode before enabling it in firmware.
- Firmware Updates: Check your laptop or motherboard manufacturer’s support page for BIOS/UEFI firmware updates. Firmware updates occasionally include boot time optimizations and driver compatibility improvements.
Fix 8: Repair Corrupted System Files (SFC and DISM)
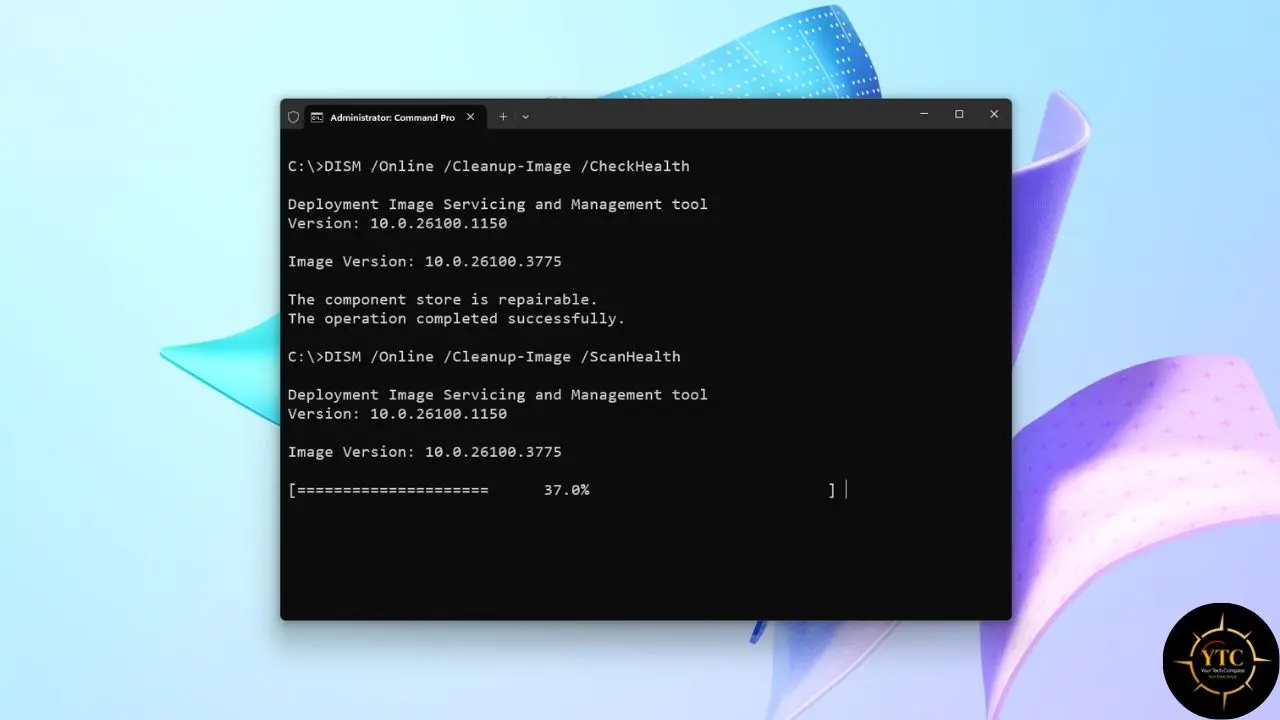
Corrupted or damaged system files can cause slow boot times and may prevent other optimizations from working correctly. Windows includes two built-in tools for finding and repairing these issues. Run them in sequence for best results.
How to Run SFC and DISM
Step 1: Press Windows + S, type cmd, right-click Command Prompt, and select Run as administrator.
Step 2: Type this command and press Enter:
sfc /scannow
The System File Checker scans Windows system files for corruption and replaces damaged files with cached copies. The SFC scan can take 10 to 15 minutes. Wait for it to complete fully before doing anything else.
Step 3: When SFC finishes, type this command and press Enter:
DISM /Online /Cleanup-Image /RestoreHealth
DISM (Deployment Image Servicing and Management) repairs the Windows component store that SFC relies on for replacement files. It requires an internet connection and takes 15–30 minutes.
Step 4: When both commands complete, restart your PC and check your boot time.
If either tool reports that it fixed something, restart and check whether boot has improved. In addition, if SFC reports errors it cannot fix, running DISM first, then SFC again, often resolves issues SFC couldn’t repair on the first pass.
Fix 9: Perform a Clean Boot
A clean boot starts Windows with only Microsoft’s own drivers and services, no third-party startup programs, and no manufacturer-installed services. This helps determine whether external software is causing your slow startup.
How to Perform a Clean Boot
Step 1: Press Windows + R, type msconfig, and press Enter.
Step 2: In the General tab, select Selective startup and uncheck Load startup items.
Step 3: Click the Services tab. Check Hide all Microsoft services, then click Disable all.
Step 4: Click OK and restart your PC.
If your startup is dramatically faster after a clean boot, a third-party service or startup program is the culprit. To identify which one:
Step 1: Open MSConfig again and re-enable services in batches of five or six.
Step 2: Restart after each batch, then check the boot time.
Step 3: When slow startup returns, the last batch you enabled contains the problem service.
Step 4: Re-enable services within that batch one at a time to identify the culprit.
To restore normal startup after troubleshooting, open MSConfig and select Normal startup in the General tab.
Fix 10: Reduce Visual Effects for Older or Low-RAM Systems
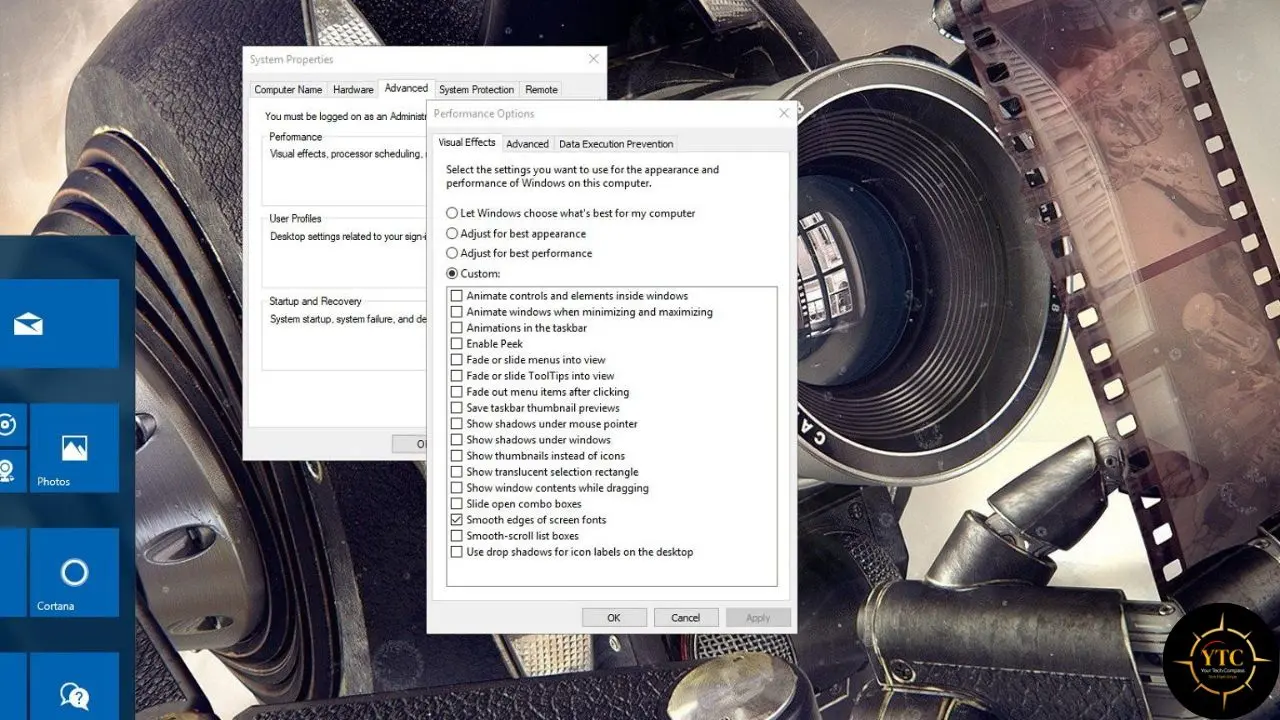
This fix has the most impact on systems with 4–8GB of RAM or older integrated graphics. On fast modern hardware, it is cosmetic, but on lower-spec systems, it can make a noticeable difference.
Step 1: Press Windows + S, then search for “Adjust the appearance and performance of Windows”.
Step 2: In the dialog that opens, select Adjust for best performance to disable all animations and visual effects at once.
Step 3: Alternatively, select Custom and manually uncheck specific effects; at minimum, uncheck animations and transparency effects while keeping smooth fonts enabled.
This won’t transform a slow startup into a fast one on modern hardware, but on systems with limited RAM and older integrated graphics, reducing the visual overhead during the loading sequence can meaningfully improve how quickly the desktop becomes responsive after login.
Fix 11: The Storage Upgrade: The Single Biggest Hardware Impact
No software fix addresses what a storage upgrade does. SSDs offer better performance than traditional HDDs dramatically and can significantly reduce boot and load times. The performance difference isn’t marginal; it’s the difference between a 2–3-minute startup and a 15–20-second one.
📊 HDD vs SSD: Startup Speed Comparison
Storage Type | Typical Boot Time | Real-World Experience | Upgrade Worth It? |
5400 RPM HDD | 2–4 minutes | Constant lag, spinning icon | ✅ Absolutely |
7200 RPM HDD | 60–90 seconds | Noticeably slow | ✅ Yes |
SATA SSD | 20–35 seconds | Fast, responsive | ⚠️ Only if on HDD |
NVMe SSD | 10–20 seconds | Near-instant | ✅ Best upgrade for older SATA SSD |
If your PC is still running on a traditional hard drive, upgrading to an SSD is the highest-impact change you can make, more impactful than any combination of the software fixes above. A 1TB SATA SSD costs around $60–$80. An NVMe SSD for M.2 slots costs about the same and delivers even faster speeds.
Upgrading involves either cloning your existing drive to the new SSD (Samsung Magician, Macrium Reflect, or AOMEI Backupper all do this well) or installing Windows 11 from scratch on the new drive. Either approach is well within reach for any Windows user willing to follow a guide specific to their laptop or desktop model.
Fix 12: Reset Windows (Last Resort)
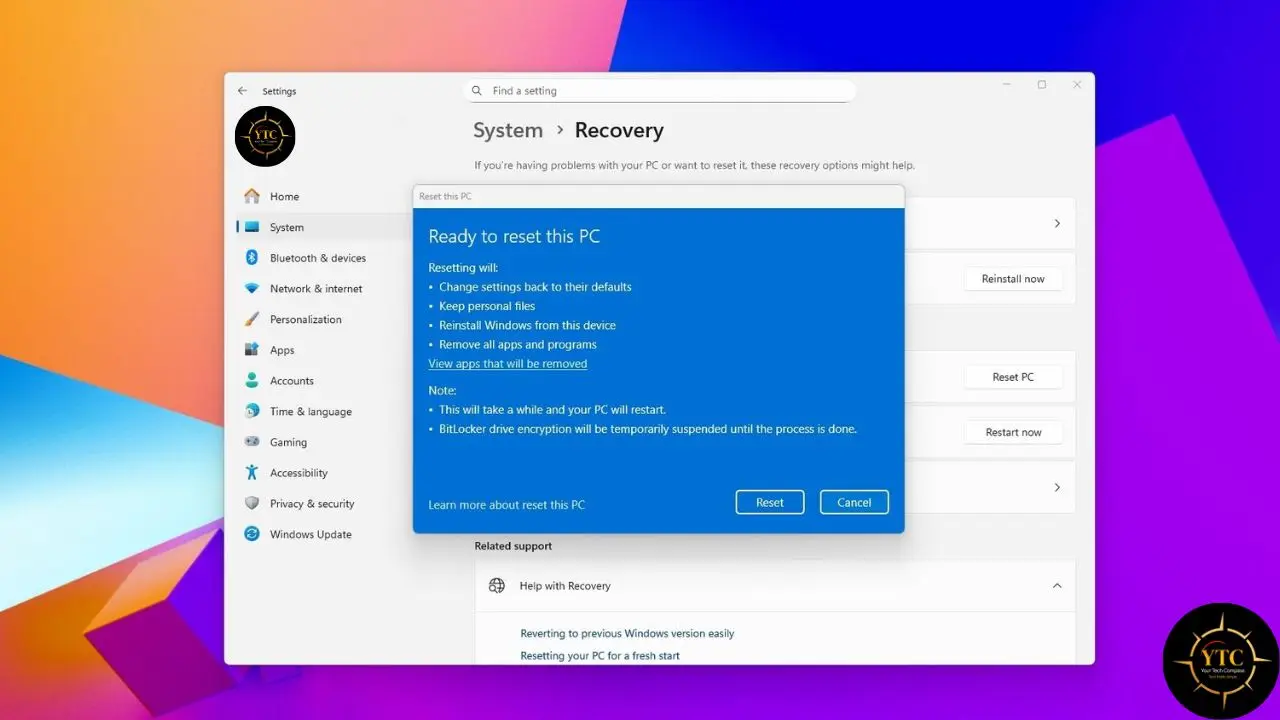
If you’ve worked through every fix above and your startup is still significantly slower than the benchmarks for your hardware, a Windows reset is the most thorough solution available without replacing components.
Using Reset this PC with Keep my files (to reinstall Windows while preserving personal data) is the next recommended step for severe cases, as it reinstalls Windows while keeping your documents, photos, and videos.
How to Reset Windows
Step 1: Open Settings → System → Recovery.
Step 2: Click Reset PC next to Reset this PC.
Step 3: Select “Keep my files” to preserve your personal data when reinstalling Windows.
Step 4: Choose Cloud download for the freshest Windows installation files, or Local reinstall if your internet connection is slow.
After the reset, Windows reinstalls from scratch. Your personal files survive.
Your installed apps and their settings have been removed; you’ll need to reinstall the software manually. This resolves slow startup caused by accumulated software conflicts, corrupted Windows components, and misconfigured services that individual fixes couldn’t reach.
Quick Reference: All Fixes Ranked by Impact and Effort
🚀 Windows 11 Slow Startup: Fix Priority Guide
Fix | Difficulty | Time Required | Typical Impact |
Disable Startup Apps | Easy | 5 minutes | 🔴 Highest (most common cause) |
Update Windows + Drivers | Easy | 15–30 minutes | 🟠 High |
Free Up Disk Space | Easy | 10 minutes | 🟡 Medium–High |
Adjust Power Plan | Easy | 2 minutes | 🟡 Medium |
Run Malware Scan | Easy | 30–60 minutes | 🟠 High (if infected) |
Fast Startup Toggle | Easy | 2 minutes | 🟡 Variable (test both ways) |
SFC + DISM Repair | Moderate | 30–45 minutes | 🟠 High (if corrupted files) |
Clean Boot Diagnosis | Moderate | 20–30 minutes | 🟠 High (identifies cause) |
Reduce Visual Effects | Easy | 3 minutes | 🟡 Medium (older hardware) |
BIOS/UEFI Settings | Advanced | 15 minutes | 🟠 High (if misconfigured) |
SSD Upgrade | Advanced | 1–2 hours | 🔴 Highest hardware fix |
Reset Windows | Advanced | 1–2 hours | 🔴 Highest software fix |
FAQs
A healthy Windows 11 PC should boot to a usable desktop in 15–30 seconds on an SSD, or 45–90 seconds on a hard drive. If you’re significantly above those numbers, at least one of the fixes in this guide applies to your system.
Disabling a startup app only stops it from launching automatically when Windows starts. You can still open the app normally afterward. Use Task Manager’s Startup apps tab or Settings → Apps → Startup to re-enable anything you find missing. Nothing is deleted. Nothing is uninstalled. You can reverse every change with one click.
Yes, especially if your system has 8GB or less. When Windows runs out of available RAM at boot, it begins paging data to your storage drive, which adds significant delays, particularly on HDDs. Upgrading from 8GB to 16GB of RAM often dramatically improves usability in the first minute after login, even if raw boot time does not change much. Storage upgrades have a greater impact on boot time itself; RAM upgrades improve how quickly the desktop becomes usable after loading.
Windows updates often schedule background tasks, such as indexing, telemetry reporting, and component cleanup, to run during the first one or two boots after installation. In most cases, boot times return to normal after two or three reboots. If slowness persists beyond that, run DISM as described in Fix 8 to check for any corruption introduced by the update.
Test both. Enable Fast Startup and measure your boot time. Disable it and measure again. On an SSD-based system, the difference is often negligible, and disabling it eliminates potential driver initialization conflicts. On an HDD-based system, Fast Startup provides a more meaningful speed benefit. Keep the setting that produces the fastest and most reliable startup for your specific hardware.
No. A clean boot is fully reversible: open System Configuration (msconfig), go to the General tab, select Normal startup, re-enable your services, and restart. Your files, apps, and settings are completely untouched. The clean boot only changes which services and startup items load during that particular session.
Conclusion
Slow Windows 11 startup is almost always fixable, and in most cases, it can be fixed without spending any money or taking your PC apart. Disabling the startup apps you don’t actually need at boot is where I’d start every time, because it’s the fastest change with the most consistent impact. From there, keeping Windows and drivers up to date, running SFC and DISM when something feels structurally wrong, and taking a clean-boot approach when you suspect a software conflict will solve the vast majority of slow-startup problems any user encounters.
For hardware-level improvement, particularly on systems still running traditional hard drives, an SSD upgrade is the single most impactful change available. The cost is modest, the installation is well documented for virtually every laptop and desktop model, and the difference in experience is immediately obvious. Work through this guide’s fixes from top to bottom, measure your boot time after each change, and you’ll have a Windows 11 system that starts the way it should, fast enough that you’re at your desk working before your morning coffee is ready.
Every Windows guide, tech how-to, and performance fix worth bookmarking lives at YourTechCompass.com, where we give you the complete picture, not just the obvious steps everyone already knows.