Here’s something I’ve noticed after working with Android phones for years: most people don’t realize how much their phone slows down, not because of the phone itself, but because of something hiding in the background called cache. You open an app, and it freezes. A page in Chrome shows you information that you know has already changed. Your storage is nearly full even though you haven’t downloaded anything new in weeks. Sound familiar? That’s cache buildup, and it’s one of the most common, most fixable problems on any Android device.
The good news is that clearing cache costs you nothing, takes less than two minutes, and doesn’t delete a single photo, contact, message, or password. I’ll walk you through every method step by step, including exactly what you’re looking at, why each step matters, and what happens after you tap. Whether you’re on a Samsung Galaxy, a Google Pixel, or any other Android phone, this guide has you covered from start to finish.
What Is Cache and Why Does It Cause Problems?
Before we start tapping through menus, it’s worth understanding what cache actually is. Because once you understand it, the rest of this guide makes perfect sense.
Every time you use an app or visit a website, your phone saves small pieces of information to your device. These pieces of information are called cache files.
The reason your phone does this is simple: so that the next time you open that app or visit that website, it doesn’t have to download everything from scratch. Instead, it just reads those saved files from your phone’s storage, which is much faster than pulling data from the internet.
Here’s a real-world example. When you open YouTube, the app needs to display thumbnails for every video in your home feed. Without cache, it would download every single thumbnail from YouTube’s servers each time you opened the app.
With cache, it saves those thumbnails to your phone the first time, and then loads them from local storage on every subsequent visit. That’s why YouTube loads quickly even on a slower connection; it’s pulling from your phone’s memory, not the internet.
So cache is genuinely useful. The problem is that it accumulates. Over weeks and months of daily app use, these temporary files accumulate and take up significant space. We’re talking gigabytes, not megabytes. And here’s the part most people don’t know: cache files can also become corrupted. This happens when you update an app: the old cache files sometimes don’t match the new version, and that mismatch can cause crashes, incorrect information, and sluggish behavior.
Think of it this way: imagine you have a notebook where you write down reminders to speed up your work. Useful at first. But if you never erase old pages, eventually you’re flipping through hundreds of outdated notes just to find the one you actually need. Clearing cache is like wiping the old pages so your phone works from a clean slate again.
There are two main types of cache on your Android phone:
- App Cache: This is the cache stored by individual apps, such as Instagram, YouTube, Google Maps, and Spotify. This includes profile pictures, thumbnails, previews of downloaded content, and background scripts.
- Browser Cache: This is the cache stored by your browser. This includes website images, fonts, layout files, and scripts that make pages load faster.
Both types build up the same way and cause the same kinds of problems when they get too large or go corrupt.
Why Should You Clear Cache on Android?
Now that you understand what cache is, here’s why clearing it actually matters:
It Frees Up Storage Space You Didn’t Know You Were Losing
Cache files don’t announce themselves. They just quietly accumulate in the background.
I’ve seen Android phones with 5–8GB of cache taking up space; space that could hold hundreds of photos or dozens of apps. When you clear the cache, that storage comes back immediately.
It Fixes Apps That are Crashing or Behaving Strangely
When an app’s cache becomes corrupted, usually after an update, the app starts reading old, broken data and doesn’t know what to do with it. This causes crashes, freezes, and incorrect information appearing on screen.
Clearing the cache forces the app to start fresh, and in most cases, the problem disappears. If the problem continues even after clearing the cache, our guide on how to fix apps that keep crashing on Android walks through the next steps.
It Improves Your Phone’s Overall Speed
When your storage is almost full, and a large portion of it is old cache, your phone has to work harder to find and read files because it’s searching through much more data. Removing unnecessary files means your phone has less to wade through, which translates to snappier performance.
It Removes Outdated Information
Sometimes apps show you old data (old prices on a shopping app, old news articles, or old contact information) because they’re reading from cached versions instead of fetching the latest data. Clearing the cache forces the app to pull fresh information the next time you open it.
The Most Important Thing to Know Before You Start: Clear Cache vs Clear Data
This is the single most important distinction in this entire guide. Understanding it will protect you from accidentally losing your account information, saved settings, or app data.
Clear Cache
Clearing cache removes only the temporary files I described above, the throwaway data that your phone created to make things load faster. It does not touch your personal information. And, it does not log you out of your accounts. In addition, it does not delete your saved settings, messages, or preferences.
The only thing you might notice after clearing cache is that an app takes an extra second or two to load the first time, because it’s rebuilding those temporary files from scratch. Everything else stays exactly the same.
Clear Data
Clearing Data is a completely different thing. When you tap Clear Data, you are wiping everything the app has ever stored on your phone. That means your login credentials, your saved settings, your downloaded content, your preferences; all of it is gone.
The app returns to the state it was in when you first installed it, as if it had never been used. You will have to sign in again, set up your preferences again, and rebuild any saved content.
My rule (and I tell everyone this) is to always start with Clear Cache. Only consider Clear Data if you’ve already tried Clear Cache and the problem persists, and only do it when you’re fully prepared to set that app up from scratch.
How to Clear App Cache on Standard Android Phones
This method works on most Android phones running Android 10 or higher, including Google Pixel, OnePlus, Motorola, and Nokia.
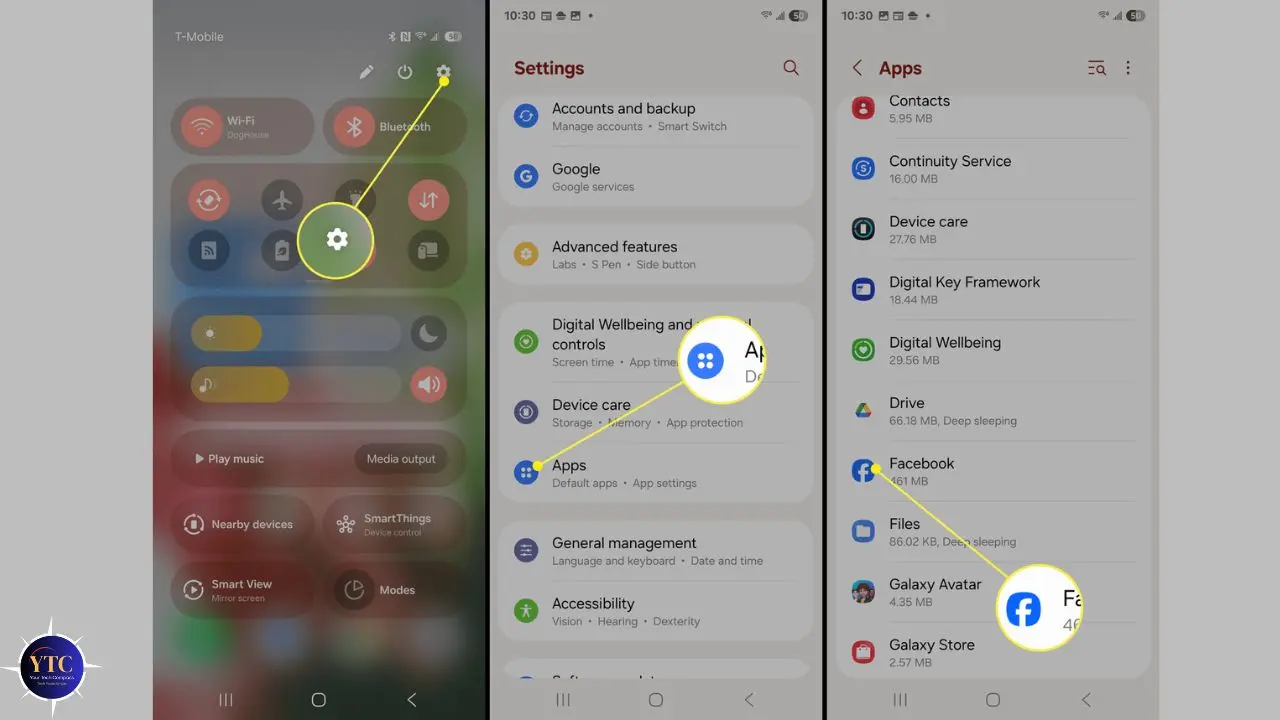
Step 1: Open the Settings App
Find the Settings app on your phone; it looks like a gear icon. You can find it in your app drawer, or you can swipe down from the top of your screen and tap the gear icon in the top-right corner of the notification panel. Tap it to open.
Step 2: Tap “Apps”
Once you’re in Settings, scroll down until you see an option called “Apps.” On some phones, this might be labeled “Applications,” “App Manager,” or “Manage Apps.”
The name depends on which brand of Android phone you have. Tap it. This will show you a full list of all the apps installed on your phone.
Step 3: Find the App Whose Cache You Want to Clear
You’ll see a long list of all your installed apps. If you’re doing general maintenance and want to start with the apps using the most storage, look for a sort or filter option, usually a small icon in the top-right corner, and sort by size. This puts the apps with the largest storage footprint at the top.
Social media apps like Instagram, Facebook, and TikTok are almost always near the top. So are streaming apps like YouTube, Netflix, and Spotify. Tap on the app you want to clean up.
Step 4: Tap “Storage & Cache”
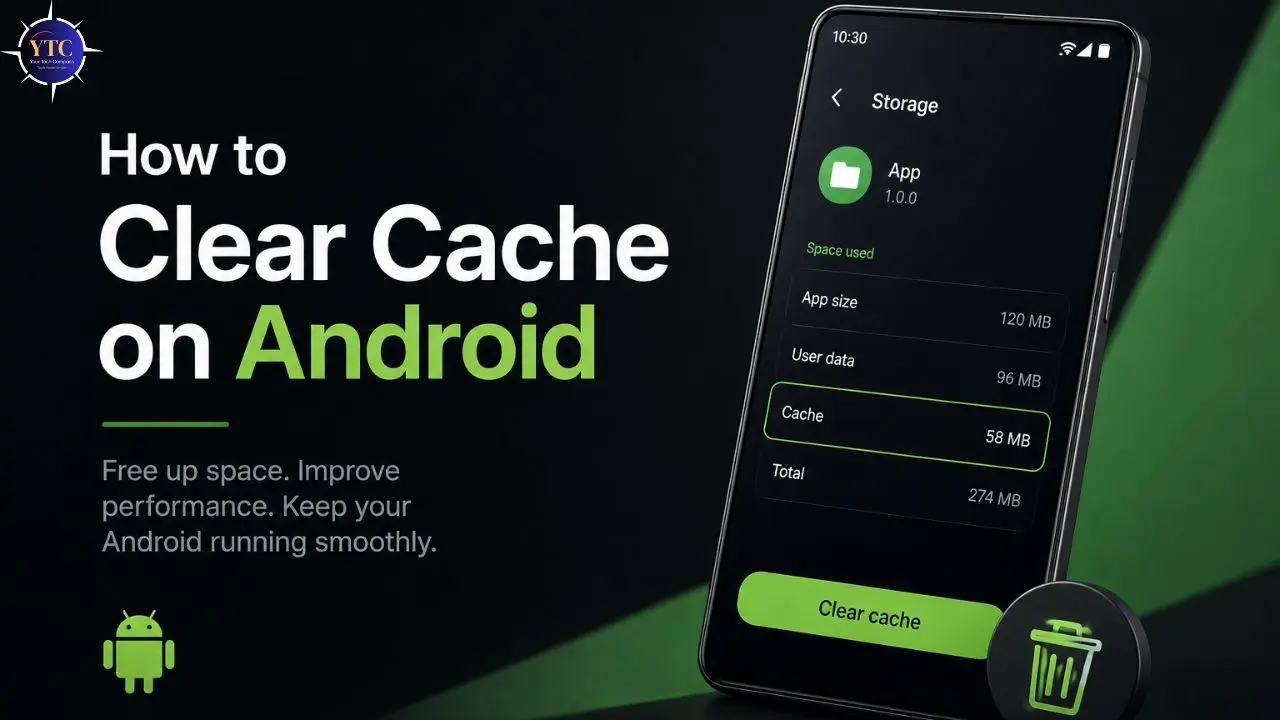
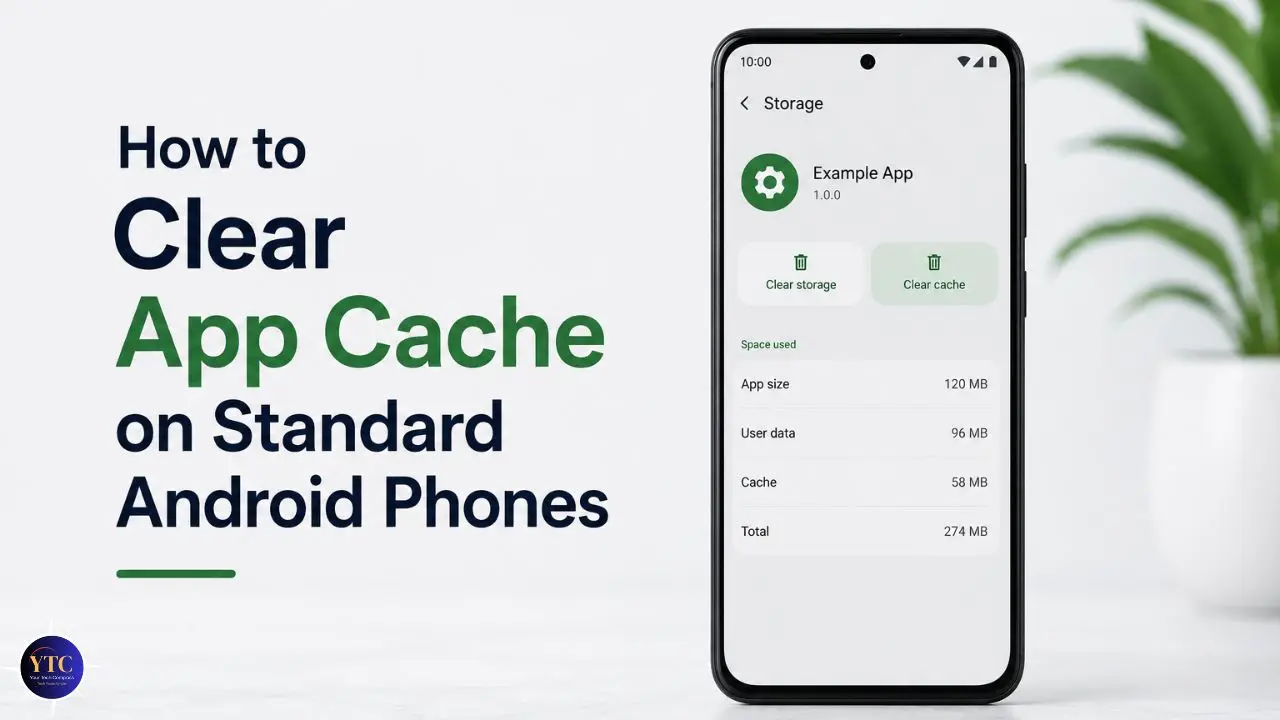
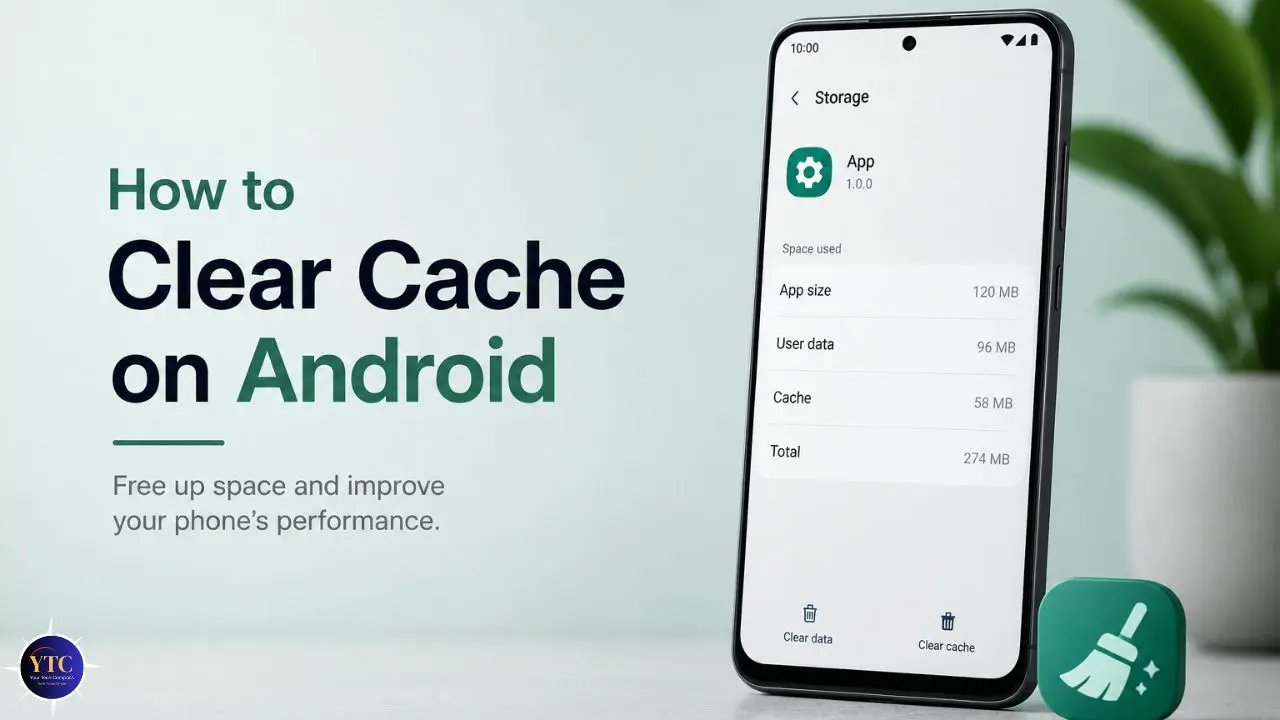
After tapping on an app, you’ll see its app info page, a summary of how much space it’s using and some options for managing it. Look for an option called “Storage & Cache” or just “Storage.” Tap it. This opens a screen showing you exactly how much space the app is using, separated into “App size” (the app itself), “User data” (your personal information and settings), and “Cache.”
Step 5: Tap “Clear Cache”
You’ll see two buttons at the bottom of the screen: “Clear Cache” and “Clear Data.” Tap only “Clear Cache.”
You’ll notice the number next to “Cache” immediately drop to zero, which confirms that the cache has been cleared. The process is instant. No loading bar, no waiting. It’s done.
Step 6: Go Back and Repeat for Other Apps
Use the back button to return to the app list and repeat this process for any other apps that are causing problems or taking up a lot of space. Tap Storage & Cache, then Clear Cache; it takes about 15 seconds per app once you know where everything is.
If You’re Running Android 9 or Earlier
The path is slightly different. Go to Settings → Apps → tap the app → Storage → Clear Cache. The button may look slightly different, but the outcome is exactly the same.
A Word of Caution
You’ll notice that the “Clear Data” button is sitting right next to the “Clear Cache” button. Do not tap it unless you specifically intend to reset the entire app. There is no undo button if you tap it by mistake.
How to Clear Cache on Samsung Galaxy Phones (One UI)
Samsung phones use a custom version of Android called One UI, which has its own layout and its own tools for managing storage. If you have a Samsung Galaxy phone, any model from the Galaxy A, S, Z, or Note series, follow these steps instead.
Samsung actually gives you two ways to do this, and which one you use depends on what you’re trying to fix.
Method 1: Device Care (For a General Cleanup Across Your Whole Phone)
This method is the fastest option when you just want to clear out temporary files across the board, without going app by app. Think of it as a one-tap sweep of your entire phone’s cache.
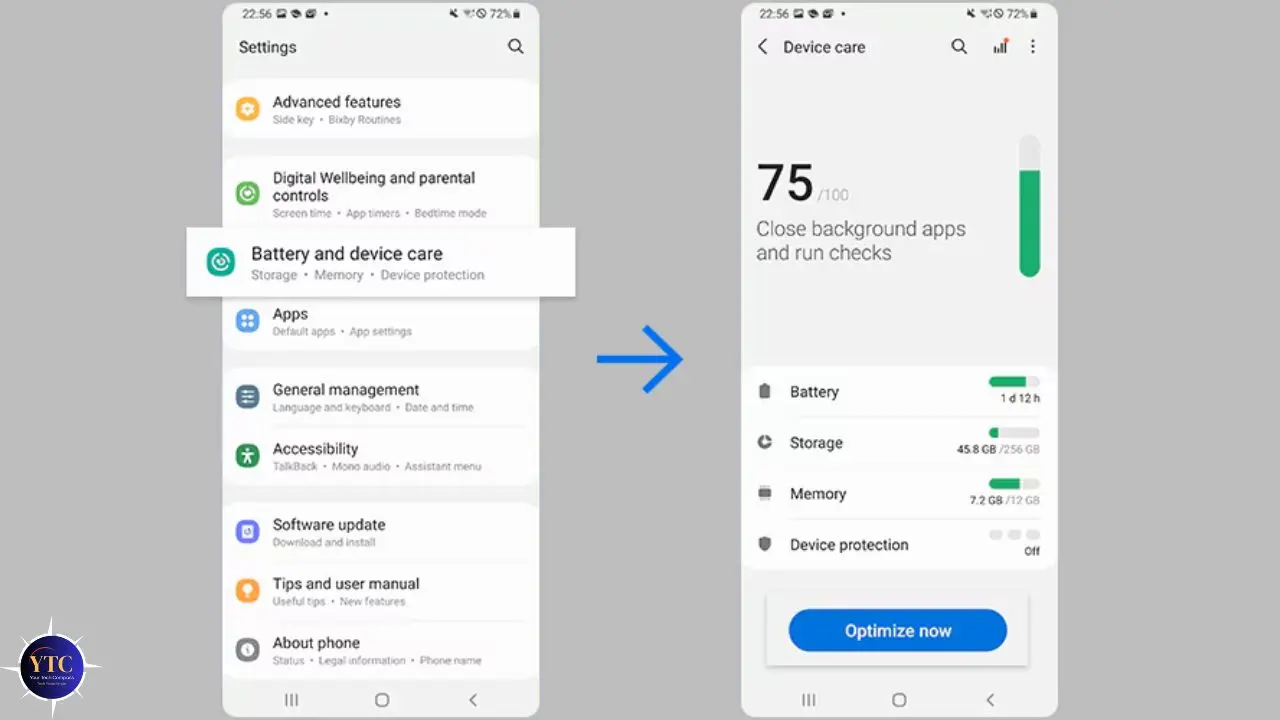
Step 1: Open Settings, the gear icon in your app drawer or notification panel.
Step 2: Scroll down and tap “Battery and Device Care.” On older Samsung models, this might be called “Device Maintenance.” This is Samsung’s built-in health and optimization tool. It shows you a summary of your battery, storage, memory, and device protection status all in one place.
Step 3: Tap “Storage.” This takes you to a breakdown of exactly how your storage is being used: apps, photos, videos, documents, and cached data. You can see at a glance how much space cache is consuming.
Step 4: Tap “Clean Now” or “Optimize Now.” Samsung’s system will automatically identify and clear cache files and other unnecessary temporary data across your phone. This happens in seconds. When it’s done, you’ll see an updated storage number that’s noticeably lower than before.
This method is ideal for monthly maintenance. It’s fast, it’s safe, and it covers everything in one go without you having to go through each app individually.
Method 2: Individual App Cache (For When One Specific App Is the Problem)
Sometimes the issue isn’t your whole phone; it’s one particular app that’s crashing, freezing, or loading slowly. In that case, it makes more sense to target that specific app rather than doing a broad sweep.
Step 1: Open Settings.
Step 2: Tap “Apps.” You’ll see a list of all your installed apps.
Step 3: Find the app that’s giving you trouble, then tap it.
Step 4: Tap “Storage.” This shows you the storage breakdown for that specific app.
Step 5: Tap “Clear Cache.”
That’s it. The app’s cache is cleared without affecting any other app on your phone. For more details on Samsung-specific steps, Samsung’s official support guide on clearing app cache and data is a reliable reference.
How to Clear Cache on Google Pixel Phones
Pixel phones are made by Google and run what’s called “stock Android,” the purest, most straightforward version of Android, without any manufacturer customization layered on top. This means the steps are the same across every Pixel phone, from Pixel 6 through the latest models.
Step 1: Open Settings. Tap the gear icon. You’ll find it in your app drawer or in the notification shade.
Step 2: Tap “Apps.” This brings up your full list of installed apps.
Step 3: Tap on the specific app you want to clear. If you want to see which apps are using the most cache, tap the three-dot icon in the top-right corner and sort by size.
Step 4: Tap “Storage and Cache.” Unlike some other Android versions, which show “Storage” and “Cache” as separate sections, Pixel phones group them under a single label.
Step 5: Tap “Clear Cache.” You’ll see the cache size drop to zero immediately.
A confirmation box may appear on some Pixel models asking you to confirm. Just tap “OK” to proceed. The whole process takes under 30 seconds per app.
How to Clear Chrome’s Browser Cache on Android
This step surprises many people: you cannot clear your browser’s cache through the regular app settings I described above. Browsers manage their own cache separately, through their own internal menus. If you’ve been wondering why Chrome still loads old pages after clearing your app cache, this is why. They’re in two different places.
Here’s how to clear Chrome’s cache specifically. Chrome is the default browser on most Android phones, so this covers the majority of readers.
Step 1: Open Chrome
Find the Chrome app (the circular icon with red, yellow, green, and blue) and tap it to open your browser.
Step 2: Tap the Three-Dot Menu
In the top-right corner of Chrome, you’ll see three vertical dots stacked on top of each other. This is the main menu. Tap it. A dropdown menu will appear with several options.
Step 3: Tap “History,” then “Clear Browsing Data”
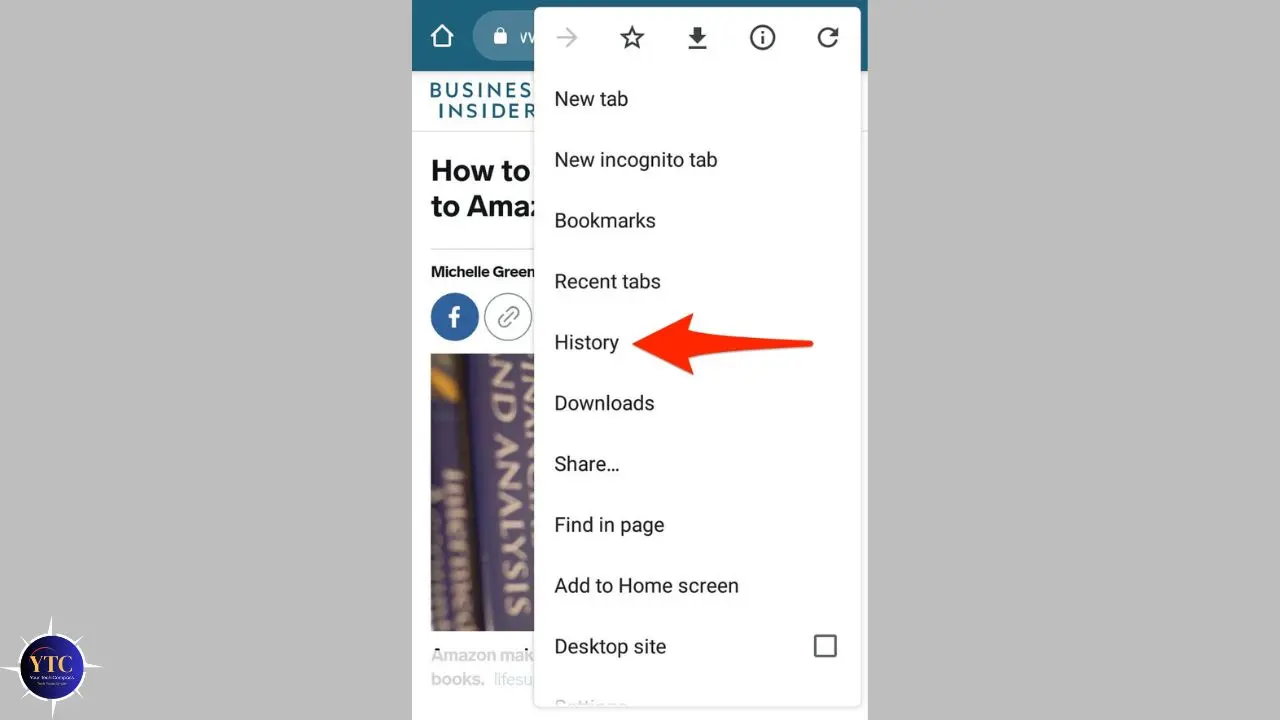
In the dropdown menu, tap “History.” On the History screen, you’ll see a button at the top that says “Clear browsing data.” Tap that. This opens a dedicated screen for clearing your browser’s stored data.
Step 4: Set Your Time Range
At the top of this screen is a dropdown menu labeled “Time range.” This lets you choose how far back you want to clear.
Your options are: Last hour, Last 24 hours, Last 7 days, Last 4 weeks, and All time. If you’re doing this to fix a problem, choose “All time.” This makes sure you’re clearing everything, not just recent files. If you’re just doing routine maintenance, “Last 4 weeks” is usually sufficient.
Step 5: Check “Cached Images and Files”
You’ll see a list of checkboxes for different types of data. Look for “Cached images and files” and make sure it’s checked. This is the specific type of data you want to remove. It includes all the website images, scripts, and layout files that Chrome has been saving on your phone.
Step 6: Tap “Delete Data”
Once you’ve set your time range and confirmed that “Cached images and files” is checked, tap the blue “Delete data” button. Chrome will clear the selected data immediately.
A Few Important Things to Know About the Other Checkboxes
- Browsing History: This deletes the list of websites you’ve visited. It does not affect your cache or your login sessions. Only check this if you want to clear your browsing history for privacy reasons.
- Cookies and Site Data: This is where your website login sessions are stored. If you check this box, you will be signed out of most websites the next time you visit them. Only check this if you specifically want that outcome.
- Saved Passwords and Autofill Data: I would strongly advise against clearing these during a routine cache clean. These are genuinely useful pieces of information that are hard to rebuild.
The first time you visit a website after clearing Chrome’s cache, it may take slightly longer to load; that’s normal. Chrome is rebuilding the cache from fresh data, and subsequent visits will be fast again.
How to Clear System Cache on Older Android Devices
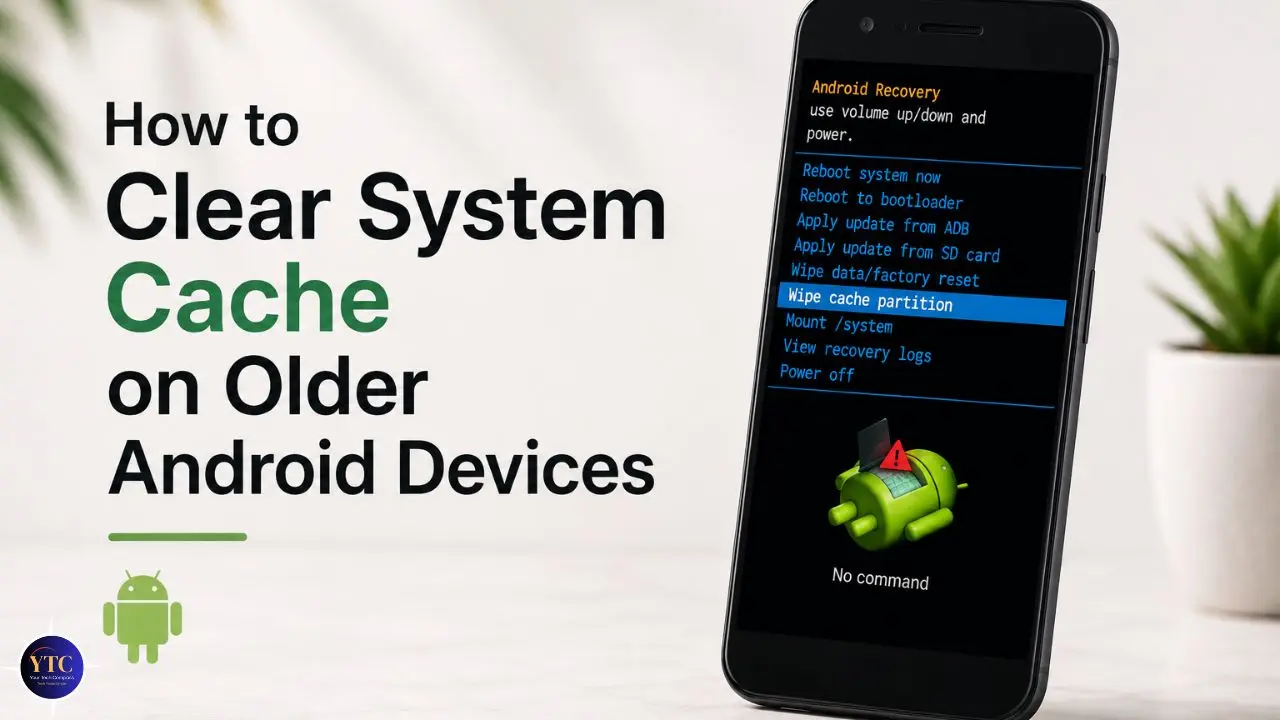
This section applies specifically to older Android phones running Android 9 or below. If you’re on Android 10 or newer, which covers most phones sold in the last four or five years, this method doesn’t apply to you, and you can skip it.
On older Android versions, there was a system-level cache, separate from individual app caches, that stored temporary files used by the Android operating system itself. Clearing this system cache could help with broader performance issues that clearing individual app caches couldn’t fix.
Here’s how it worked on supported devices:
Step 1: Turn your phone completely off. Hold the power button and select “Power off.”
Step 2: Boot into Recovery Mode. This is done by holding a specific button combination while your phone is off. On most devices, that’s holding Volume Up + Power together until you see a new screen appear. Note: the button combination varies by manufacturer and model. On some phones, it’s Volume Down + Power; on others, it also involves the Home button. If the combination above doesn’t work, a quick search for “[your phone model] recovery mode” will give you the exact buttons.
Step 3: Once you’re in Recovery Mode, you’ll see a basic text menu. Use your Volume Up and Volume Down buttons to navigate through the options. Your touchscreen won’t work here. Look for an option called “Wipe cache partition” and highlight it.
Step 4: Press the Power button to select it. The phone will begin clearing the system cache. This takes about 30 seconds.
Step 5: When it’s done, navigate to “Reboot system now” using the volume buttons and press Power to confirm. Your phone will restart normally.
Again, if you’re on a modern Android phone, you don’t need to do this. Google removed the system cache partition option from Android 10 and above. The per-app method I described earlier covers everything you need.
Clear Cache vs Clear Data vs Clear Cookies: Quick Reference Table
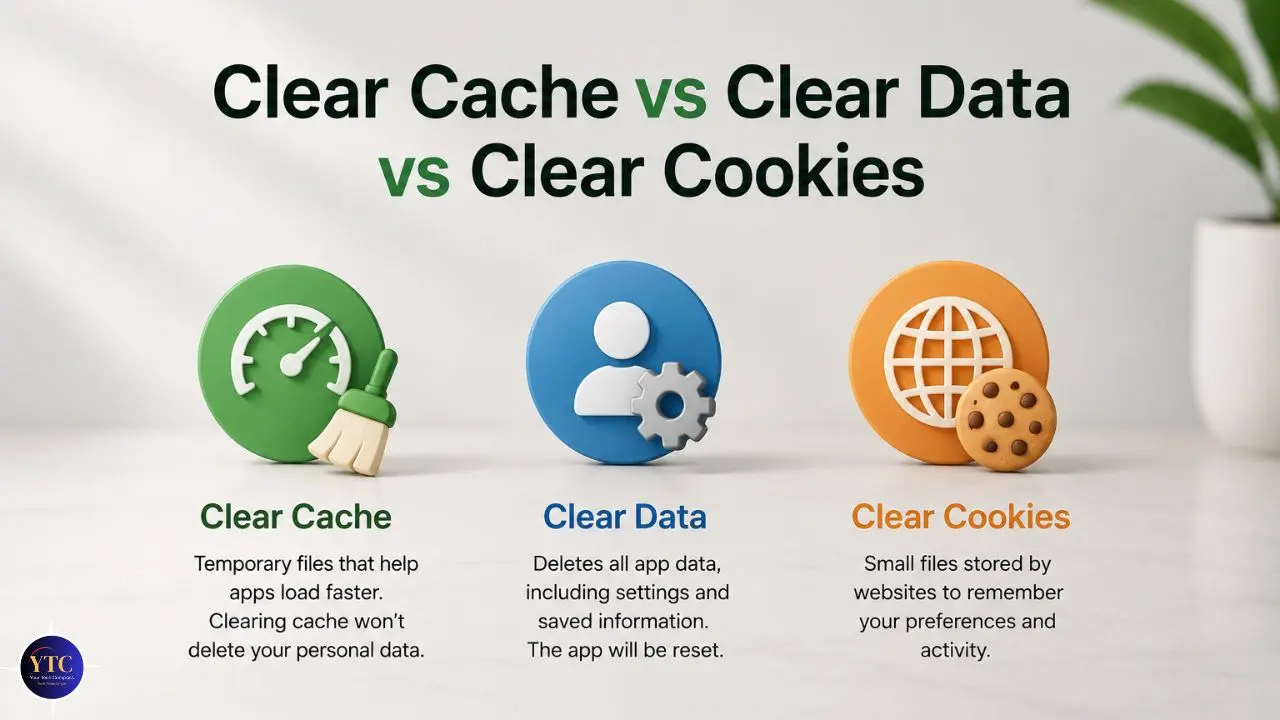
If you’re ever unsure which option to choose, this table gives you a clear, at-a-glance answer:
Action | What It Actually Removes | Will It Log You Out? | Will You Lose Settings? | The Right Time to Use It |
Clear Cache | Temporary files only (thumbnails, scripts, saved images) | ❌ No | ❌ No | When an App is slow, crashing, showing wrong info, or using too much storage |
Clear Data | Everything (logins, settings, downloaded content, all personal data) | ✅ Yes | ✅ Yes | When an App is completely broken, and cache clearing didn’t fix it |
Clear Browser Cache | Website images, scripts, and layout files saved by Chrome | ❌ No | ❌ No | When web pages are loading incorrectly, showing outdated content, or loading slowly |
Clear Cookies | Website login sessions and tracking data | ✅ Yes (on most sites) | Partial | When you want to sign out of all sites, or you’re doing a privacy clean |
The key takeaway from this table: Clear Cache is always the safe starting point. Everything else has more significant consequences that you should consciously choose to accept.
What You Should Never Clear and Why
This section could save you from a frustrating hour of troubleshooting. Not all cache is the same, and some of it should be left completely alone.
System Apps Like Google Play Services, Phone, and Contacts
These apps power the core functions of your Android device. Google Play Services, for example, handles app authentication, location services, and background syncing for almost every app on your phone.
If you clear its cache recklessly, you can break things that seem completely unrelated: apps might stop syncing, location may stop working, and certain features might disappear entirely. Unless a tech professional specifically tells you to clear a system app’s cache while troubleshooting, leave it alone.
Third-Party Cache Cleaner Apps
I want to be direct about this: don’t use them. Third-party cleaner apps, the ones that promise to boost your speed, clear junk, and free up gigabytes with one tap, are almost universally a bad idea. They make dramatic promises that don’t hold up in practice.
Many of them run constantly in the background, which actually slows your phone down more than the cache they’re clearing. Most are full of aggressive ads, and some request permissions that go far beyond what a cache cleaner needs. Your phone’s built-in tools, which we’ve covered in detail above, do everything these apps claim to do, without any of the downsides. Stick to what’s already on your device.
Apps That are Working Fine
This one sounds obvious, but I mention it because it’s tempting to do a full sweep of everything once you know how. Cache exists for a purpose.
If an app loads quickly and works correctly, its cache is doing its job. Clearing it means the app has to rebuild those temporary files from scratch, which takes time and data. Therefore, target the apps that are actually causing problems, not the ones that are working exactly as they should.
Tips to Prevent Cache From Building Up Too Fast
Now that you know how to clear cache, here’s how to stop it from getting out of control in the first place. These are habits I follow on my own phone, and they make a real difference over time.
Do a Monthly Sweep of Your Heaviest Apps
You don’t need to clear every app every month; just focus on the ones that use the most data. Social media apps like Instagram, Facebook, TikTok, and Twitter are almost always the worst offenders because they constantly save images and video thumbnails. Streaming apps like YouTube and Netflix save preview content. A quick monthly clear of these five or six apps is usually enough to keep storage under control.
Use Your Phone’s Built-In Storage Tool Regularly
Whether you’re on Samsung (Battery and Device Care → Storage) or another Android brand (Settings → Storage), these built-in tools give you a clear picture of where your storage is going. Opening this once a month takes 30 seconds and tells you immediately if something has gotten out of hand.
Keep Your Apps and Your Android System Updated
App developers regularly release updates that fix cache-related bugs and improve the management of temporary files. When you delay updates, you’re often leaving cache inefficiencies in place that the developer has already fixed. The same is true for Android system updates, which frequently include performance improvements that affect how the phone manages temporary storage.
Uninstall Apps You No Longer Use
Even apps you never open accumulate cache in the background. If you haven’t opened an app in two or three months, uninstalling it is cleaner and more effective than just clearing its cache periodically.
Troubleshooting: When Cache Clearing Doesn’t Fully Fix the Problem
Sometimes you clear the cache, but the problem persists. Here’s what to do next, explained clearly:
The App Is Still Crashing After You’ve Cleared Its Cache
The next step is Clear Data, but only after you fully understand what that means. As I explained earlier, Clear Data completely resets the app to its factory state. Therefore, you’ll lose your login, your settings, and any downloaded content stored locally.
If you’re prepared for that, go back to Settings → Apps → [App name] → Storage → Clear Data. After the reset, open the app, sign in again, and see if the crashing has stopped.
If it continues even after Clear Data, uninstall the app completely and reinstall it fresh from the Google Play Store. However, if the problem persists across multiple apps (not just one), your device may need a system update, or there could be a deeper software issue. Our full guide to fixing apps that keep crashing on Android covers every escalation step in detail.
Your Phone Is Still Slow After Clearing Cache

Cache clearing helps with software-related slowdowns, but it cannot fix hardware limitations. If your phone is several years old, the processor and RAM may simply not be powerful enough to run the latest, more demanding app versions at full speed.
Beyond cache, also check: how full your storage is (phones slow down significantly when storage is over 85% full), how many apps are running in the background, and whether a system update is available. A pending Android update sometimes holds performance-impacting bugs that are fixed in the next release.
You Can’t Find the “Clear Cache” Button on Your Phone
Different manufacturers label things differently, which can make this genuinely confusing. If you can’t find “Clear Cache,” look for “Storage & Cache,” “Storage Usage,” or “App Storage.” These are all different labels for the same screen on different Android brands.
On Samsung specifically, the path is Battery and Device Care → Storage → [App name], rather than going through Apps first. However, if you’re completely stuck, use the search bar inside your Settings app, type “cache,” and it will often surface the relevant screen directly.
You Cleared the Cache, But Now You’re Signed Out of An App
This happens occasionally and can feel alarming, but it’s completely normal behavior for certain apps. Some apps are designed to clear their login session alongside the cache. Your account still exists; you haven’t lost anything. Simply open the app, sign in again with your usual credentials, and everything will be exactly as you left it.
Cache Keeps Building Back Up Faster Than You’d Expect
If you’re finding that certain apps accumulate gigabytes of cache within days of clearing it, that’s a sign the app is caching aggressively in the background. The fix is to go to Settings → Apps → [App name] → Battery and restrict background activity. This limits what the app can do when you’re not actively using it, significantly slowing cache accumulation. Alternatively, if the app isn’t essential, uninstalling it is the cleanest solution.
FAQs

No, not at all. I want to be absolutely clear about this because it’s the concern I hear most often. Clearing the cache removes only temporary files your phone automatically creates to speed up loading times. Your photos live in your Gallery or Google Photos. And, your messages live in your messaging app’s database. Your contacts are stored in your Google account or your SIM card. Cache clearing doesn’t touch any of these. The only change you’ll notice is that an app might take an extra second or two to load the first time after its cache is cleared; that’s it.
Once or twice a month is a good baseline for most people. You don’t need to do it every day; that would actually be counterproductive, since you’d be forcing your apps to constantly rebuild useful temporary files. Beyond that monthly rhythm, clear the cache whenever you notice a specific problem: an app crashing, pages loading incorrectly in your browser, a storage warning appearing, or general sluggishness after a system update.
Yes, but with an honest caveat. If your phone is slow because accumulated cache files are eating up storage or corrupted temporary data is causing apps to work harder than necessary, clearing cache will produce a noticeable improvement. However, if your phone is slow because it’s an older device with limited processing power, clearing cache helps a little but isn’t a magic fix. It’s always worth trying first because it costs nothing and often makes a meaningful difference.
They sound similar, but they store completely different things. Cache stores visual and functional files (images, scripts, layout data) to make apps and websites load faster. Cookies store your preferences and login sessions, things like “this user is signed in” or “this user prefers dark mode.” Clearing the cache alone generally won’t sign you out of anything. Clearing cookies will. This is why I recommend clearing the cache only during routine maintenance, and clearing cookies only when you have a specific reason to.
Yes, completely. Nothing important is stored in cache. Your phone automatically creates cache files as you use your apps, so there’s no permanent loss of anything. The worst-case scenario is that an app loads a few seconds slower after you clear it, and then rebuilds its cache from fresh data, which may actually work better than the corrupted old data it was using before.
Conclusion
Clearing the cache on your Android phone is one of the simplest, safest, and most effective ways to keep it running well. It doesn’t require any technical knowledge, it doesn’t risk any of your personal data, and it takes less time than making a cup of tea. I clear the cache on my own Android phone once a month without fail, and I consistently find at least two or three apps that have quietly accumulated hundreds of megabytes of data they no longer need.
The approach I’d recommend: start with your heaviest social media and streaming apps, clear Chrome’s browser cache separately through its own menu, use your phone’s built-in storage tool for a broader sweep, and leave your system apps and anything working correctly completely alone. Do this once a month, and you’ll find your phone stays faster, your storage warnings become less frequent, and those mysterious app crashes become far less common. It’s two minutes of maintenance that pays back every single day.
Every practical tech guide, honest how-to, and step-by-step Android walkthrough worth bookmarking lives at YourTechCompass.com, where we make technology simple, clear, and actually useful for everyone.