If you’re switching from Windows, the first thing that trips you up on a MacBook is copy and paste, because it’s Command + C and Command + V, not Ctrl. That’s the most important thing to know upfront. But beyond the basic shortcut, macOS has several copy-paste methods that most users never discover: Universal Clipboard (copy on your iPhone, paste on your Mac), Paste and Match Style (paste without bringing in someone else’s formatting), and a file-moving shortcut in Finder that works nothing like Windows.
This guide covers every copy-and-paste method on a MacBook, keyboard shortcuts, trackpad right-click, the Edit menu, Universal Clipboard, drag-and-drop, file management, and troubleshooting when nothing works. Whether you’re a new Mac user or someone who’s been using a MacBook for years and wants to close the gaps, you’ll find what you need here. If you’re looking for the best apps to take notes and paste content into, the best note-taking apps for Mac guide is a useful companion.
Quick Reference: Every Copy-Paste Method at a Glance
Method | Shortcut / Action | Best For |
Keyboard Shortcut | Command + C / Command + V | Everyday text, files, and images |
Cut | Command + X | Text only (not files in Finder) |
Paste without Formatting | Command + Shift + Option + V | Pasting into documents cleanly |
Right-Click Menu | Two-finger tap → Copy / Paste | Quick context menu access |
Edit Menu | Menu bar → Edit → Copy / Paste | Accessibility, app-specific use |
Universal Clipboard | Copy on iPhone → Paste on Mac | Cross-device workflow |
Drag and Drop | Click, hold, drag | Files, text between apps |
Move File (cut + paste) | Command + C → Command + Option + V | Moving files in Finder |
Copy Screenshot to Clipboard | Command + Control + Shift + 4 | Pasting the screenshot directly |
Method 1: Keyboard Shortcuts (Command + C and Command + V)
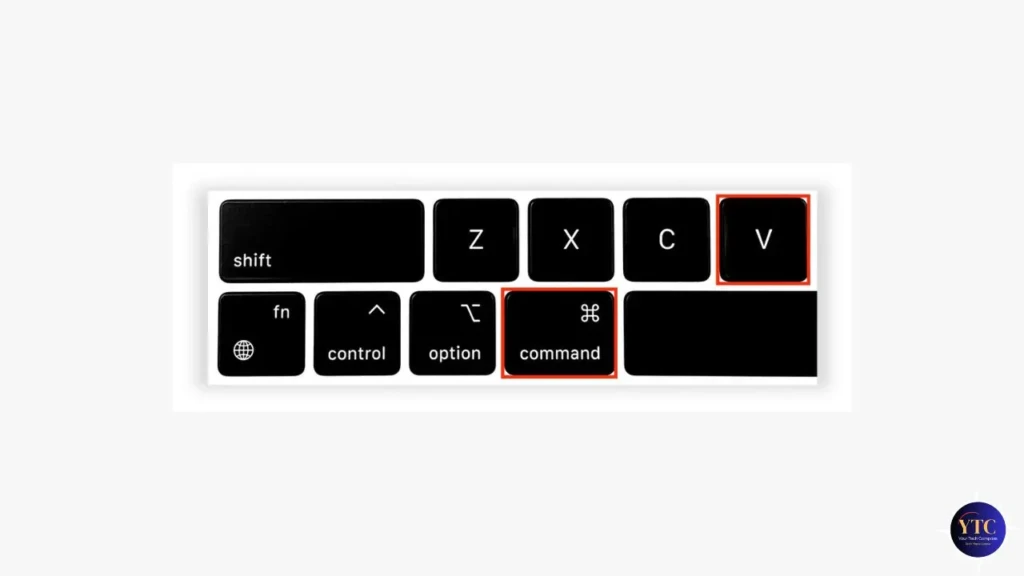
This covers 90% of everything you’ll ever need to copy and paste on a MacBook.
The Command key (⌘) is located immediately to the left and right of the spacebar. It’s the Mac equivalent of the Windows Ctrl key for most shortcuts. Once you build that muscle memory, everything else follows naturally.
Core Shortcuts:
- Command + C: Copies selected text, file, or image.
- Command + V: Pastes at the cursor position.
- Command + X: Cuts selected text (removes original and copies to the clipboard).
- Command + Z: Undoes the last paste or action.
- Command + A: Selects all (useful before copying an entire document or page).
Step-by-step for text:
- Click and drag to highlight the text you want, or use Command + A to select everything.
- Press Command + C to copy.
- Click where you want to paste.
- Press Command + V.
Step-by-step for files:
- Click a file in Finder to select it (Command + click to select multiple).
- Press Command + C.
- Navigate to the destination folder.
- Press Command + V to paste a copy.
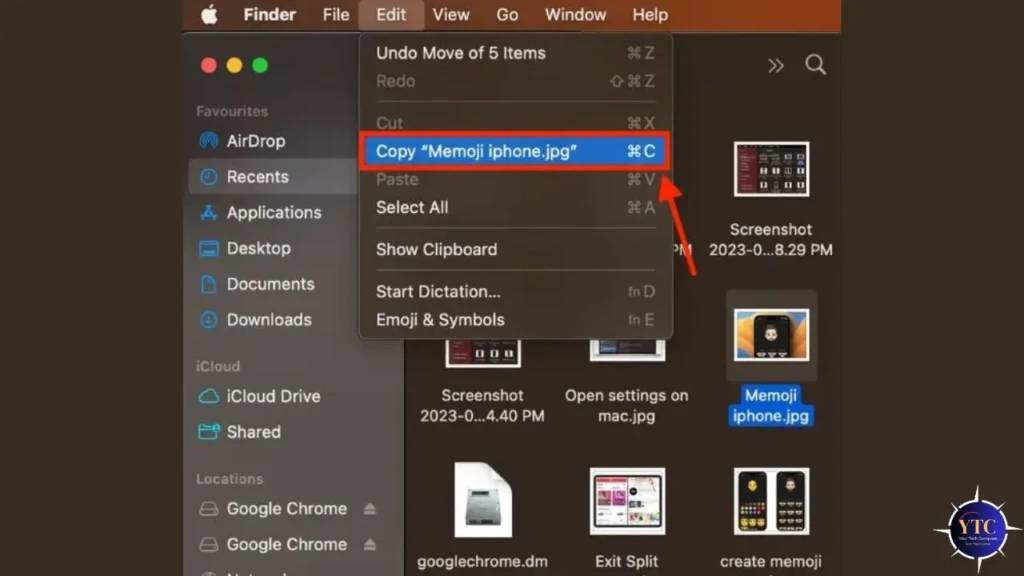
Method 2: Right-Click Context Menu
If you prefer clicking over keyboard shortcuts, this right-click context menu will give you Copy and Paste options directly on screen.
How to right-click on a MacBook trackpad:
- Two-finger tap anywhere on the trackpad; this is the default gesture.
- Or hold Control and click with one finger.
If the two-finger tap isn’t working on your MacBook, it may need to be enabled. Go to System Settings → Trackpad → Secondary Click and select “Click or Tap with Two Fingers.”
To copy and paste using right-click:
- Highlight your text or select your file.
- Two-finger tap (right-click) on the selection.
- Click Copy from the context menu.
- Right-click at your destination.
- Click Paste.
This method is particularly useful when working with images in a browser, files in Finder, or any situation where lifting your hands to the keyboard feels slower than a quick two-finger tap.
Method 3: The Edit Menu
Every Mac app includes an Edit menu in the top menu bar with Copy, Cut, Paste, and Paste and Match Style options. It’s the slowest method but the most universally accessible, useful when keyboard shortcuts aren’t responding or when you need to see all paste options in one place.
Steps:
- Select your text or file.
- Click Edit in the menu bar at the top of the screen.
- Click Copy (or Cut).
- Click on your destination.
- Click Edit → Paste.
One practical benefit of using the Edit menu: the keyboard shortcuts are displayed next to each option, which helps you learn them naturally. Additionally, the Edit menu in some apps, like Pages, Notes, and Google Docs, includes options that don’t have obvious keyboard shortcuts, such as Paste and Match Style.
Method 4: Universal Clipboard (Copy on iPhone, Paste on MacBook)
Universal Clipboard is one of the most genuinely useful features in the Apple ecosystem, and most Mac users either don’t know it exists or don’t realize they already have it enabled. It lets you copy something on your iPhone and paste it directly on your MacBook (and vice versa). No AirDrop, no email, no third-party app required.
Requirements:
- Both devices should be signed into the same Apple ID.
- Wi-Fi and Bluetooth should be enabled on both devices.
- Handoff should also be enabled on both devices.
- Both devices should be within normal Bluetooth range of each other (~30 feet).
How to enable Handoff:
- On MacBook: System Settings → General → AirDrop & Handoff → toggle Handoff ON
- On iPhone: Settings → General → AirPlay & Handoff → toggle Handoff ON
How to use it:
- On your iPhone, select and copy any text, image, or link; Edit → Copy or long-press → Copy.
- Within approximately two minutes, switch to your MacBook.
- Press Command + V to paste. The content from your iPhone appears instantly.
The two-minute window is the key limitation; the Universal Clipboard clears after roughly two minutes, so this is a workflow for immediate transfers, not delayed ones. This feature works in both directions: copy on your Mac, paste on your iPhone; it works exactly the same way. If you use AirPods across devices, our “How to Connect AirPods to MacBook” guide covers Handoff and automatic device switching, which work alongside Universal Clipboard.
Method 5: Paste and Match Style (Command + Shift + Option + V)
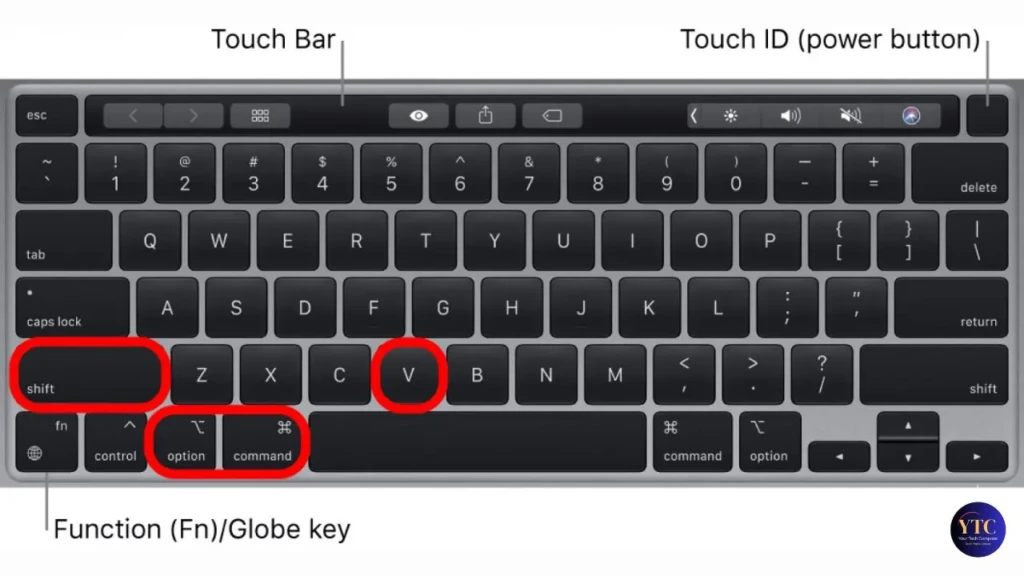
This is the most underused copy-paste shortcut on macOS, and once you know it, you’ll use it constantly.
When you copy text from a webpage, PDF, or another document and paste it into your own document, it usually retains the original formatting: different font, different size, bold text, and colored text. Paste and Match Style strips all of that and pastes plain text that matches the formatting of wherever you’re pasting into.
Shortcut: Command + Shift + Option + V
Via the Edit menu: Edit → Paste and Match Style (available in Pages, Notes, TextEdit, Google Docs, and most text editors)
Example Use Case: You’re copying a paragraph from a website into a Pages document. Standard paste (Command + V) brings the website’s font and styling. Paste and Match Style (Command + Shift + Option + V) pastes clean text in your document’s font and size; no cleanup needed.
Note that Paste and Match Style only apply to text. It has no effect when pasting images or files.
Method 6: Drag and Drop
Drag-and-drop is the fastest copy-and-paste method for moving content between apps; no keyboard required.
For text:
- Highlight the text you want to copy.
- Click, hold for half a second, then drag it to the destination (another app window, a Notes document, an email).
- Release to drop; the text is inserted at that position.
For files in Finder:
- Drag to Move: Dragging a file from one folder to another on the same drive moves it.
- Hold Option While Dragging: Copies the file instead of moving it (you’ll see a green + badge appear on the file icon while holding Option).
- Drag to a Different Drive: Always copies by default; hold Command while dragging to move instead.
Between Apps: Drag and drop works across most native macOS apps, from Safari to Notes, from Finder to Mail, from Photos to Pages. Third-party apps vary in their support for drag-and-drop.
How to Copy and Paste Files and Folders on MacBook
File copy-paste in macOS Finder behaves differently from text, and it’s where most Windows switchers get confused, because macOS has no standard “cut” shortcut for files.
To copy a file:
- Select the file in Finder (Command + click for multiple files).
- Press Command + C.
- Navigate to the destination folder.
- Press Command + V. A copy is created; the original stays in place.
To move a file (cut and paste equivalent):
- Select the file and press Command + C.
- Navigate to the destination.
- Press Command + Option + V. This moves the file (removes it from the original location) rather than copying it.
This Command + Option + V behavior is the macOS equivalent of Windows’ Ctrl + X or Ctrl + V for cutting and pasting files. Many Mac users don’t know this shortcut exists and resort to dragging instead.
To duplicate a file in the same folder: Select it and press Command + D; a copy named “[filename] copy” is created instantly without going through the clipboard.
How to Copy and Paste Images on MacBook
Copying and pasting images works slightly differently depending on where they come from.
From Safari (webpage image):
- Right-click (two-finger tap) the image.
- Select Copy Image, not “Copy Image Address” (that copies the URL, not the image).
- Paste into Pages, Notes, Mail, or Keynote with Command + V.
From Finder (image file):
- Select the image file.
- Press Command + C.
- Paste into a supported app. Note that some apps accept pasted image files while others (like plain text editors) don’t.
Copy a Screenshot Directly to Clipboard: Press Command + Control + Shift + 4; drag to select a region, and it copies directly to the clipboard (no file is saved). Then paste immediately with Command + V into any app that accepts images. This is the fastest way to capture and paste a screenshot without saving a file first.
Troubleshooting: Copy and Paste Not Working on MacBook

Clipboard Not Responding
The most common fix is to restart the pasteboard server via Terminal. Open Terminal (Applications → Utilities → Terminal) and type:
killall pboard
Then, Press Enter. This resets the clipboard process without restarting your Mac and resolves most clipboard freezes caused by corrupted clipboard data.
App Blocking Copy
Some web apps, PDFs, and banking sites block text selection and copying. If right-click is also disabled, try selecting the text, opening the browser’s developer tools (Command + Option + I), and finding the text in the page source, or use a browser extension like “Enable Copy” for Chrome.
Universal Clipboard Not Working
Confirm both devices are on the same Apple ID, that Wi-Fi and Bluetooth are active on both, and that Handoff is enabled on both (System Settings → General → AirDrop & Handoff on Mac; Settings → General → AirPlay & Handoff on iPhone). If it still fails, toggle Bluetooth off and on on both devices.
Paste Not Matching Your Document’s Style
You’re using Command + V when you want Command + Shift + Option + V. Switch to Paste, and Match Style, and the formatting issue disappears.
Everything Else Fails
Restart your MacBook. A clean reboot clears the clipboard state, resets background processes, and resolves most intermittent copy-paste issues. If recurring clipboard problems persist after a restart, it may point to a deeper system issue. Our guides on how to factory reset your MacBook and how to reset MacBook Air will walk you through restoring macOS cleanly if needed.
FAQs
Command + C to copy and Command + V to paste. Command + X cuts (copies and removes the original). These shortcuts work across all macOS apps.
Use Universal Clipboard. Copy on your iPhone and paste on your MacBook with Command + V within approximately two minutes. Both devices need to be signed into the same Apple ID with Wi-Fi, Bluetooth, and Handoff enabled.
The most common causes are a frozen clipboard process (fix: run killall pboard in Terminal), an app blocking copying, or a conflict with a clipboard manager. Restarting your Mac resolves most cases.
Press Command + Shift + Option + V instead of Command + V to paste plain text that matches your document’s existing style, stripping any bold, font, size, or color from the source.
macOS does not have a built-in clipboard history; it only stores the most recent copy. For clipboard history, you need a third-party app like Paste, Clipboard Manager, or the free Maccy app, which keeps a searchable history of everything you’ve copied.
Conclusion
For day-to-day use, two methods cover almost everything: Command + C or Command + V for standard copying and pasting, and Command + Shift + Option + V for pasting without formatting. Add Universal Clipboard to your workflow if you regularly move content between your iPhone and MacBook. It eliminates one of the most common friction points in a multi-device Apple setup.
For file management in Finder, remember that Command + Option + V is the move shortcut. It’s the one gap in macOS that catches every Windows switcher off guard. Everything else covered in this guide fills in the corners of copy-paste that most users never explore but genuinely benefit from once they do.
For more tech guides and honest reviews, visit YourTechCompass.