Taking a screenshot on a Lenovo laptop isn’t always straightforward; the right method depends on what you want to capture, which Windows version you’re running, and whether your keyboard requires the Fn key to activate PrtSc. Some methods copy to the clipboard and require pasting; others save a file automatically. Some capture the full screen; others let you select a region, a single window, or even a scrolling webpage.
This guide covers every screenshot method available on Lenovo laptops, built-in shortcuts, the Snipping Tool, the Xbox Game Bar, Lenovo-specific Fn key behavior, third-party tools, and troubleshooting steps when nothing else works. If you’re also dealing with other performance issues on your Windows machine, our guide on fixing slow startup on Windows 11 is a useful companion read. For a broader Windows screenshot reference beyond Lenovo-specific notes, check the How to Screenshot on Windows guide.
Quick Reference: Every Screenshot Method at a Glance
Method | Shortcut | What It Captures | Saves To |
Print Screen | PrtSc | Full screen | Clipboard only |
Auto-Save Screenshot | Win + PrtSc | Full screen | Pictures → Screenshots |
Active Window | Alt + PrtSc | Current window only | Clipboard only |
Snipping Tool (region) | Win + Shift + S | Your selection | Clipboard + notification |
Snipping Tool (app) | Start → Snipping Tool | Any mode with a delay option | Your chosen folder |
Xbox Game Bar | Win + G | Full screen | Videos → Captures |
Lenovo ThinkPad | Fn + PrtSc | Full screen | Clipboard only |
Tablet (Lenovo) | Power + Volume Down | Full screen | Pictures → Screenshots |
Method 1: Print Screen Key (PrtSc)
The PrtSc key is the fastest way to grab a screenshot; one keypress copies the entire screen to your clipboard instantly.
Steps:
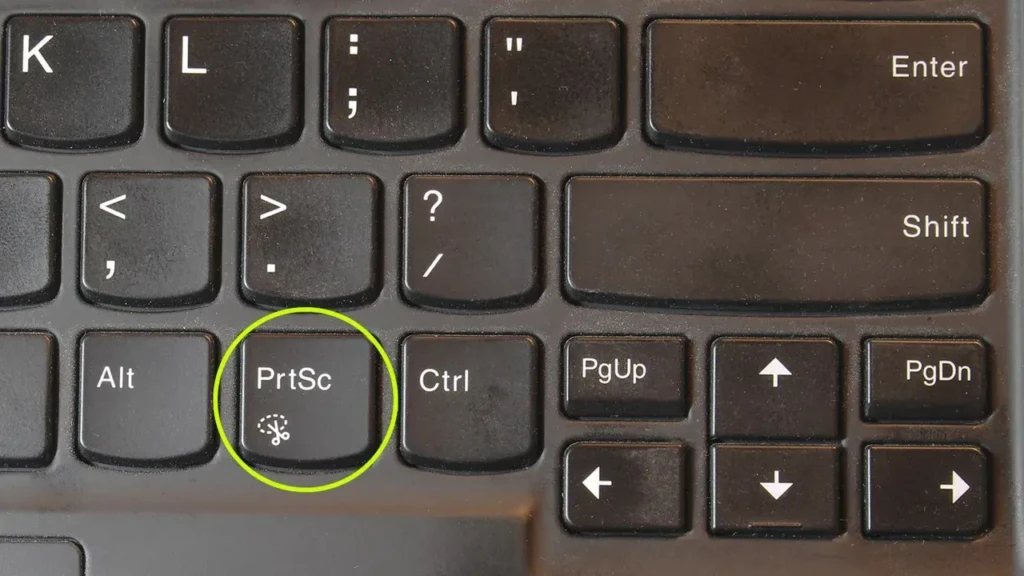
- Press PrtSc (labeled PrtSc, PrtScn, or Print Scr on your keyboard, usually top-right of the function key row).
- Open Paint, Word, or any image editor.
- Press Ctrl + V to paste.
- Press Ctrl + S to save.
Nothing is saved automatically with this method; the image remains on your clipboard until you paste it somewhere. It’s best for quick one-off captures where you need to paste directly into a document or email.
Method 2: Windows Key + Print Screen (Auto-Save)
This is the most convenient method for most users; it captures the full screen and saves the file automatically without any pasting required.
Steps:
- Press Windows + PrtSc simultaneously.
- Your screen will briefly dim to confirm the capture.
- Find your screenshot at C:\Users[Your Name]\Pictures\Screenshots.
Files are named sequentially, Screenshot (1), Screenshot (2), and so on. This method works on all Lenovo laptops running Windows 10 or 11 and is the best default option for users who take screenshots regularly.
Method 3: Alt + Print Screen (Active Window Only)
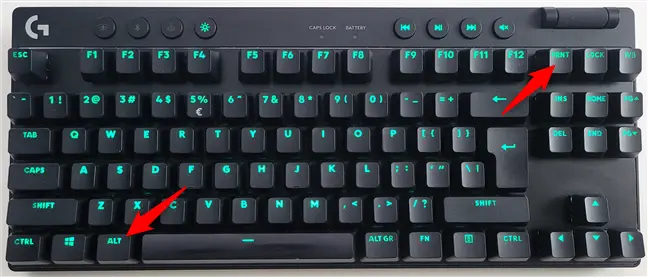
When you only want to capture the window you’re currently working in, not the full desktop, Alt + PrtSc is the right shortcut.
Steps:
- Click the window you want to capture to make it active.
- Press Alt + PrtSc.
- Paste into Paint or any app using Ctrl+V, then save.
This method copies only the focused window to the clipboard, excluding the taskbar, desktop, and any other open windows. It’s particularly useful when you need a clean screenshot of a specific application without surrounding clutter.
Method 4: Snipping Tool (The Most Flexible Option)
The Snipping Tool is built into Windows 10 and 11 and gives you the most control over what you capture. In Windows 11, it replaces the old Snip & Sketch tool and combines it with the old tool into a single updated app.
To open it: Press Windows + Shift + S or search “Snipping Tool” in the Start menu.
The four capture modes:
- Rectangular Snip: Click and drag to draw a rectangle around the area you want.
- Freeform Snip: Draw any custom shape around your selection.
- Window Snip: Click any open window to capture it cleanly.
- Full Screen Snip: Captures the entire screen instantly.
Steps using Windows + Shift + S:
- Press Win + Shift + S; the screen dims, and a toolbar appears at the top.
- Select your capture mode from the four icons.
- Click and drag to make your selection.
- A notification appears in the bottom-right corner. Click it to annotate, crop, or save.
- Press Ctrl + S to save to your chosen folder.
Using the Snipping Tool app directly gives you additional options, including a delay timer (1 to 10 seconds) that lets you capture dropdown menus, tooltips, and hover states that disappear when you press a shortcut. Open the app, click the dropdown arrow next to “New,” and set your delay before the screenshot fires.
Method 5: Windows + Shift + S (Standalone Shortcut)
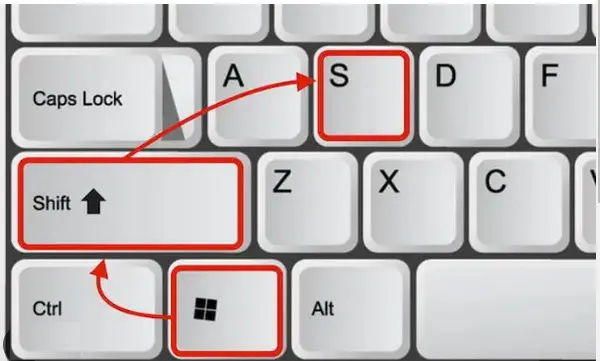
Many users don’t realize that Win + Shift + S works as a standalone shortcut even without opening the Snipping Tool app; it’s the fastest way to capture a custom region on any Lenovo laptop.
Steps:
- Press Win + Shift + S.
- Your screen immediately dims.
- Select your capture mode at the top of the screen (rectangular is selected by default).
- Drag to select your area.
- Click the notification to open, annotate, or save, or paste directly from the clipboard with Ctrl + V.
This is the most practical everyday screenshot method for most users. It’s fast, flexible, and requires no app switching.
Method 6: Xbox Game Bar (Windows + G)
Xbox Game Bar is primarily designed for gamers, but it works for any full-screen application where keyboard shortcuts might conflict with the running program.
Steps:
- Press Windows + G to open the Game Bar overlay.
- Click the Camera icon in the Capture widget (or press Windows + Alt + PrtSc).
- A notification confirms the screenshot was saved.
- Find screenshots at C:\Users[Your Name]\Videos\Captures.
Note that Game Bar may not work in all apps or on all hardware configurations. If the overlay doesn’t appear, go to Settings → Gaming → Xbox Game Bar and ensure it’s enabled.
Method 7: Lenovo-Specific Fn Key Behavior
This is the most common source of confusion for Lenovo laptop users, and it varies by model. On many Lenovo ThinkPad and IdeaPad models, the PrtSc key shares a function key and requires the Fn key to be pressed to activate it.
- On ThinkPads: Press Fn + PrtSc to capture the full screen to the clipboard. The PrtSc key is often located on the function row, commonly on F10, F11, or F12, with a small PrtScn label printed beneath the key.
- Fn Lock: If you find yourself pressing Fn every time for basic shortcuts, toggle Fn Lock to reverse the behavior. Press Fn + Esc (the Esc key usually has a lock icon on ThinkPads) to toggle Fn Lock on or off. When Fn Lock is active, the function keys behave as F1–F12 by default without holding Fn, and PrtSc activates directly.
- On compact Lenovo Laptops without a Dedicated PrtSc Key: Try Fn + Insert or check your specific model’s keyboard guide in Lenovo Vantage → Device → My Device Settings. The Lenovo brand explained guide gives useful context on how keyboard layouts differ across ThinkPad, IdeaPad, and Yoga models. For Lenovo Legion users specifically, the Lenovo Legion laptops review notes that Legion keyboards include a standard PrtSc key without an Fn requirement on most configurations.
- On Lenovo Tablets: Press and hold Power + Volume Down simultaneously. Your screenshot saves to Pictures → Screenshots automatically.
Method 8: Third-Party Screenshot Tools
Built-in methods cover most use cases, but if you need scrolling screenshots, advanced annotation, or workflow integrations, a third-party tool fills those gaps. These tools include:
- ShareX (Free): The most powerful free option. Supports scrolling window capture, region capture, full-screen capture, annotation, OCR text extraction from screenshots, and direct upload to cloud services. Download from getsharex.com.
- Lightshot (Free): Lightweight and fast. Press PrtSc after installing Lightshot, and it replaces the default behavior with a region-select overlay. Best for users who want a simpler experience with instant sharing options.
- Snagit (Paid, ~$63 one-time): The professional standard. Panoramic scrolling capture, video recording, advanced annotation, and direct integration with Microsoft Office and Google Workspace. Worth it for documentation professionals and content creators who take screenshots daily.
- Browser-Specific Scrolling: For full-page screenshots, Firefox has a built-in option. Right-click anywhere on a page → Take Screenshot → Save full page. Chrome users can install the GoFullPage extension for the same result without a third-party app.
Where Do Screenshots Go on a Lenovo Laptop?
The save location depends entirely on which method you used:
- PrtSc, Alt + PrtSc: Clipboard only. Nothing is saved until you paste and save manually.
- Win + PrtSc: Automatically saved to Pictures → Screenshots (C:\Users\[Your Name]\Pictures\Screenshots).
- Win + Shift + S / Snipping Tool: Clipboard initially; click the notification to save to any folder you choose.
- Xbox Game Bar: Automatically saved to Videos → Captures (C:\Users\[Your Name]\Videos\Captures).
- Third-Party Tools: Your configured save folder.
To change the default Screenshots folder location: Right-click the Screenshots folder in File Explorer → Properties → Location tab → Move → select your preferred folder. This is useful if your C: drive is low on space. You can redirect screenshots to a secondary drive or a cloud-synced folder.
How to Take a Scrolling Screenshot on a Lenovo Laptop
Windows lacks a native scrolling screenshot feature, and none of the built-in methods capture content outside the visible screen area. Therefore, for you to take a scrolling screenshot on a Lenovo laptop, your options are:
- ShareX (free): Open ShareX → Capture → Scrolling Capture → select your browser or app window. ShareX automatically scrolls and stitches the full page into one image.
- Firefox: Right-click any webpage → Take Screenshot → Save full page. No extension needed.
- Chrome / Edge: Install the GoFullPage extension → click its icon to capture the full page as a PNG or PDF.
- Snagit (paid): The most reliable scrolling capture, including scrolling capture of applications outside the browser.
Troubleshooting: Screenshot Not Working on Lenovo Laptop
- PrtSc Key Does Nothing: Your model likely requires Fn + PrtSc. Try that combination first. If it still doesn’t work, check whether Fn Lock needs to be toggled with Fn + Esc.
- Win + PrtSc Saves Nothing: Open File Explorer and navigate to Pictures → Screenshots. The folder may exist but be empty if the screen didn’t dim to confirm the capture. Check that the Screenshots folder exists; if it was deleted, Windows won’t recreate it automatically. Create a new folder named “Screenshots” inside Pictures and try again.
- OneDrive or Dropbox intercepting PrtSc: Both apps can override PrtSc behavior to save screenshots to their cloud folders instead. Check OneDrive settings: OneDrive tray icon → Settings → Backup → Screenshots and turn off the option. Do the same in Dropbox’s preferences if installed.
- Snipping Tool Not Opening: Press Win + Shift + S as an alternative. If the app itself is broken, open the Microsoft Store, search “Snipping Tool,” and reinstall it. This commonly resolves issues after Windows updates.
- Keyboard Driver Issue: If no screenshot shortcut works, your keyboard driver may need to be updated. Open Device Manager → Keyboards → right-click your keyboard → Update Driver. Alternatively, open Lenovo Vantage → Device → System Update to check for available driver updates. A slow or unresponsive system can sometimes cause input lag, making shortcuts feel broken. If that’s affecting you, the “How to Fix Slow Startup on Windows 11” guide addresses the underlying system performance issues. You should also check your laptop battery health if your Lenovo is behaving unpredictably, as a failing battery can cause irregular system behavior.
FAQs
It depends on the method. Win + PrtSc saves to Pictures → Screenshots. Xbox Game Bar saves to Videos → Captures. PrtSc alone and Alt + PrtSc copy to the clipboard only. Nothing is saved until you paste manually.
Most likely, you need to use Fn + PrtSc instead of PrtSc alone. This is standard on ThinkPad and many IdeaPad models. Also, check whether OneDrive or Dropbox has overridden the PrtSc function in their settings.
Press Win + Shift + S, then drag to select the area you want. This is the fastest built-in method for region capture and works on all Lenovo laptops running Windows 10 or 11.
Yes. Windows includes the Snipping Tool, which is pre-installed on all Lenovo laptops running Windows 10 and 11. Lenovo Vantage does not include its own screenshot tool, but you can use it to customize Fn key behavior on supported models.
Use Win + Shift + S to open the Snipping Tool overlay without using PrtSc. Alternatively, on compact Lenovo models, PrtSc is often mapped to Fn + Insert or a labeled function key (F10–F12). Check the small printed label beneath your function keys.
Conclusion
For most users, two methods cover everything: Win + PrtSc for a full-screen capture that saves automatically, and Win + Shift + S for any region, window, or partial capture. If you’re on a ThinkPad or a Lenovo model with a compact keyboard, add Fn to your PrtSc shortcut to solve the single most common screenshot problem on Lenovo laptops.
For scrolling screenshots, install ShareX (free) or use Firefox’s built-in full-page capture. For professional annotation and documentation work, Snagit is worth the investment. Every other scenario is covered by the built-in Windows methods outlined above. No additional software needed.
Found this helpful? Browse more in-depth tech guides, honest reviews, and step-by-step tutorials at YourTechCompass; your go-to resource for making smarter tech decisions.