
You remember exactly what your MacBook felt like when you first opened it. Apps launched instantly. Scrolling was smooth. The fan was silent. Fast forward to today, and something has changed. Clicking Finder feels sluggish. Chrome takes three seconds too long to open. The spinning beach ball makes an appearance when you’re trying to finish something important. The fan runs like your MacBook is processing a feature film when you’re doing nothing more demanding than reading email. That gap between then and now is real, it’s frustrating, and here’s the thing: most people don’t know it’s usually fixable without spending a cent or booking an Apple Store appointment.
Here’s what makes MacBook slowdowns genuinely tricky: they’re almost never caused by a single problem. They’re the result of several compounding issues: a full startup app list, a nearly full SSD, Chrome with 40 open tabs, iCloud syncing in the background, and a Spotlight index that got corrupted six months ago, all piling up on top of each other. This guide covers every layer, from the two-minute quick fixes you can do right now to the deeper system-level interventions for persistent problems. You’ll find both Apple Silicon and Intel-specific steps clearly labeled. You can stop at any point when performance returns to normal, or work through to a thorough optimization that will serve you for months.
Before You Start, Diagnose the Problem First
Jumping into fixes without understanding what’s actually causing the slowdown is the most common mistake, and it wastes time. Two minutes with Activity Monitor tells you more about your Mac’s health than any generic tip list.
How to Open and Read Activity Monitor
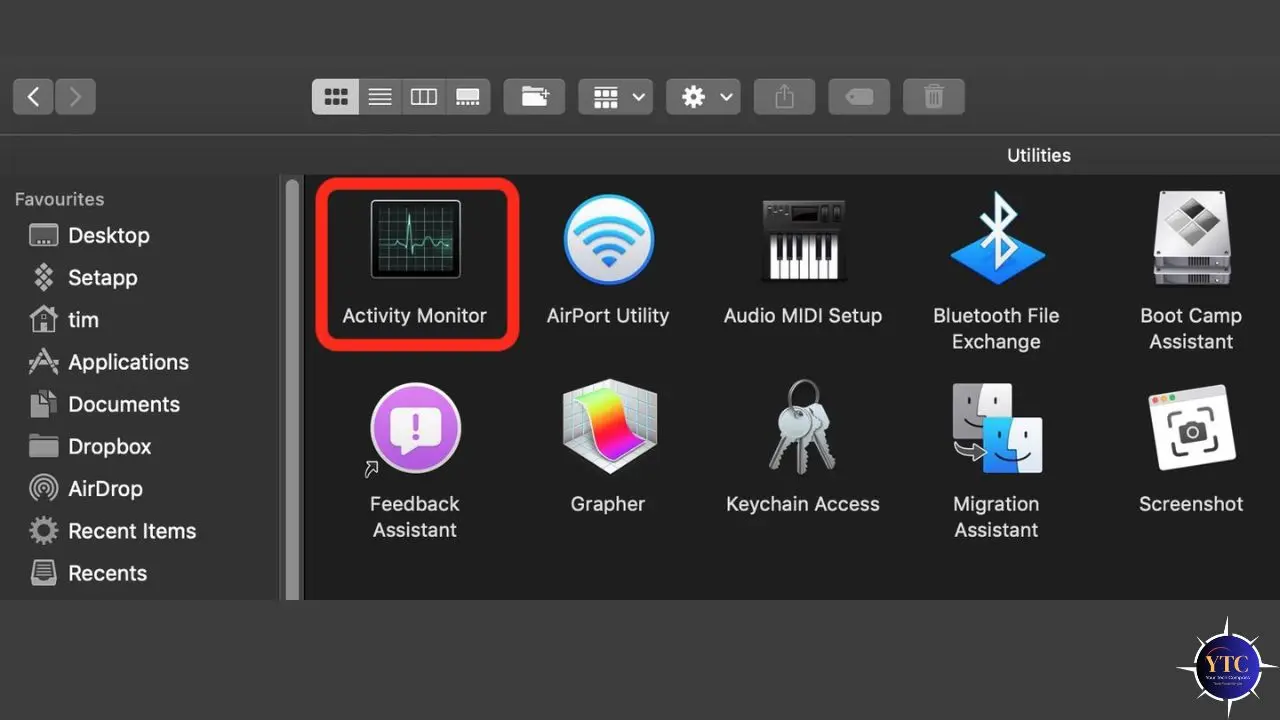
Open Finder → Applications → Utilities → Activity Monitor. Alternatively, press Command + Space to open Spotlight, type “Activity Monitor,” and press Enter. You’ll see five tabs across the top: CPU, Memory, Energy, Disk, and Network.
Here’s what each one tells you:
- CPU Tab: Shows which processes are consuming processing power right now. Sort by “% CPU” by clicking the column header. Any process consistently consuming 80% or more of your CPU is abnormal and worth investigating. Common culprits include browser renderers, cloud sync processes, and runaway background tasks.
- Memory Tab: This is often the most revealing. Look at the Memory Pressure graph at the bottom of the window. A green graph means your RAM is healthy and available. A yellow graph means pressure is building, worth monitoring. A red graph means your Mac is actively struggling with RAM and is using virtual memory (slower SSD space) as a substitute. This is a primary cause of sluggishness. Additionally, sort the process list by “Memory” to see which apps are consuming the most RAM.
- Energy Tab: Shows which apps are demanding high-performance mode and draining battery; useful if your fan is running constantly even during light work.
- Disk Tab: Shows which processes are actively reading and writing to your storage. Constant, sustained disk activity from a non-system process can indicate backup software, indexing, or a misbehaving app.
Check Your Storage Quickly
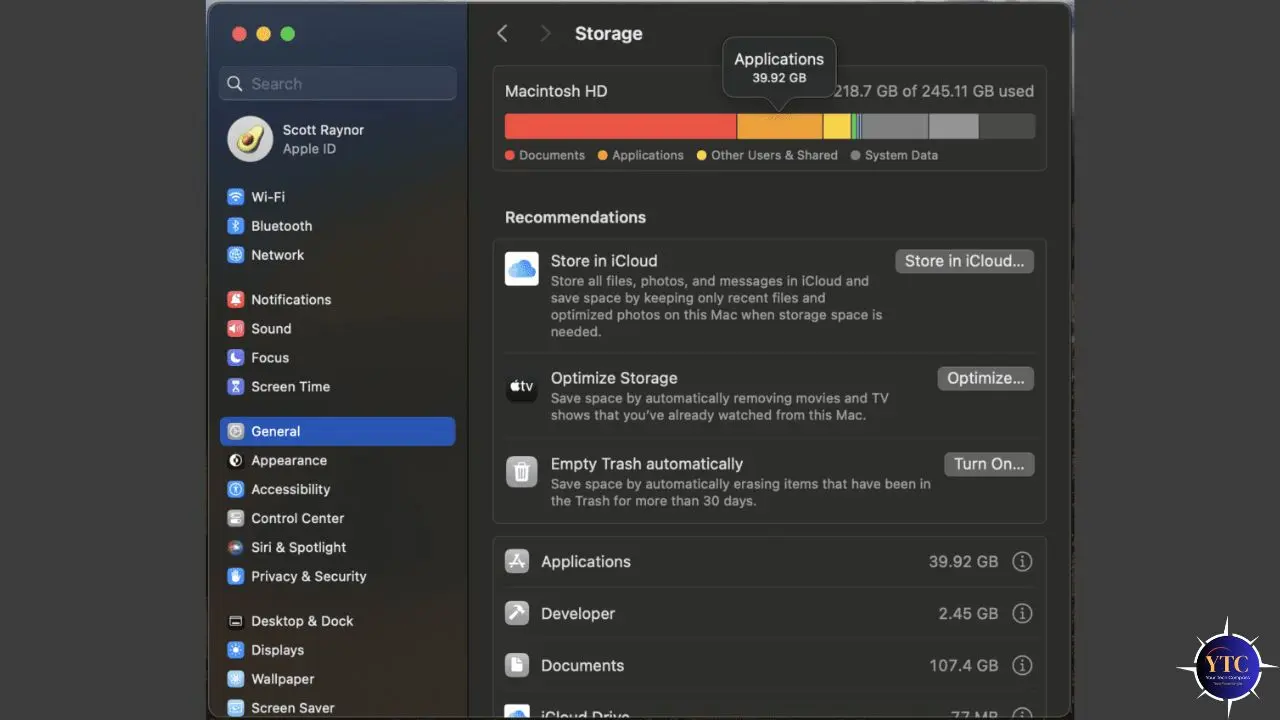
Click the Apple menu → System Settings → General → Storage. The coloured bar shows what’s consuming space. If your available storage is below 10% of total capacity, or below 15GB on any Mac, storage pressure is almost certainly contributing to your slowdown. macOS uses free disk space for virtual memory and temporary system operations, and when it runs out, performance slows.
With this two-minute diagnosis complete, you’ll know exactly which sections of this guide to prioritize.
Fix 1–5: Quick Wins (Under 5 Minutes Each)
These five fixes require no technical knowledge, take under five minutes each, and collectively have a significant impact on performance. Start here.
Fix 1: Restart Your Mac Properly

This sounds too obvious, but most people haven’t restarted their Mac in weeks, and that matters more than you think. macOS keeps processes running across sleep cycles, which means RAM fills up, caches accumulate, and background tasks multiply.
A full restart clears RAM, flushes system caches, resets background processes, and, on Apple Silicon Macs, also automatically performs system checks and resets the System Management Controller (SMC) and NVRAM. On an Intel Mac, a restart doesn’t reset the SMC, but it still delivers meaningful performance improvement.
Go to Apple menu → Restart. When prompted, uncheck “Reopen windows when logging back in.” Relaunching every previously open window defeats much of the purpose of the restart. Aim to restart at least once per week; it’s the highest-return-on-time habit in Mac maintenance.
Fix 2: Fully Quit Apps You’re Not Using
Here’s something many Mac users don’t realize: clicking the red X button in a Mac window doesn’t quit the application. It closes the window. The app keeps running in the background, consuming RAM and CPU. Look at your Dock; apps with a small dot underneath are still running, even if no windows are open. To fully quit an app (any), press Command + Q while the app is in focus, or right-click its Dock icon and select Quit.
Additionally, close unnecessary browser tabs. Each open tab, particularly in Chrome, consumes real RAM. Bookmark anything you need to return to and close the rest. The performance difference between Chrome with 5 tabs and Chrome with 50 tabs is measurable and significant.
Fix 3: Remove Login Items (The Hidden Boot Drag)
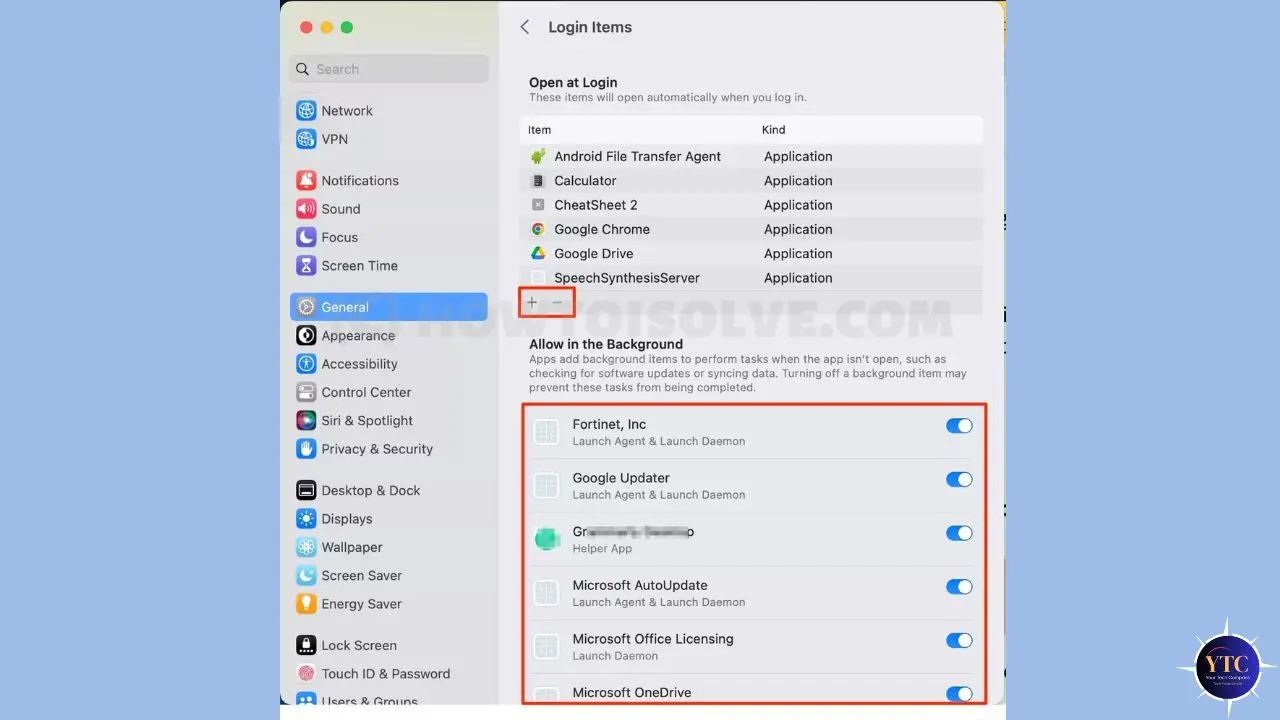
Every app in your login items list launches automatically at startup, consuming boot time and running in the background even when you never actively open them. This list grows silently every time you install new software and forget to uncheck the “launch at login” option.
Go to System Settings → General → Login Items & Extensions. You’ll see two sections: “Open at Login” and “Allow in the Background.” Review both carefully.
In addition, remove anything you don’t need running immediately when you start your Mac; candidates include Spotify, Dropbox (if not critical), creative app helpers, Microsoft Office updaters, and any app you rarely use. Consequently, keeping this list to five items or fewer directly impacts boot time and background RAM usage.
Fix 4: Reduce Visual Effects
macOS’s animations and transparency effects look polished, but they consume GPU and CPU resources for every open, close, minimize, and transition of a window. On older Macs, this visual overhead is a meaningful performance drain. Even on newer Macs, disabling these effects makes the interface feel snappier because you’re eliminating the animation delay between actions.
Go to System Settings → Accessibility → Display and turn on both Reduce Motion and Reduce Transparency. Reduce Motion replaces the zoom animations with simpler cross-fades.
Reduce Transparency removes the frosted-glass blur effects from menu bars, sidebars, and notification panels. The difference is immediately noticeable, particularly on Intel MacBooks from 2019 and earlier.
Fix 5: Disconnect Non-Essential Peripherals
USB hubs, external drives, card readers, and poorly optimized peripherals can trigger background CPU activity, particularly when drivers are outdated or the device causes repeated connection/disconnection events. Furthermore, some USB hubs with power delivery can cause unexpected system management activity that registers in Activity Monitor without an obvious name.
Unplug everything non-essential from your MacBook, restart, and test performance. If speed improves noticeably, reconnect peripherals one at a time to identify the culprit.
Fix 6–9: Free Up Storage (The Most Common Bottleneck)
You need to keep at least 10% of your Mac’s total storage free to keep it running well, and for most MacBooks with 256GB or 512GB SSDs, that threshold is easier to hit than you’d think. Here’s how to reclaim space systematically.
Fix 6: Use macOS Built-In Storage Recommendations

Go to Apple menu → System Settings → General → Storage. Beneath the storage bar, you’ll see a Recommendations section.
Enable these:
- Store in iCloud: Moves the Desktop and Documents folders to iCloud, keeping only local copies of recently accessed files. Ideal if you have sufficient iCloud storage.
- Optimize Storage: Automatically removes Apple TV movies and shows you’ve already watched. Keeps your library intact in iCloud while freeing local space.
- Empty Trash Automatically: Permanently deletes files in the Trash that have been there for more than 30 days. This alone can recover gigabytes of space that accumulates invisibly.
- Reduce Clutter: Opens a file browser organized by file size; the fastest way to identify the largest files on your Mac. Sort by size, identify anything you no longer need, and delete directly from this view.
Fix 7: Manually Clear Large and Forgotten Files
Open Finder → File → New Smart Folder → click the + button → set criteria to File Size → is greater than → 500MB. This instantly shows every file on your Mac larger than 500MB, usually revealing old video exports, disk images, archived project files, and downloads you forgot about years ago. Review and delete anything you no longer need.
Additionally, open your Downloads folder — Finder → Go → Downloads, and sort by size. This folder is one of the most consistently neglected sources of wasted storage, typically containing installer files, zip archives, and PDF downloads that accumulate over the years.
Fix 8: Uninstall Unused Apps Completely
Go to Finder → Applications and sort the list by size using View → Show View Options → Sort By → Size.
Work from the top down, identify apps you haven’t opened in months and remove them. However, dragging an app to the Trash doesn’t remove all associated files. App preferences, caches, support files, and containers remain scattered across your Library folder, collectively consuming gigabytes of storage.
AppCleaner is a free utility that identifies and removes all files associated with an app when you drag it into the AppCleaner window, giving you complete removal rather than just the application binary.
Fix 9: Clear System and App Caches
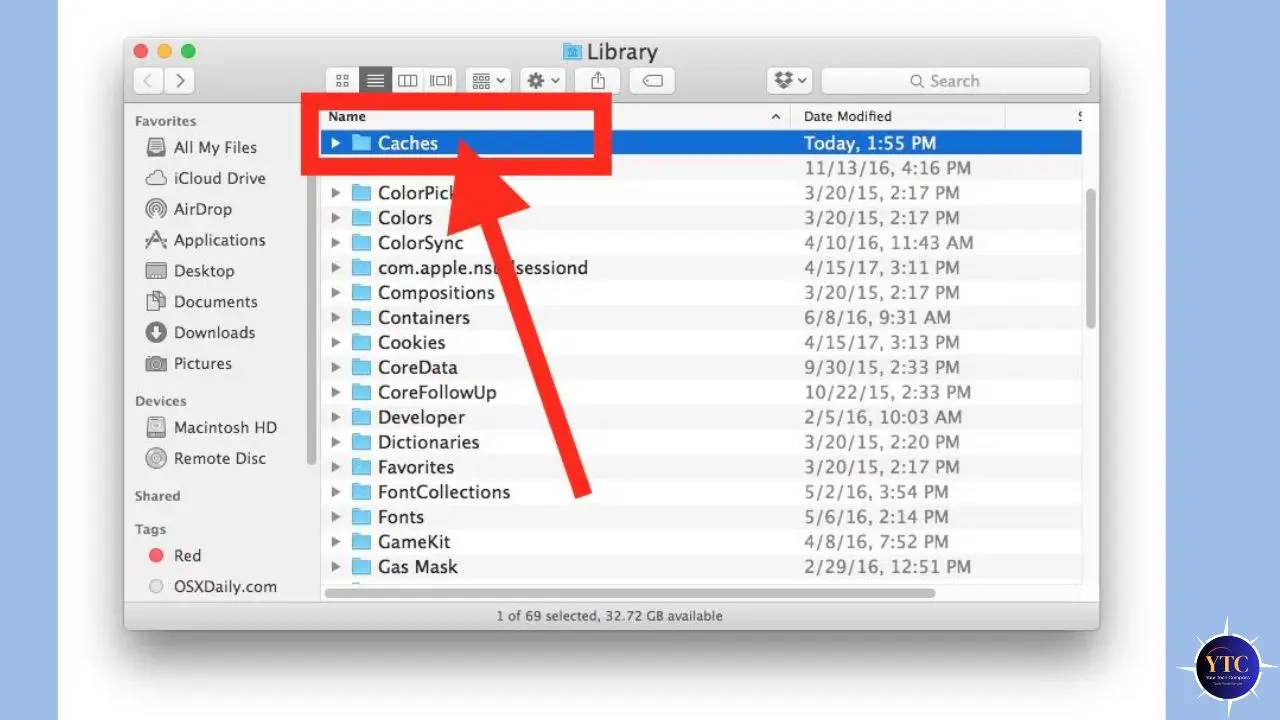
Caches are temporary files that apps create to load faster, but over time, they accumulate and can themselves consume significant storage. To clear app caches manually: press Command + Shift + G in Finder (or Go → Go to Folder), type ~/Library/Caches, and press Enter.
You’ll see folders named after each application. Delete the contents of folders for apps you use heavily, but do not delete folders named after system processes you don’t recognize.
Honest Caveat: After clearing caches, apps may feel slightly slower for a session or two while they rebuild their cache files. That’s normal; performance returns and often improves once clean caches replace bloated old ones. Additionally, do not delete any folder you can’t identify. Stick to app-specific cache folders named after apps you recognize.
Fix 10–11: Manage RAM and Background Processes
If your Activity Monitor Memory Pressure graph is yellow or red, or your Mac feels slow even with just a few apps open, RAM management is your primary target.
Fix 10: Switch from Chrome to Safari
This is the single highest-impact RAM fix for most Mac users, and the one most people resist. Chrome is notoriously memory-intensive on macOS. Each tab, each extension and each background process in Chrome spawns a separate renderer process that consumes RAM independently. On a MacBook with 8GB of unified memory, Chrome with twenty open tabs can consume 4–6GB alone.
Safari is optimized for Apple Silicon and Intel Macs, integrates with the macOS memory management system, and uses significantly less RAM for equivalent browsing activity. Furthermore, Safari’s energy efficiency directly translates to less fan activity and longer battery life. The practical advice: switch to Safari for everyday browsing and keep Chrome only for sites or tasks that specifically require it. Your Mac will feel different within minutes of making the switch.
Fix 11: Audit and Disable Browser Extensions
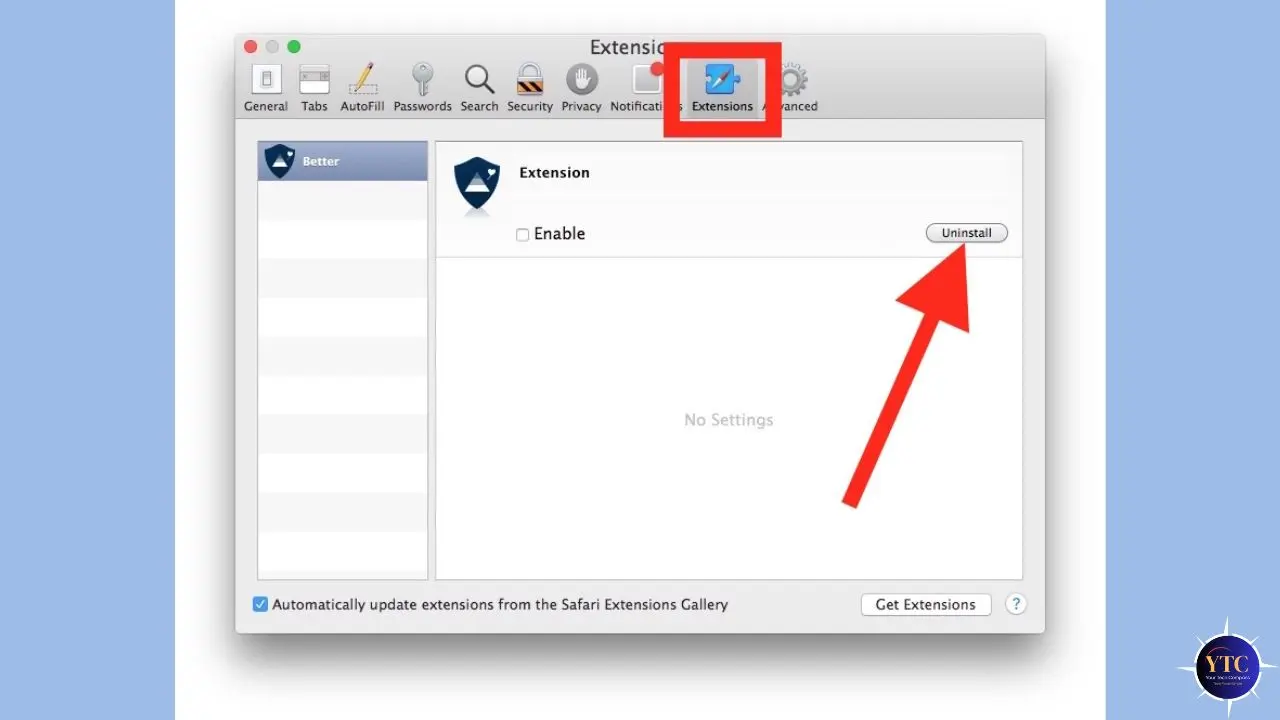
Every browser extension runs as a background process, consuming RAM and potentially triggering network activity, even when you’re not actively using it. Open your browser’s extension management page (in Safari: Settings → Extensions; in Chrome: chrome://extensions) and disable or remove anything you haven’t consciously used in the past month. Password managers, ad blockers, and productivity tools you actively rely on are worth keeping. Everything else should go.
Additionally, review your menu bar apps; each icon represents a running process. Hold Command and drag unwanted menu bar icons off the bar to remove them (this works for some apps but not all). For others, right-click the icon and select Quit.
Fix 12: Optimize Startup, Background Activity, and iCloud Sync
Fix 12: Manage iCloud Sync Activity
iCloud running continuously in the background is one of the most invisible performance drains on a MacBook, consuming CPU, RAM, disk read/write operations, and bandwidth simultaneously. If your Mac feels sluggish primarily when connected to the internet, iCloud sync is a strong candidate for the issue.
To verify: open Activity Monitor → Disk tab and look for “bird” (the iCloud daemon) in the process list. If it shows sustained disk activity, iCloud is actively syncing.
To manage it: go to System Settings → [Your Name] → iCloud and review which services are syncing. Temporarily disable iCloud Drive sync during performance-intensive work by toggling it off.
Enable Optimize Mac Storage under Photos to keep low-resolution versions locally while storing full-resolution files in iCloud. This alone can recover tens of gigabytes on MacBooks with large photo libraries. Additionally, toggle off per-app iCloud sync for any apps you don’t actively need synced across devices.
Time Machine is another background process worth timing. Automatic hourly backups can cause temporary slowdowns during the backup window. Consider switching to manual backups during intensive work sessions via System Settings → General → Time Machine.
Fix 13–14: Keep Software Updated and Rebuild Spotlight
Fix 13: Update macOS and Apps
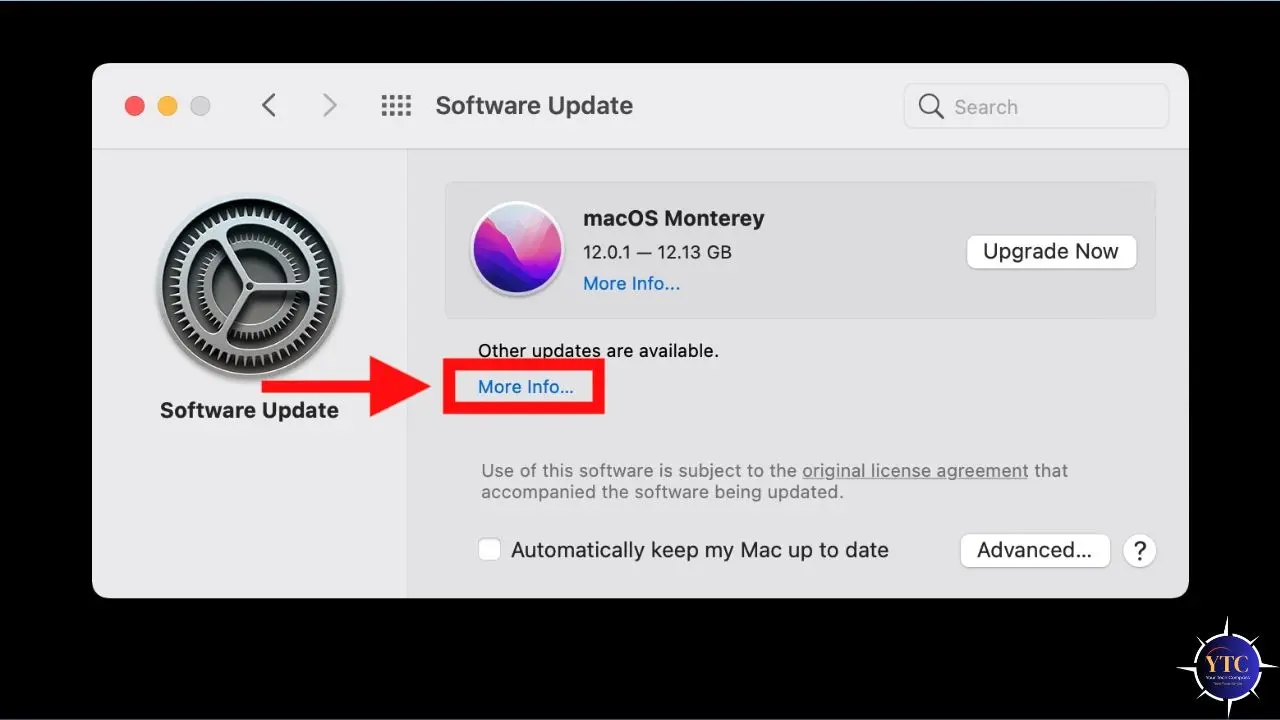
This is counterintuitive advice that most people resist because updating feels like it might slow things down. In reality, outdated software is a more common cause of slowdowns than recent updates. macOS updates regularly include memory management improvements, energy efficiency patches, and bug fixes for known performance regressions. Running an outdated version means missing those optimizations.
Go to System Settings → General → Software Update, then install any available updates. Enable automatic security updates while choosing when to install major feature updates. For apps: open the App Store → Updates tab → Update All. For third-party apps outside the App Store, check Help → Check for Updates in most applications.
When updates genuinely cause temporary slowdowns: After a major macOS update, Spotlight reindexes your entire drive, and the system completes various background tasks. This process can take 24–72 hours and can make your Mac feel slower than usual.
The honest advice: give it 48–72 hours before concluding the update caused a permanent slowdown. In the vast majority of cases, performance returns to normal and often improves once background indexing completes.
Fix 14: Rebuild Your Spotlight Index
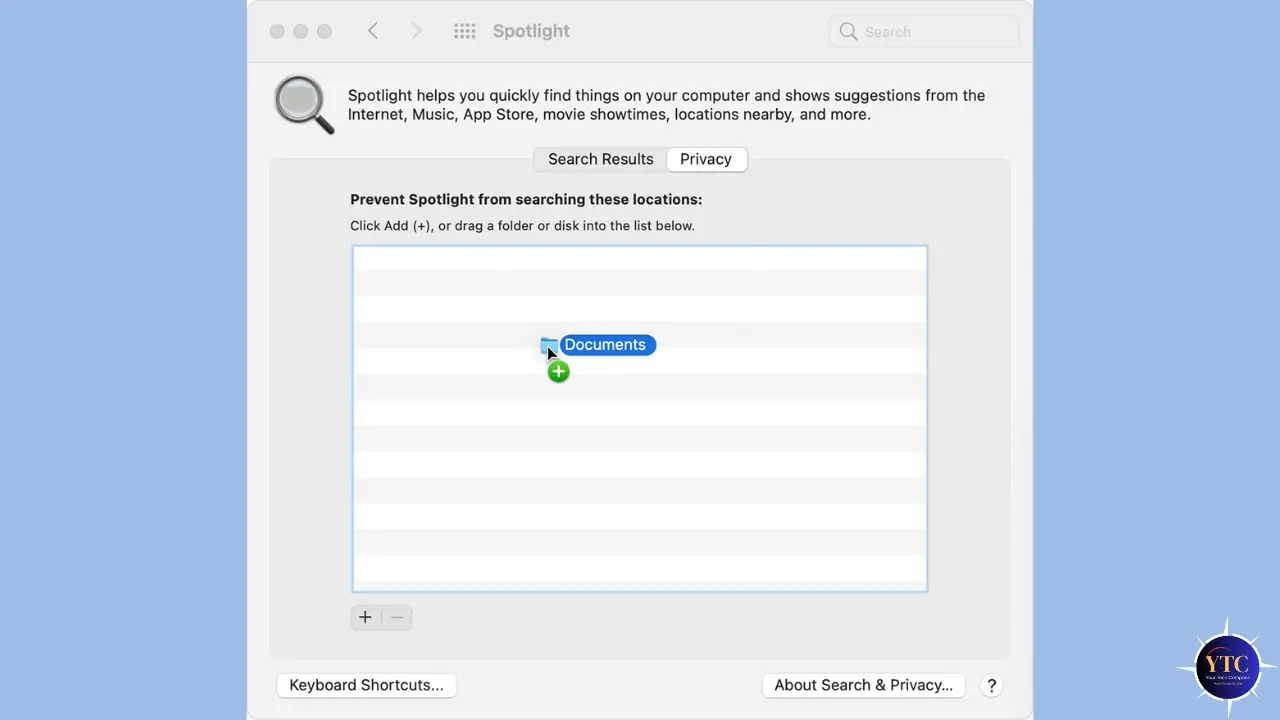
A corrupted Spotlight index is a well-documented yet under-diagnosed cause of persistent Mac slowdowns, leading to CPU spikes during searches and unpredictable background processing. To force a complete rebuild: go to System Settings → Siri & Spotlight → Spotlight Privacy → click the + button → add your startup disk → then immediately remove it by selecting it and clicking −.
This forces Spotlight to rebuild the index from scratch. The rebuilding process takes 1–4 hours, depending on drive size and will temporarily cause CPU activity; let it complete without interruption.
Fix 15: Advanced Fixes for Persistent Slowdowns
If none of the above has fully resolved your slowdown, these deeper interventions target more persistent system-level problems.
Run First Aid on Your Startup Disk
Go to Applications → Utilities → Disk Utility → select your startup disk in the left panel → click First Aid → Run. This identifies and repairs disk permission errors, directory structure issues, and minor file system problems that can cause sustained performance degradation. Most users have never done this. Consequently, on Macs that are 2+ years old without a First Aid pass, this step frequently resolves mysterious background slowdowns.
Check for Malware
macOS is not immune to adware, browser hijackers, and cryptomining background processes, all of which can cause extreme CPU drain. If Activity Monitor shows a process you don’t recognize consistently consuming 50%+ CPU, malware is worth ruling out. Malwarebytes for Mac offers a reputable, effective free scanner that doesn’t require purchase to scan and remove threats. Run a scan, review the results, and remove anything flagged.
SMC Reset (Intel Macs Only)
The System Management Controller handles fan behavior, thermal management, power, and battery performance on Intel Macs. A corrupted SMC can cause a Mac to run in a permanently throttled, high-heat state even when performing light tasks.
The reset process varies by Intel Mac model. Check Apple’s official support page for your specific model before proceeding.
Note: Apple Silicon Macs don’t have a separate SMC; a standard restart is the equivalent of a reset on M-series chips.
Create a New User Account to Test

If your Mac feels slow only in your user account but fast when testing in another user’s account, the problem is isolated to your user profile, likely a corrupted preference file or a user-level background process. Go to System Settings → Users & Groups → Add Account → create a new Standard account → log into it and test performance.
If the new account runs well, the issue is user-level, and you can begin identifying and removing corrupted preferences from your main account’s Library folder. Furthermore, this is one of the most powerful diagnostic steps available because it definitively separates user-level from system-level problems.
Reinstall macOS (Last Resort)
If a persistent slowdown persists through every step above, a macOS reinstall often resolves corrupted system files that can cause sustained degradation. Done correctly, it does not erase your data.
Restart your Mac → hold Command + R during startup → select Reinstall macOS from the Recovery menu → follow the prompts. The reinstall repairs system files without touching your personal data, applications, or settings. And if you’d rather start fresh, our full guide to resetting your MacBook Air walks you through the factory reset process in detail.
Quick Reference: MacBook Speed Optimization Checklist
Here’s your complete action checklist organized by time investment. Save this or take a screenshot for reference.
Category | Fix | Time Required | Impact |
Quick Win | Full restart (uncheck reopen windows) | 2 minutes | High |
Quick Win | Fully quit unused apps (Cmd + Q) | 2 minutes | High |
Quick Win | Remove unnecessary login items | 3 minutes | High |
Quick Win | Enable Reduce Motion + Reduce Transparency | 2 minutes | Medium |
Quick Win | Disconnect non-essential peripherals | 1 minute | Medium |
Storage | Run macOS Storage Recommendations | 5 minutes | High |
Storage | Clear Downloads folder | 10 minutes | Medium–High |
Storage | Uninstall unused apps with AppCleaner | 15 minutes | Medium |
Storage | Clear ~/Library/Caches (known apps only) | 10 minutes | Medium |
RAM | Switch from Chrome to Safari | 5 minutes | Very High |
RAM | Disable unused browser extensions | 5 minutes | Medium |
Background | Manage iCloud sync and Photo optimization | 10 minutes | High |
System | Update macOS and all apps | 20–60 minutes | High |
System | Rebuild Spotlight index | 10 min setup / 1–4 hrs processing | Medium–High |
Advanced | Run First Aid in Disk Utility | 15 minutes | Medium |
Advanced | Malwarebytes malware scan | 20 minutes | High (if infected) |
Advanced | SMC reset (Intel only) | 5 minutes | Medium |
Advanced | New user account test (diagnostic) | 10 minutes | Diagnostic |
Last Resort | Reinstall macOS | 1–2 hours | Very High |
Hardware Considerations: When Software Can’t Fix It

Software optimization has real limits. Some MacBooks are underpowered for their current workload, and the honest answer in those cases involves hardware decisions, not additional settings tweaks.
RAM Pressure That Software Can’t Resolve
If your Memory Pressure graph remains consistently red after completing all optimizations above, you’ve reached the hardware ceiling. On Apple Silicon Macs, unified memory cannot be upgraded after purchase; the RAM is soldered to the logic board. If you’re buying new, always spec up from the base RAM configuration.
For most professional workflows in 2025 and beyond, 16GB is the practical minimum, and 24GB provides comfortable headroom. If you’re evaluating what the current MacBook Pro offers across different RAM configurations, our MacBook Pro M4 review covers real-world performance across different memory tiers.
Storage Running Critically Low
If you’re consistently below 20GB free on your startup drive, an external SSD for media files, project archives, and large downloads is the most cost-effective solution. This keeps your internal SSD’s free space in the performance-healthy range without requiring you to delete files you need.
Age and the Apple Silicon Transition
Intel MacBooks from 2017 and earlier running current macOS versions may show genuine performance degradation because the operating system has outpaced the hardware. If your Intel Mac is 6+ years old and remains consistently slow after all optimizations, the cost-benefit calculation often favors an Apple Silicon upgrade.
The performance gap between a 2017 Intel MacBook Air and any M-series Mac is not marginal; it’s transformative. However, if you’re considering running Windows applications on a newer Mac as part of your workflow decision, our Windows for Mac guide covers your current options in detail.
FAQs
Sudden slowdowns typically have one of four causes: a software update triggered Spotlight reindexing (which completes in 24–72 hours), storage has dropped below the 10% free threshold, and macOS is struggling with virtual memory, a background process or app has gone rogue and is consuming most of your CPU, or malware is running hidden processes. Open Activity Monitor, check the CPU tab sorted by % CPU and the Memory tab for Memory Pressure. Those two views will almost always reveal the cause within two minutes.
Yes, but with nuance. Clearing bloated or corrupted caches can improve performance, particularly if cached files have become fragmented or oversized. However, immediately after clearing caches, apps rebuild their cache files and may feel slightly slower for a session. The net effect over time is positive, particularly for app-specific caches that have grown unchecked for years. Additionally, clearing system caches via Finder’s Go to Folder path (~/Library/Caches) is safe if you only delete contents of folders named after apps you recognize.
Keep at least 10% of total storage free at all times. For a 256GB MacBook, that’s 25GB. For a 512GB model, that’s 51GB. Moreover, a 15–20% free target is more comfortable, giving macOS sufficient headroom for virtual memory, temporary files, and system operations. Consistently operating below 10% is one of the most reliable predictors of Mac slowdown; storage pressure degrades performance across every application simultaneously.
Yes, in cases where the slowdown is caused by corrupted system files, damaged system extensions, or the accumulation of system-level junk that manual cleaning can’t fully address. A reinstall via Recovery Mode (Command + R at startup → Reinstall macOS) repairs system files without erasing your data or applications. It’s not the first step; exhaust the other optimizations in this guide first, but it’s a genuinely effective last resort that most users have never tried.
Usually faster in the medium term, occasionally slower in the short term. Major macOS updates include performance patches, memory management improvements, and hardware optimizations, particularly for Apple Silicon. The temporary slowdown that sometimes follows an update is typically caused by Spotlight reindexing and background system tasks that complete within 24–72 hours. If your Mac is still measurably slower two weeks after an update, that’s worth investigating, but the update itself is rarely the permanent cause.
Open Activity Monitor → Memory tab → look at the Memory Pressure graph at the bottom. If it’s consistently yellow or red, particularly during normal, non-intensive work, your Mac is regularly exceeding its RAM capacity and using slower SSD space as virtual memory. Additionally, if you’re consistently running 4+ apps simultaneously and seeing performance degradation even after all other optimizations, RAM is the constraint. On Apple Silicon Macs, where RAM cannot be added, upgrading to a model with more unified memory is the only resolution.
Conclusion
A slow MacBook is almost never a reason to buy a new one; at least not before working through the optimizations in this guide. The combination of restarting properly, trimming your login items, keeping 15% of storage free, switching to Safari, disabling unnecessary iCloud sync, and staying current on macOS updates comprehensively addresses the most common causes of Mac slowdown. Furthermore, the diagnostic-first approach (spending two minutes in Activity Monitor before running any fixes) means you’re targeting actual problems rather than applying generic advice that may not apply to your situation. That two-minute investment is what separates effective Mac optimization from wasted time.
The habits you build from these fixes compound over time. A Mac that gets restarted weekly, whose login items get reviewed quarterly, and whose storage stays well above the 10% threshold runs meaningfully better than one that doesn’t, for years longer than the alternative. Additionally, for deeper fixes, such as spotlight rebuilding, Disk Utility First Aid and malware scanning, doing them once and then scheduling them as annual maintenance tasks is all most users ever need. For more practical tech guides that help you get the most out of your devices, the Tech Guides section on YourTechCompass has you covered. And if you frequently use keyboard shortcuts to move faster on your Mac, which itself reduces perceived system lag, our copy-and-paste guide for MacBook is worth bookmarking alongside this one.
Your MacBook is capable of a lot more than it’s currently showing you. Take twenty minutes today, work through the quick wins, and see how much of that original speed you can bring back. Then head to YourTechCompass.com for more guides that help you get the most out of every device you own.